Planning Guides, Style Guide
Google Form For Wedding Rsvp: Complete Guide
Mar
Setting Up Your Google Form for Wedding RSVPs
Okay so Google Forms for wedding RSVPs is actually kinda brilliant and I’ve been pushing couples toward this since like 2019 when one of my brides accidentally lost an entire stack of paper RSVPs at a coffee shop and had a complete meltdown. You’re gonna need a Gmail account first which most people already have but if you don’t just make one real quick.
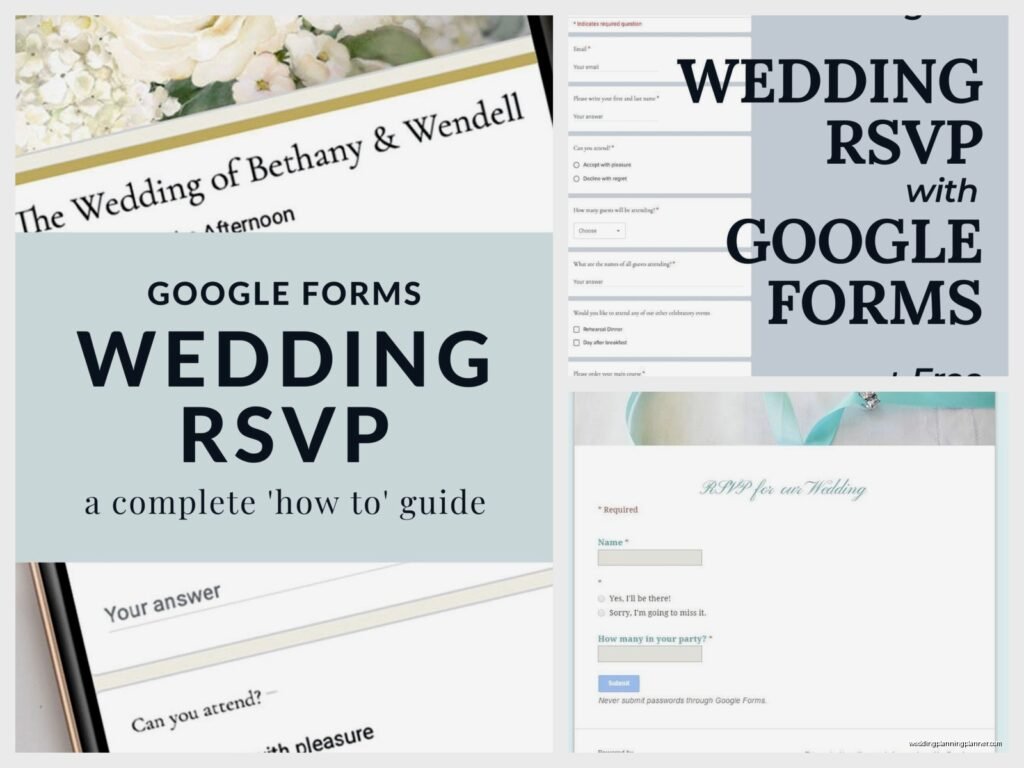
Go to forms.google.com and click the blank form option. Right away you’ll see “Untitled form” at the top and you need to change that to something clear like “Sarah and Mike’s Wedding RSVP” or whatever your names are. Under that there’s a form description box and this is where you put your wedding date, venue location, and maybe a cute line about being excited to celebrate with them.
The Essential Questions You Actually Need
First question should always be “Full Name” and make it required by toggling that little switch at the bottom of the question. Use “Short answer” as the question type. Then immediately add another question for “Email Address” because you’re gonna want to send confirmations and updates, trust me on this.
Next up is the actual attendance question and here’s where people get weird about wording. I usually write it as “Will you be attending?” with radio button options for “Joyfully accepts” and “Regretfully declines” because it sounds nicer than just yes/no. Some couples do “Accepts with pleasure” but honestly whatever feels like you.
Now here’s the part that drives me absolutely insane and I saw this mess up SO many weddings in spring 2023 when we had like six weddings in one month—you need to account for plus-ones properly. Don’t just ask “Number of guests attending” because people will put random numbers that don’t match your actual guest list. Instead, if someone gets a plus-one, you need to either list their guest’s name on the invitation OR have a separate question that says “Guest Name (if applicable)” so you actually know who’s coming.
Meal Selections and Dietary Restrictions
If you’re doing a plated dinner you gotta add meal choice questions. Use “Multiple choice” question type and list your entrees clearly. Like “Herb-Roasted Chicken” or “Pan-Seared Salmon” or “Vegetarian Pasta Primavera”—be specific about what the food actually is, not just “chicken” or “fish” because people want to know what they’re choosing.
Always always always include a question about dietary restrictions and allergies. Make this one a “Short answer” or “Paragraph” type so people can explain. I’ve seen guests with severe allergies show up and the couple had no idea because they didn’t ask. One time this woman was allergic to shellfish and the appetizers were shrimp cocktail and she just… couldn’t eat anything for the first hour of the reception.
Optional But Useful Questions
You can add a question for song requests which guests love. Make it optional though because not everyone will have suggestions. I usually phrase it as “Any song requests for the dance floor?” and use paragraph text so they can list multiple songs.
Some couples ask about transportation needs or hotel accommodations especially if you’re providing shuttles. That’s actually super helpful for planning purposes.
A “Special notes or well wishes” question at the end is nice because people like to write sweet messages and you’ll want to read those later when you’re feeling nostalgic.
Making It Look Less Boring
Click the palette icon at the top to change colors and themes. Google Forms has improved this feature a lot—you can upload a header image which should probably be your engagement photo or something related to your wedding theme. The image shows up at the top and makes it feel more personal and less like you’re filling out a doctor’s office form.
Pick a color scheme that matches your wedding colors. It’s a small detail but it makes the whole thing feel more cohesive with your other wedding stuff.
Settings You Need to Change Right Now
Click the gear icon for Settings and this is important. Under “General” make sure “Limit to 1 response” is turned ON so people can’t submit multiple times and confuse your count. But also check “Respondents can edit after submit” because inevitably someone’s plans will change and they need to update their RSVP.
Under “Presentation” I always check “Show progress bar” so people know how long the form is, and definitely turn on “Confirmation message” where you can write something like “Thank you! We can’t wait to celebrate with you on [date]!” Make it warm but brief.
The “Collect email addresses” option is useful because it automatically grabs their email without them having to type it twice, but only if they’re signed into Google. Some older guests might not be signed in so you still need that separate email question.
The Response Spreadsheet Thing
Once you start getting responses, click the “Responses” tab in your form. There’s a green spreadsheet icon that says “Link to Sheets”—click that and it’ll create a Google Sheet with all your responses organized. This is where the magic happens because now you have a sortable, searchable database of everyone’s RSVPs.
The spreadsheet updates in real-time whenever someone submits the form. Each row is one person’s response and each column is one question. You can add columns to track things like “Thank you card sent” or “Seating assignment” or whatever you need.
I usually freeze the top row so you can scroll down and still see the column headers. To do this, click View > Freeze > 1 row. Also, you might wanna add a column for “Date submitted” which Google Forms actually includes automatically with a timestamp.
Sharing the Form With Guests
Click the “Send” button at the top right and you’ve got options. The link option is usually easiest—just copy that URL and you can paste it into your wedding website, text it to people, or include it in your invitation.
Some people email the form directly through Google but honestly I don’t recommend this because it looks kinda generic and impersonal. Better to send a nice email from your regular email account and include the link in there with some context.
You can also shorten the URL using the checkbox that says “Shorten URL” which makes it way easier for people to type if you’re including it on a physical invitation card. Like instead of a massive long link, you get something like forms.gle/abc123.
Dealing With Technology-Challenged Guests
Okay real talk, some of your older relatives are gonna struggle with this. My cat literally walked across my keyboard while I was helping a bride troubleshoot why her grandmother couldn’t submit the form and it turned out her grandmother was on like Internet Explorer from 2012 or something ridiculous.
Have a backup plan for guests who can’t or won’t use technology. This could be a phone number they can call or text to RSVP, or you can fill out the form on their behalf if they call you. I know it defeats the purpose of automation but you gotta be realistic about your guest list’s tech literacy.
In summer 2021 I had a wedding where the couple sent the Google Form link to everyone and then had to follow up with like 15 paper RSVPs for their grandparents’ friends who just… weren’t gonna figure out a web form. It happens.
Tracking Who Hasn’t Responded
This is where that spreadsheet becomes your best friend. Create a master guest list in a separate sheet with everyone you invited, then cross-reference it with your response sheet to see who’s MIA. You can use formulas for this if you’re into that kind of thing, or just manually check names off.
Set your RSVP deadline for like 3-4 weeks before the wedding so you have time to chase down the stragglers. And trust me there will be stragglers because people are terrible at responding to things on time.
Advanced Features If You’re Feeling Extra
You can set up conditional logic using the three-dot menu on any question and selecting “Go to section based on answer.” This means if someone says they’re not attending, they skip all the meal choice questions and go straight to the end. Saves them time and keeps your data cleaner.
To do this you need to break your form into sections. Click the icon that looks like two rectangles stacked on the right toolbar to add a section. Then in your attendance question, click the three dots and set it up so “Regretfully declines” goes to a final section with just a nice message, while “Joyfully accepts” continues to the meal and other questions.
The “Response validation” feature under the three-dot menu lets you require specific answer formats. Like for the email question you can make sure people actually enter a valid email address format. For guest count you can set minimum and maximum numbers.
Sending Confirmation Emails
Google Forms doesn’t automatically send confirmation emails to respondents which is annoying, but there’s a workaround. You can install an add-on called “Email Notifications for Forms” or “Form Publisher” that sends automatic confirmations. Or you can manually send thank you emails from the spreadsheet.
Honestly though most couples just rely on the confirmation message that shows after someone submits the form. It’s not ideal but it works if you don’t wanna mess with add-ons and… I mean, people are used to just screenshotting confirmations these days anyway.
Common Mistakes People Make
Don’t make every single question required. Like song requests? That doesn’t need to be required. Special dietary needs? Only required if they actually have any. Too many required fields and people get frustrated and abandon the form.
Also don’t ask too many questions. I’ve seen forms with like 20 questions asking about transportation and hotel preferences and what color napkin they prefer and it’s just too much. Keep it to the essentials: name, email, attendance, guest count, meal choice, dietary restrictions, and maybe one or two other things max.
Test your form before sending it out. Fill it out yourself from a different account or ask a friend to test it. Make sure all the logic works and questions make sense.
Privacy and Guest List Drama
One thing to know is that Google Forms responses are private by default—guests can’t see what other people answered. This is good for preventing guest list drama or people comparing meal choices or whatever.
But if you want to show a public count of who’s attending (some couples do this on their website), you’d need to manually update that elsewhere. The form responses themselves stay private to you.
Integration With Your Wedding Website
Most wedding website builders let you embed a Google Form directly into a page. You just copy the embed code (click Send, then the angle brackets icon) and paste it into your website. This looks more seamless than sending people to a separate Google Forms page.
If your website builder doesn’t support embedding, just put the link on your RSVP page with clear instructions. Something like “Please click the button below to submit your RSVP by [date].”
Make sure the form works on mobile because probably half your guests will fill it out on their phones. Google Forms is pretty mobile-friendly but test it yourself first.
Following Up and Reminders
About two weeks before your RSVP deadline, check your spreadsheet and send friendly reminders to anyone who hasn’t responded. You can do this through email or text or however you normally communicate with them.
After the deadline passes you’re gonna need to personally reach out to the remaining non-responders. Some people just don’t do online forms and you’ll have to call them. It’s annoying but it’s part of wedding planning.
Keep your spreadsheet updated with any phone or text RSVPs you receive so everything’s in one place. You can manually add rows to the response sheet for people who RSVP’d through other methods.
The whole system works really well once you get it set up and honestly it’s so much easier than dealing with physical RSVP cards that get lost in the mail or people who forget to include the pre-stamped envelope or whatever. Plus you can access your responses from anywhere which is super helpful when you’re meeting with your caterer or venue coordinator and need exact numbers.