Planning Guides, Style Guide
Unique Wedding Invitation Ideas: Design & Ordering Guide
Apr
okay so let me just dive into invitation design because honestly this is where couples either nail it or completely stress themselves out for no reason
The first thing you gotta know is that wedding invitations aren’t just paper anymore. Like, yes traditional cardstock is still gorgeous and I’ll never stop loving a good letterpress suite, but we’re in 2024 and there are so many options that didn’t exist even five years ago. I had this couple in spring 2023 who came to me absolutely convinced they needed to do everything the “proper” way with engraved invitations and the whole nine yards, but their wedding was this fun brewery reception with lawn games and a taco truck. The disconnect was wild.
Non-Traditional Materials That Actually Work
So here’s where it gets interesting. Acrylic invitations are having a massive moment right now. They’re basically clear or frosted plastic sheets that you can print on or have engraved. They look super modern and fancy, but here’s what no one tells you – they’re HEAVY. Like really heavy. Which means your postage is gonna be more expensive than regular invitations. I always tell couples to factor in an extra 50 cents to a dollar per invite for shipping because the post office will charge you for it.
Wood invitations are another option that photographs beautifully. You can get thin wood veneer that’s laser cut or engraved. They smell amazing when they arrive which is kinda random but guests always mention it? The downside is they can splinter if they’re not finished properly, and you definitely need to order samples before committing to 150 of them.
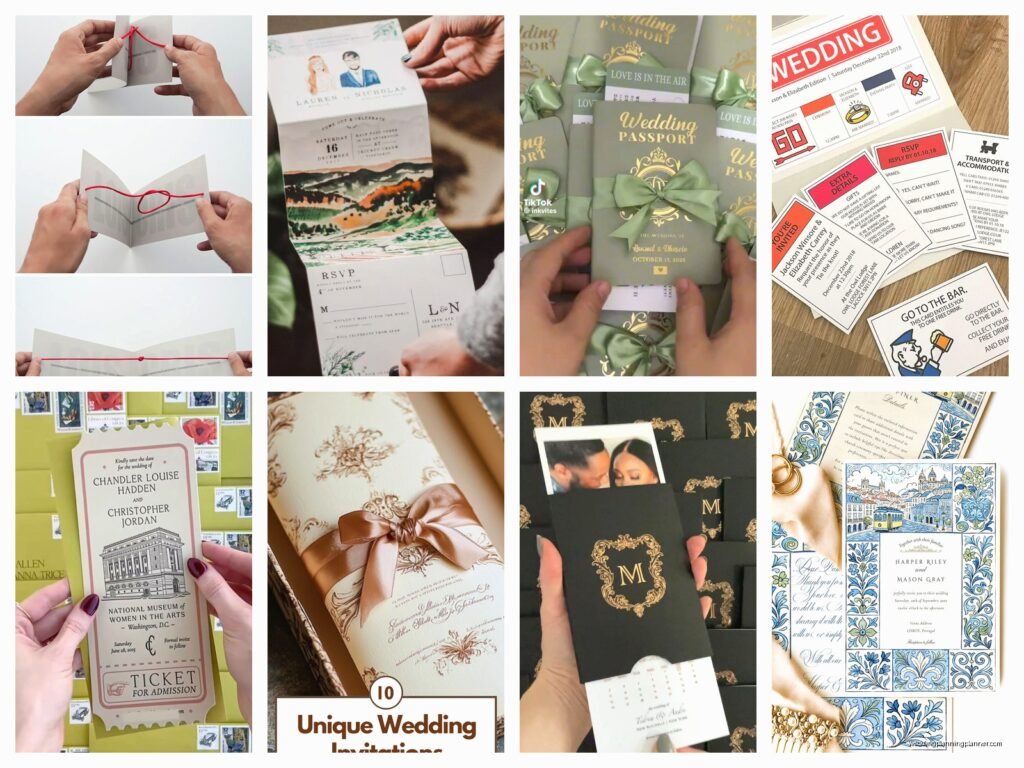
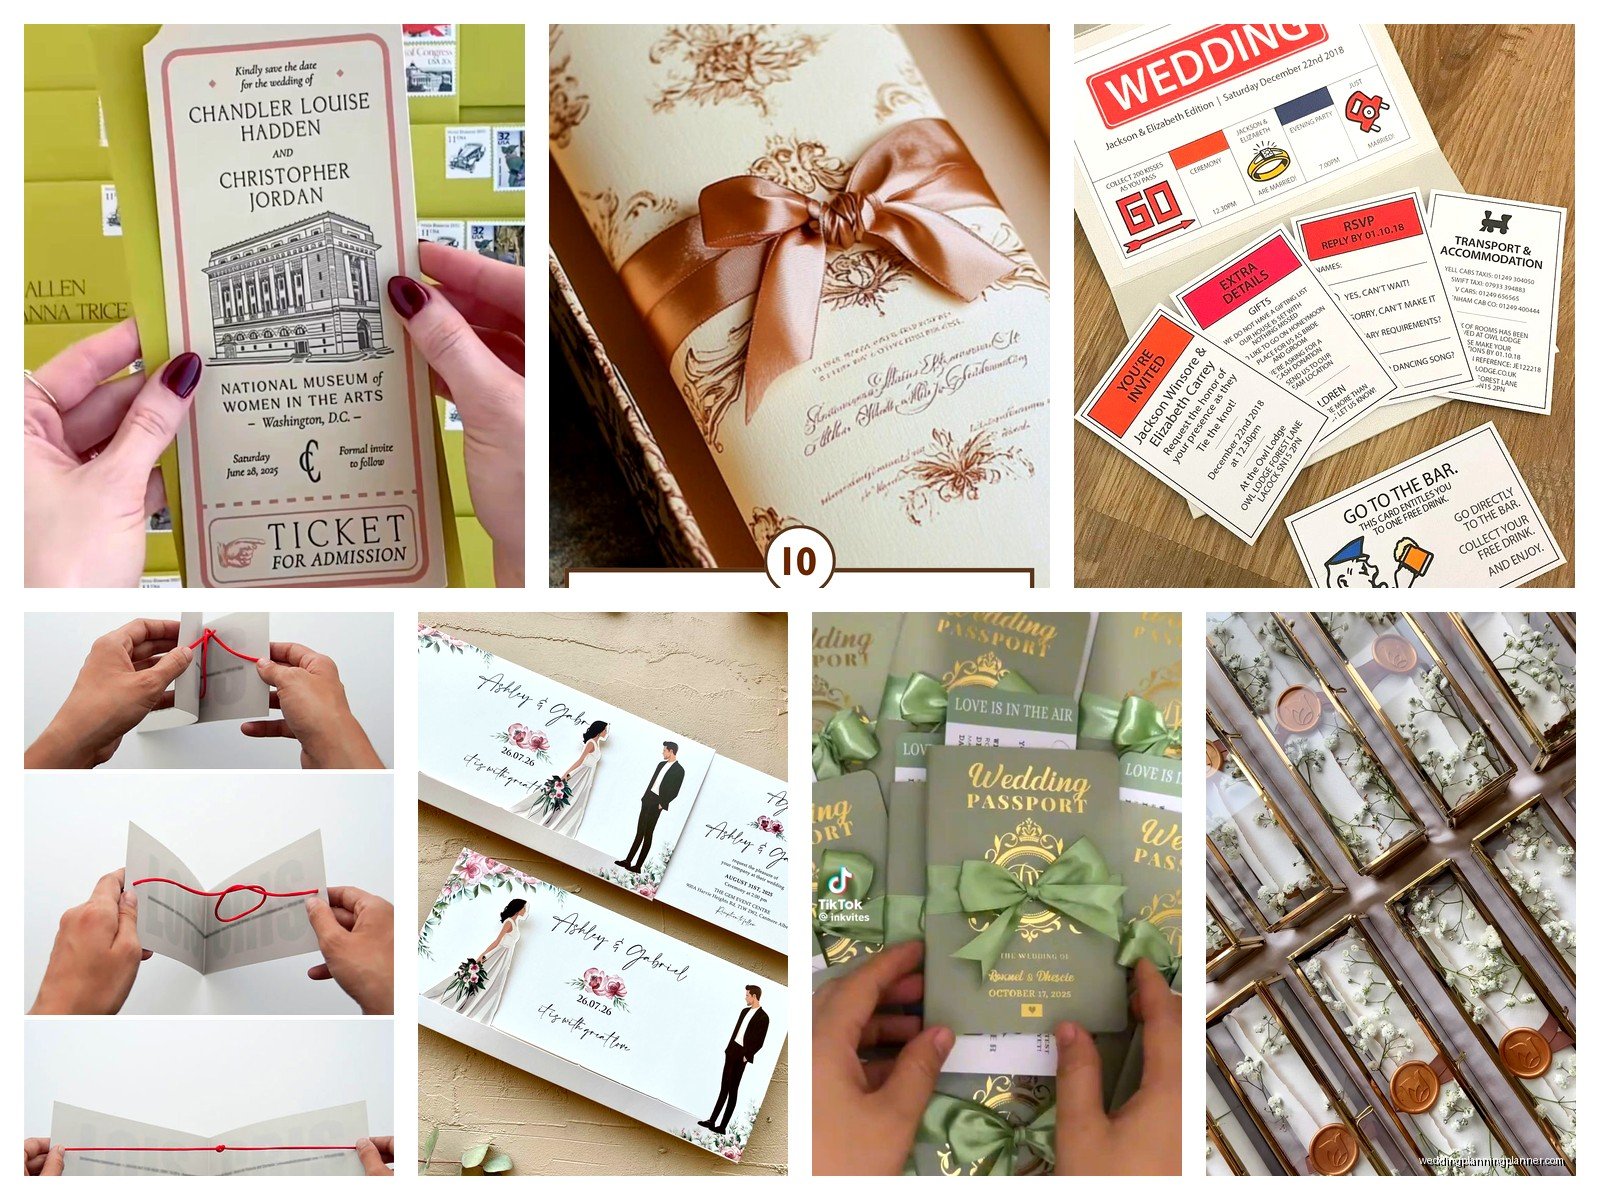
Vellum overlays are still popular and I actually love them because they add this soft, romantic layer without being too expensive. You print your main invitation on cardstock and then have a translucent vellum sheet on top with additional details or just decorative elements. Pro tip: use a belly band or wax seal to hold everything together because vellum is slippery and things will slide around in the envelope.
Digital Invitations (and why they’re not tacky anymore)
Look, I know some people still think digital invites are cheap or impersonal, but that’s outdated thinking. Paperless Post has come so far with their designs, and there are platforms like Greenvelope and Joy that create really beautiful digital suites. For a casual wedding or an elopement announcement, they’re perfect. Plus you can track who’s opened them and get RSVPs instantly without chasing people down three weeks after the deadline.
What really annoys me though is when couples send digital save-the-dates and then act surprised when older relatives say they never got them. Your grandmother probably isn’t checking her email every day, just saying. I always recommend a hybrid approach if you’re going digital – send the digital version to your younger guests and actually mail something to anyone over 60 or anyone you know isn’t tech-savvy.
Design Elements That Make Your Invites Stand Out
Okay so you want your invitations to be unique but not so weird that people don’t understand what they’re looking at. I’ve seen some invites that were so “artistic” that guests couldn’t figure out the date or venue, which defeats the entire purpose.
Custom Illustrations
Getting a custom venue illustration is honestly one of my favorite touches. You can hire an artist on Etsy or through Instagram to draw your ceremony site, and then incorporate that into your invitation design. It’s personal without being cheesy. I used this approach for my own sister’s wedding and – wait, I should mention I have a cat named Biscuit who literally sat on the invitation proofs and I had to reorder them because of paw prints, but anyway – the illustrated invites turned out gorgeous and guests kept them as keepsakes.
If custom illustration is outside your budget, you can use a really good photo of your venue instead. Just make sure it’s high resolution (300 DPI minimum) because a grainy photo printed on nice paper looks worse than a clean, simple design with no photo at all.
Unique Shapes and Die Cuts
Die cutting is when they cut your invitation into a custom shape instead of the standard rectangle. I’ve seen circle invites, arch-shaped ones, invites cut to look like a envelope ticket, or even shaped like your venue. These look amazing but here’s what you need to know – they require custom envelopes, and custom envelopes are expensive. Also, non-standard sizes at the post office get charged extra, so that $0.68 stamp isn’t gonna cut it.
You’ll probably need to hand-cancel them too, which means going to the post office and asking them to manually process each envelope instead of running them through the machine. The machine will eat your weird-shaped invites and spit them out destroyed. Trust me on this.
Wax Seals and Other Tactile Details
Wax seals are back in a big way and I’m here for it. You can get custom stamps with your initials or monogram, and the wax comes in every color imaginable. They add this old-world elegance that feels really special. But – and this is important – you MUST hand-cancel these at the post office. The wax will get crushed or ripped off in the sorting machines.
Other tactile elements worth considering: ribbon ties, fabric wraps, pressed flowers (sealed under vellum so they don’t crumble), letterpress printing which creates an actual impression in the paper, or foil stamping in gold, silver, rose gold, or even holographic finishes.
The Actual Ordering Process (because this is where people mess up)
Alright so you’ve picked your design concept, now you gotta actually order these things and there’s a process that will save you so much stress.
Timeline
Order your invitations at LEAST 4 months before your wedding date. That gives you time for: design and proofs (2-3 weeks), printing (2-4 weeks depending on the method), assembly (1 week if you’re doing it yourself, which you probably are), addressing (1-2 weeks), and mailing (you want them to arrive 8 weeks before the wedding).

I had this situation in summer 2021 where a couple waited until 6 weeks before their wedding to even start looking at invitations and they ended up having to do rush printing which cost them literally double, plus they had to address everything in like three days and we were all exhausted and I’m pretty sure I spelled someone’s name wrong because we were moving so fast. Don’t be those people.
Ordering Quantities
Here’s a thing that trips everyone up – you don’t need one invitation per guest. You need one invitation per household. So if you’re inviting a family of four, that’s ONE invitation. Make a spreadsheet with your guest list organized by household and count those.
Then order extras. I always say order 15-20 more than you need because:
- Some will get lost in the mail
- You’ll mess up addressing some of them
- Last-minute additions to the guest list happen
- You’ll want to keep some for your own records or scrapbook
- Something will get damaged during assembly
Most printers have price breaks at certain quantities (like 50, 100, 150), so sometimes ordering 120 costs almost the same as ordering 100. Do the math.
Proofs Are Not Optional
Always, ALWAYS order a printed proof before you approve the full print run. What looks good on your computer screen can look completely different on actual paper. Colors shift, fonts can be too small to read comfortably, and typos that you missed on screen suddenly become obvious in print.
I cannot tell you how many times I’ve caught errors in proofs that would have been disasters. Wrong dates, misspelled names, missing information about hotels or transportation. One time the couple had their ceremony time as 4:00 PM but it was actually at 6:00 PM and we caught it at proof stage, thank god.
Information to Include (and what you can skip)
Your invitation suite doesn’t have to include every single detail about your wedding day. In fact, too much information makes it cluttered and hard to read. Here’s what you actually need:
The Main Invitation Should Have:
- Your names (obviously)
- The date
- The time
- The venue name and city/state
- Some indication of who’s hosting if that matters to you (traditionally “Mr. and Mrs. Parent Names request the honor of your presence” but lots of couples skip this now)
- Dress code if it’s not obvious
Details Card
This is a separate card that includes everything else: reception information if it’s at a different location, hotel room block details, wedding website URL, transportation info if you’re providing shuttles, and maybe a cute note about your registry or that you prefer no gifts or whatever your situation is.
RSVP Card
Keep it simple. Name line, attendance checkboxes, meal choice if you’re doing plated dinner, and a deadline date. Include a pre-addressed and pre-stamped return envelope because if you make people find their own stamp, some of them just won’t send it back. That’s just human nature.
Alternatively, you can skip physical RSVP cards entirely and direct everyone to your wedding website to RSVP online. This saves money and makes tracking responses way easier, but again, consider your audience. If half your guest list is over 70, maybe include physical cards for them.
DIY vs. Professional Printing
So you’re probably wondering if you can just design and print these yourself, and the answer is… kinda? It depends on what you’re going for.
DIY printing at home or through a print shop like FedEx Office can work if you’re doing simple, flat designs on standard size cardstock. You can get really nice paper from specialty stores or online. The challenge is that home printers usually can’t handle thick cardstock, and the color calibration is often off. What looks like a soft blush on your screen might print as hot pink.
For anything with special printing techniques – letterpress, foil stamping, engraving, thermography – you need a professional printer. These processes require specific equipment that costs thousands of dollars. Don’t try to DIY them.
There are also great online services like Minted, Artifact Uprising, Zola, Paperless Post (for physical invites too, confusingly), and Shutterfly that let you customize templates. The quality is generally good and the prices are reasonable. The downside is your invites might look similar to other couples who used the same template, but honestly most guests won’t notice or care about that.
Assembly Tips
If your invitation suite has multiple pieces, you’ll need to assemble them. Set up a production line situation – I usually do this on my dining room table with a glass of wine and something playing in the background, maybe a podcast or like… I’ve been rewatching The Office again which is probably my tenth time through but it’s good background noise, you know?
Anyway, organize all your pieces in stacks: main invitation, details card, RSVP card and envelope, any other inserts. Figure out the order you want them in (usually largest to smallest), and then just work through the stack. Use a belly band, ribbon, or vellum wrap to hold everything together before it goes in the envelope.
For addressing, you can handwrite them if you have nice handwriting, use a calligrapher (budget $3-5 per envelope), print directly on the envelopes (requires a printer that can handle thick envelopes), or order printed address labels. I’m gonna be real with you, printed labels look fine and anyone who judges you for not having calligraphy can get over it.
Unique Ideas I’ve Actually Seen Work
Some creative approaches that couples have done successfully:
Passport Invitations: Designed like a passport booklet for destination weddings. Each page has different info – itinerary, travel details, accommodations, etc. Super cute and functional.
Puzzle Invitations: The invitation is printed on a puzzle that guests have to assemble. Fun but also some people will definitely lose pieces, so maybe not the best choice if you have crucial info that needs to be communicated clearly.
Fabric Invitations: Printed on linen or cotton fabric. Really unique and guests can keep them as handkerchiefs or decorative items. More expensive than paper but memorable.
Newspaper Style: Designed like a vintage newspaper with your love story, wedding details, and fun “articles” about your relationship. Works great for couples with a sense of humor.
Video Invitations: Not a paper invite at all – you create a video with your wedding information and send it digitally. Best for very casual weddings or when most guests are far away.
Plantable Invitations: Made from seed paper that guests can actually plant after the wedding and flowers will grow. Environmentally friendly and sweet, though the paper texture is sorta rough and not great for detailed printing.
What About Save the Dates
Oh right, I should probably mention save the dates since they come first. Send these 6-8 months before the wedding, or even earlier for destination weddings. They don’t need to be as formal as your actual invitations – magnets are popular, postcards work great, or even a simple digital announcement is fine.
The only required info is your names, wedding date, and location (city/state is enough). You can include your wedding website if you have one set up. Don’t include registry info on save the dates though, that’s considered tacky.
Budget Considerations
Let’s talk money because invitations can get expensive fast. A typical wedding invitation budget is $300-800 for 100 invitations, but that can go way higher depending on your choices.
Cost breakdown approximately:
- Basic digital printing on standard cardstock: $1-2 per suite
- Letterpress or foil stamping: $5-15 per suite
- Custom die cutting or shapes: add $1-3 per invite
- Wax seals: $0.50-2 per seal depending on DIY or pre-made
- Acrylic or wood: $8-20 per invite
- Calligraphy addressing: $3-5 per envelope
- Postage: $1-2 per invite depending on weight and size
Ways to save money without sacrificing style: skip the extra insert cards and put everything on your website instead, use online RSVP only, choose standard sizes and weights to save on postage, DIY the assembly and addressing, go digital for save the dates, or do a simpler design with one special element (like foil on an otherwise basic invite) rather than going all-out on everything.
The thing is, your invitations are one of the first impressions guests get of your wedding, but they’re also something people look at for like thirty seconds and then either toss or stick on their fridge. So yeah, make them nice and reflective of your style, but don’t go into debt over paper. There are so many other places that money could go – better food, open bar, your honeymoon, whatever matters more to you both.