
Planning Guides, Style Guide
Wedding Seating Plan Template: Table Arrangement Downloads
Jul
Okay So Seating Plan Templates Are Basically Your Best Friend
Look, I’ve been doing this wedding planning thing for like fifteen years now and the seating chart is hands down the part that makes brides cry more than anything else. Not the budget, not the mother-in-law drama, but figuring out where Aunt Susan sits so she doesn’t complain about being near the speakers.
So let me just jump into the actual templates you can download because honestly you’re gonna need them. I used to try doing everything from scratch and that was… not smart. Spring 2023 I had this wedding with 280 guests and I was still using a hand-drawn diagram like some kind of medieval cartographer and my cat Milo knocked over my coffee directly onto it. That was my breaking point.
The Basic Template Types You Should Know About
There are basically three main formats for seating plan templates and they all serve different purposes which is kinda annoying because you’d think one would just work for everything but nah.
Excel/Google Sheets Templates
These are your spreadsheet-based ones and honestly they’re super practical even though they look boring. You can download free ones from sites like Template.net or make your own. What I do is set up columns for guest name, table number, meal choice, and sometimes I add a notes column for like “needs to sit near bathroom” or “don’t seat near the Johnsons.”
The thing with spreadsheet templates is they’re great for the organizational part but terrible for visualizing the actual room layout. You need both, trust me. I keep a master spreadsheet that I update constantly and then use a different template for the visual part.
Drag-and-Drop Digital Tools
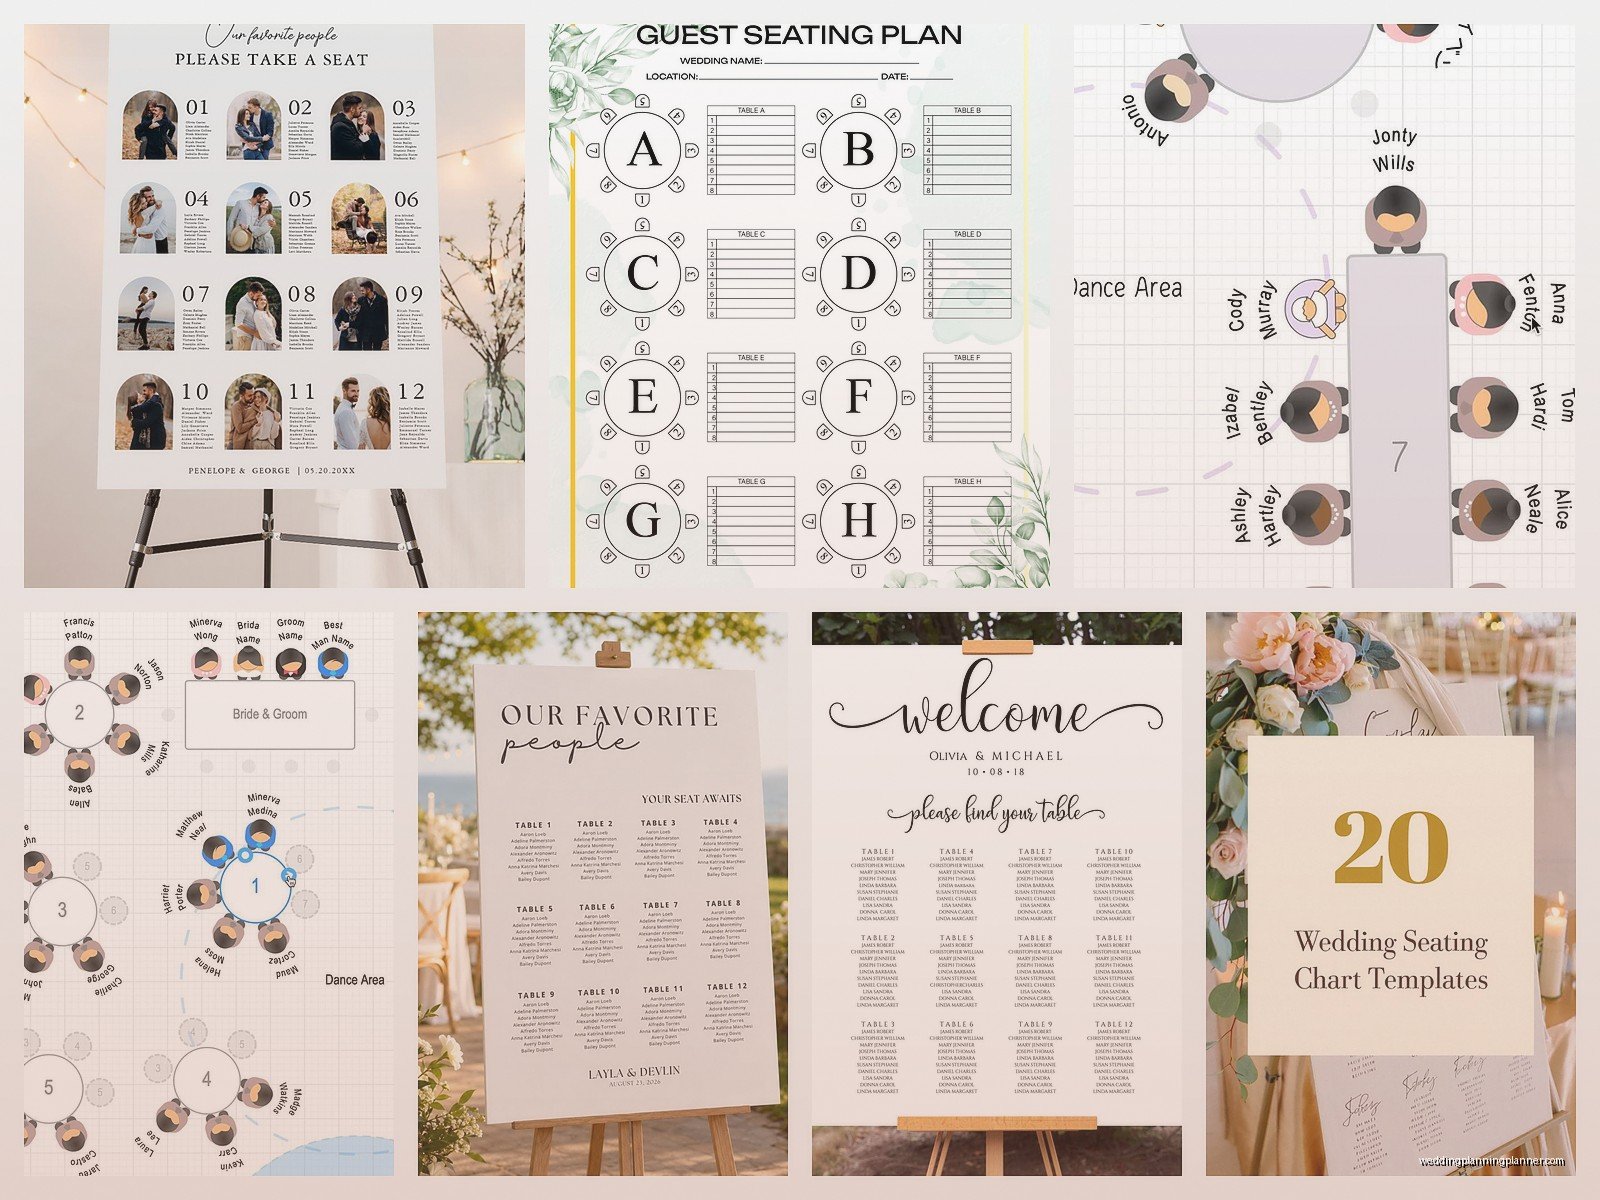
Sites like AllSeated, WeddingWire, and Social Tables have these templates where you can actually drag little circles or rectangles around to represent tables. Some are free, some have premium versions. I’m gonna be real with you – the free versions usually work fine for weddings under 150 people. After that you might want to pay for the upgrade because the limitations get annoying.
What’s great about these is you can see the actual room dimensions if you input them correctly. You can switch between round tables and rectangular ones, add a dance floor, mark where the DJ setup is. It’s way more visual than a spreadsheet.
The thing that drives me absolutely insane though is when these platforms don’t let you save multiple versions. Like I need to save version 1, version 2, version 3 because the bride is gonna change her mind seventeen times and sometimes we need to go back to an earlier version because we realize Uncle Bob actually CAN’T sit near the bar for reasons we should have remembered.
Printable PDF Templates
Then there’s the old school printable templates you can download as PDFs from Etsy or wedding blogs. These are usually prettier – they have nice fonts and decorative elements. You print them out and fill them in by hand or type on them if they’re editable PDFs.
I use these for the actual display at the wedding. Nobody wants to see your Excel spreadsheet on an easel at the venue entrance, you know? So I do all my planning work in spreadsheets and digital tools, then transfer the final version to a pretty template for display.
Where To Actually Download These Things
Okay so here’s where I actually get templates and which ones are worth your time:
Canva has a bunch of free seating chart templates that you can customize. The selection is pretty good and you can change colors and fonts to match the wedding theme. You don’t even need the Pro version for basic stuff. I probably use Canva for like 60% of my final display charts now.
Microsoft Office templates – if you have Office, just search their template library. They have Excel seating chart templates that are surprisingly functional. Not pretty, but functional.
AllSeated is what I mentioned before – it’s specifically for event planning and the free version is solid. You can download your floor plan as a PDF once you’re done.
Etsy has thousands of printable templates, usually between $5-15. Search for “wedding seating chart template” and you’ll find everything from rustic to modern to completely over-the-top floral designs. Make sure you check if they’re editable before buying because some are just… not, which seems like a weird choice but whatever.
Template.net and Vertex42 have free Excel and Google Sheets templates. They’re basic but they work. I keep a modified version of one from Vertex42 as my standard template that I use for every wedding.
How To Actually Use These Templates Without Losing Your Mind
So you’ve downloaded your template, now what? Here’s my actual process and you can adjust it however works for you.
Start With Your Guest List
Put everyone into a spreadsheet first. I don’t care if you download a fancy visual template – start with the spreadsheet. You need: full names, relationship to bride/groom, meal preference if applicable, any seating restrictions or requests, plus/minus one status.
Group people by “category” in your head or in an actual column – bride’s family, groom’s family, college friends, work friends, random cousins, etc. This makes the actual table assignment so much easier.
Figure Out Your Table Sizes
This is where you need to actually talk to your venue. Most venues have standard round tables that seat 8-10 people. Some have rectangular tables. You need to know exactly what you’re working with before you start assigning people because I’ve seen brides plan for tables of 8 when the venue only has tables of 10 and then everything falls apart.
Your template should match your actual table configuration. If you’re using a digital tool, input the correct table shapes and sizes. If you’re using a spreadsheet, note the capacity for each table number.
Do The Math First
Count your confirmed guests. Divide by your table size. That tells you how many tables you need. Seems obvious but you’d be surprised how many people skip this step and just start randomly assigning tables.
If you have 87 guests and tables of 10, you need 9 tables, but some will have empty seats. I usually try to balance it so you don’t have one sad table with only 4 people while others are packed.
Assign Tables Strategically
Start with the people who HAVE to sit together or CANNOT sit together. Do the bride and groom’s immediate family first. Then the wedding party if they’re not at a head table. Then work through your friend groups.
Summer 2021 I had this wedding where the bride’s parents were divorced and both remarried and there was this whole thing about… actually it’s too complicated to explain but basically I needed four separate tables for what would normally be “parents” and it threw off my entire arrangement. We ended up with this weird asymmetrical setup that actually looked kinda cool but was not what I planned.
Use your template to drag people around or write table numbers next to names. Change it a million times. This is normal. Anyone who gets their seating chart right on the first try is either lying or having a 20-person wedding.
The Visual Layout Part
Once you know who sits at which table NUMBER, you need to figure out where each table goes in the actual room. This is where floor plan templates are essential.
Most digital tools let you create a scaled floor plan. You input the room dimensions, place your tables, add the dance floor, DJ booth, buffet tables, gift table, whatever. Then you can see if everything actually fits and if people can, you know, walk between tables without turning sideways.
Things to remember that I always forget until the last minute: you need space for the catering staff to move around, people need to be able to get to the bathroom without climbing over the DJ equipment, and the older guests probably shouldn’t be right next to the speakers.
I usually put the head table or sweetheart table at the focal point of the room, then arrange other tables around it. Family tables typically go closer to the front, friend tables can be anywhere, and there’s always that one table of random plus-ones and coworkers that ends up in the corner but honestly they usually have more fun anyway.
Making It Look Good For Display
Your working template and your display template are different things. I cannot stress this enough. You do not want guests looking at your messy Excel spreadsheet with notes like “chatty, seat near dance floor” visible.
For the display version, I download a pretty template from Canva or Etsy and transfer just the essential info: guest names and table numbers. Sometimes table names if the couple is doing that instead of numbers.
You can organize it alphabetically by last name or by table number. Alphabetical is easier for guests to find themselves but table number organization looks neater visually. I usually go with alphabetical because the whole point is making it easy for people to find their seats.
Some couples do individual escort cards instead of one big chart and that’s fine too, but you still need to plan the seating arrangement first, so you still need the template.
Backup Plans and Flexibility
Here’s the thing nobody tells you – you’re gonna need to adjust your seating chart like two days before the wedding because people drop out or bring unexpected plus-ones or whatever. So don’t make your final display chart too early.
I keep my working spreadsheet updated until literally the day before. Then I finalize the pretty version. And I always bring a printed copy of the spreadsheet to the wedding just in case because I’ve had situations where the display chart gets knocked over or spilled on or… one time someone’s toddler drew all over it with a Sharpie before the reception started, which was actually kinda funny but also not funny at all.
Also save multiple versions of your template as you work. Name them with dates or version numbers. “Seating Chart v1” “Seating Chart v2” etc. You’ll thank me when you need to go back because you realize the version you’re working on is a disaster.
Random Tips From Someone Who’s Done This Too Many Times
Don’t put all the single people at one table unless they specifically request it. That “singles table” thing is awkward and weird and feels like middle school.
Mix up the age groups a bit if you can. All the 60-year-olds at one table and all the 25-year-olds at another creates weird energy. Blend it.
If you have kids attending, consider whether you want a kids table or if you want kids with their parents. Both options are valid but decide early because it affects your numbers.
The vendor meals thing – you need to plan seating for your photographer, DJ, videographer if they’re staying for dinner. Some couples forget this. Your template should account for a vendor table or vendor seating area.
Leave some buffer space in your floor plan template. Don’t pack tables so tightly that people can’t move. I learned this the hard way with a venue that looked spacious until we put in 25 tables and suddenly it felt like a sardine can.
Color coding your spreadsheet template helps. I use different colors for different family sides or friend groups. Makes it easier to see at a glance if you’ve got a good mix at each table or if you accidentally put all groom’s college friends at one table and they’re gonna get too rowdy.
What To Do When People Complain
They will. Someone will complain about their table assignment. I had this bride’s aunt who called me directly (which, how did she even get my number?) to complain that she was at table 12 instead of table 8 because apparently table numbers are a status symbol now?
Just remember that you can’t please everyone and the seating chart is gonna be imperfect no matter what. Do your best to keep mortal enemies apart and put people with at least one person they know at each table, and beyond that… it’s a few hours of their life, they’ll survive.
The templates make it easier to shuffle people around when you do get complaints though. Way easier than redoing everything from scratch because someone decides last minute they can’t possibly sit near their ex’s new girlfriend or whatever drama is happening.
Anyway that’s basically everything I know about seating plan templates and how to actually use them without wanting to throw your laptop out the window. Download a few different types, figure out which format works for your brain, and just know that you’re probably gonna redo it at least five times before you’re done.
