Planning Guides, Style Guide
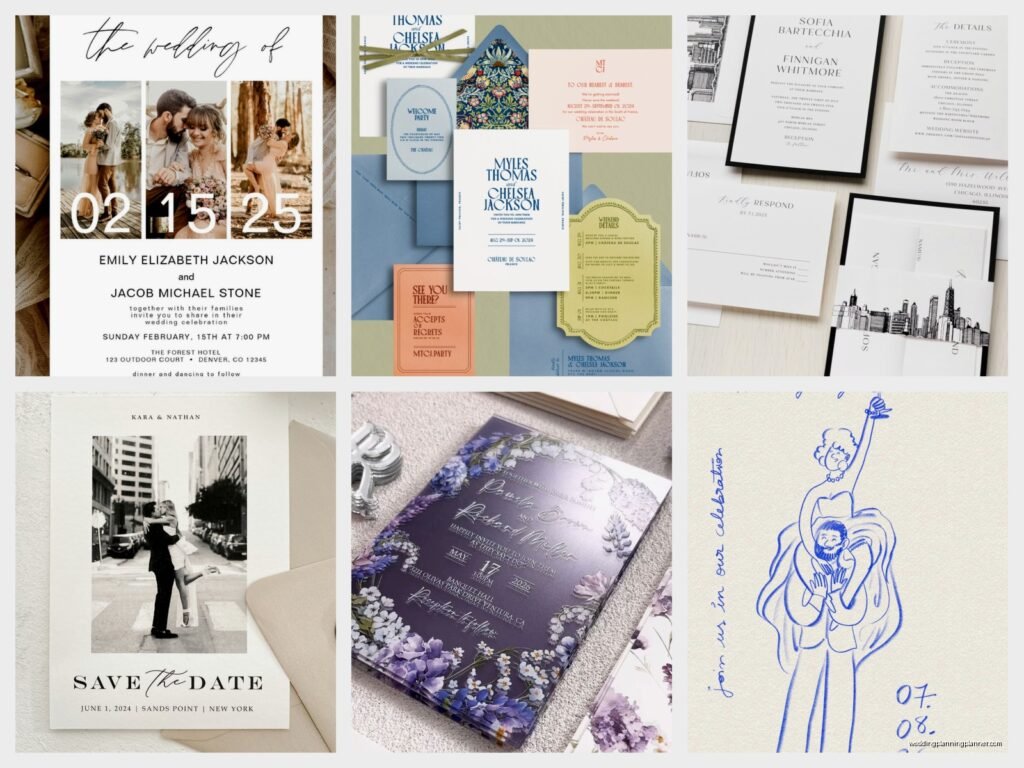
Personalized Wedding Invitations: Custom Name & Date Options
May
Getting Your Names and Dates Actually Right on Custom Invitations
Okay so personalized wedding invitations with custom names and dates seem straightforward until you’re sitting there trying to decide between “Emily and James” versus “James and Emily” and suddenly it’s 11pm and you’ve been staring at font samples for three hours. I’ve been doing this since 2008 and I still have couples who panic about this stuff, so let’s just dive into what actually matters.
The Name Order Thing Everyone Overthinks
First off, whose name goes first? Traditionally it was always the bride’s name first, but honestly that’s kinda outdated now. I had this couple in spring 2023 who spent two full consultation sessions arguing about name order because the groom’s mother insisted tradition mattered and they wanted something more equal. Here’s what I tell everyone: if you’re doing formal traditional invitations, bride’s name first is still standard. If you’re doing literally anything else, pick whatever sounds better when you say it out loud.
Say both versions out loud like five times. “Sarah and Michael” versus “Michael and Sarah” – one probably flows better. That’s your answer. Sometimes it’s about syllables, sometimes it’s about which name is shorter, sometimes it’s just vibes. You‘ll know.
For same-sex couples, I usually suggest alphabetical order or again, whatever sounds better. There’s no rule here and anyone who tells you different is selling something.
Full Names vs First Names vs The Weird In-Between
This is where it gets messy. You’ve got options:
- Full formal names: “Emily Catherine Brooks and James Michael Peterson”
- First and last only: “Emily Brooks and James Peterson”
- Just first names: “Emily and James”
- First names on the invite, full names on the details card (this is actually pretty common now)
The formality of your wedding should match your invitation formality. If you’re getting married at a country club with a seated dinner, maybe go formal with full names. Backyard barbecue wedding? First names are totally fine. I personally think the super formal three-name thing feels stuffy unless you’re doing a black-tie event, but that’s just me.
One thing that drives me absolutely insane is when couples use nicknames on formal invitations. Like if your name is William but everyone calls you Billy, the formal invite should still say William. Save Billy for the rehearsal dinner invites or something. I had a client who insisted on “Bobby and Jen” for a formal church wedding and the invitation just looked… off. But hey, it was their wedding.
Date Formatting Is More Complicated Than It Should Be
Okay so dates. You’d think this would be simple but there are like eight ways to write a date and they all mean different things formality-wise.
Formal traditional wording looks like this: “Saturday, the fifteenth of June, two thousand twenty-five” – everything spelled out, no numbers. This is what you see on classic engraved invitations.
Modern formal might be: “Saturday, June 15, 2025” or “Saturday, June fifteenth, 2025” – mixing spelled-out and numerical.
Casual can be: “June 15, 2025” or “6.15.25” or even “6/15/2025” if you’re doing a really laid-back vibe.
Here’s what matters: be consistent. If you spell out the date, spell out the time too. “Five o’clock in the evening” not “5:00 PM” – see what I mean? Mixing formal and casual formatting looks like you didn’t proofread.
Time Formatting Because Apparently That’s Also A Thing
For formal invites, you write out the time: “half after six o’clock” or “six-thirty in the evening” – evening is anything after 5pm, afternoon is noon to 5pm. You don’t use “6:30 PM” on formal invites.
For less formal, numerical time is fine. Just make sure you include AM or PM because I’ve seen guests show up 12 hours early and that’s awkward for everyone.
Also “in the evening” or “in the afternoon” is optional if the time makes it obvious, but it adds a nice touch. My cat knocked over my coffee while I was writing this and now I’m distracted thinking about whether I need more paper towels.
Where Custom Design Actually Comes In
So now that you’ve got your names and dates figured out, let’s talk about the actual customization options. This is where it gets fun or overwhelming depending on your personality.
Most online invitation companies and custom designers offer these personalization levels:
- Template customization: you pick a design and plug in your info
- Semi-custom: you can change colors, fonts, and layout within a template
- Fully custom: designer creates something from scratch based on your ideas
Template customization is gonna be cheapest, usually $2-5 per invitation. Semi-custom runs $5-12. Fully custom starts around $15 and can go up to like $50+ per invite if you’re doing fancy printing methods.
Font Choices That Don’t Make People Squint
I’m just gonna say it: script fonts are beautiful but if your entire invitation is in script, half your guests can’t read it. Especially older guests. I use script for names and maybe the date, but the venue information and other details need to be in a clean, readable font.
Popular combos that work:
- Script for names + serif font for details
- Modern sans-serif for everything (very clean, contemporary look)
- Elegant serif for names + different serif for details
- Hand-lettered style for names + simple sans-serif for info
Your designer should show you font pairings. If they’re putting your names in some super decorative font that you can barely read, speak up. Legibility matters more than looking fancy.
Color Customization and What Actually Prints Well
Here’s something they don’t tell you: colors look different on screen versus printed. That gorgeous coral you picked might print as salmon pink or orange depending on the printing method. Always, always order a printed proof before you order 150 invitations.
Most custom invitation services let you choose:
- Text color
- Background color or pattern
- Accent colors for borders, designs, etc.
- Envelope color and liner patterns
Metallic inks (gold, silver, rose gold) cost extra but they’re gorgeous for names and dates. Foil printing is even more expensive but has this amazing shiny effect that photographs really well. I had this bride in summer 2021 who went with copper foil for their names and it was stunning against navy blue cardstock, like it caught the light perfectly and… anyway, foil is worth it if you have the budget.

Digital Printing vs Letterpress vs Foil vs Engraving
The printing method affects how your custom names and dates look:
Digital printing is standard and affordable. It’s flat ink on paper. Works great for most designs and you can do full color. Your names and dates will look crisp and clean but there’s no texture.
Letterpress creates an impression in the paper – you can actually feel the letters. It’s gorgeous and vintage-feeling but more expensive. The customization is usually limited to 1-2 colors. Your names look like they’re pressed into the paper because they literally are.
Foil stamping uses heat to apply metallic or colored foil. Super popular right now for names and dates. It’s shiny and eye-catching but you can’t do fine details as well as digital printing.
Engraving is the most formal and traditional option. The letters are raised on the paper. It’s expensive and takes longer but it’s what you see on super high-end formal invitations. Perfect for traditional full-name formats.
Monograms and Custom Graphics With Your Info
Lots of couples want a custom monogram with their initials or a little graphic that includes their wedding date. These are cute and make the invitation feel more personal. Just make sure the monogram doesn’t overshadow the actual information people need to know.
Common monogram styles:
- Classic three-letter with last initial in the center (larger)
- Two initials intertwined (for couples with different last names)
- First initials + wedding date incorporated into the design
- Custom crest or seal design with names
You can use the same monogram on your napkins, dance floor decal, wedding website, all that stuff. It’s a nice way to tie everything together visually.
Proofing Your Custom Invitations Like Your Life Depends On It
This is the part where I get really serious for a second. Proofread everything twelve times. Then have three other people proofread it. Then proofread it again. I cannot tell you how many couples have ordered 200 invitations with a typo in the date or a misspelled name.
Check specifically:
- Name spelling (both first and last names, middle names if included)
- Date is correct (right day of the week for that date)
- Year is correct (I’ve seen 2024 instead of 2025 more times than you’d think)
- Time is correct and includes AM/PM if needed
- Venue name and address are spelled correctly
- RSVP date makes sense (should be like 3-4 weeks before the wedding)
- Website URL works and is spelled right
Get a printed proof. I don’t care if it costs an extra $20 or delays your timeline by a week. Order. A. Proof. Colors, fonts, and spacing look different in real life.
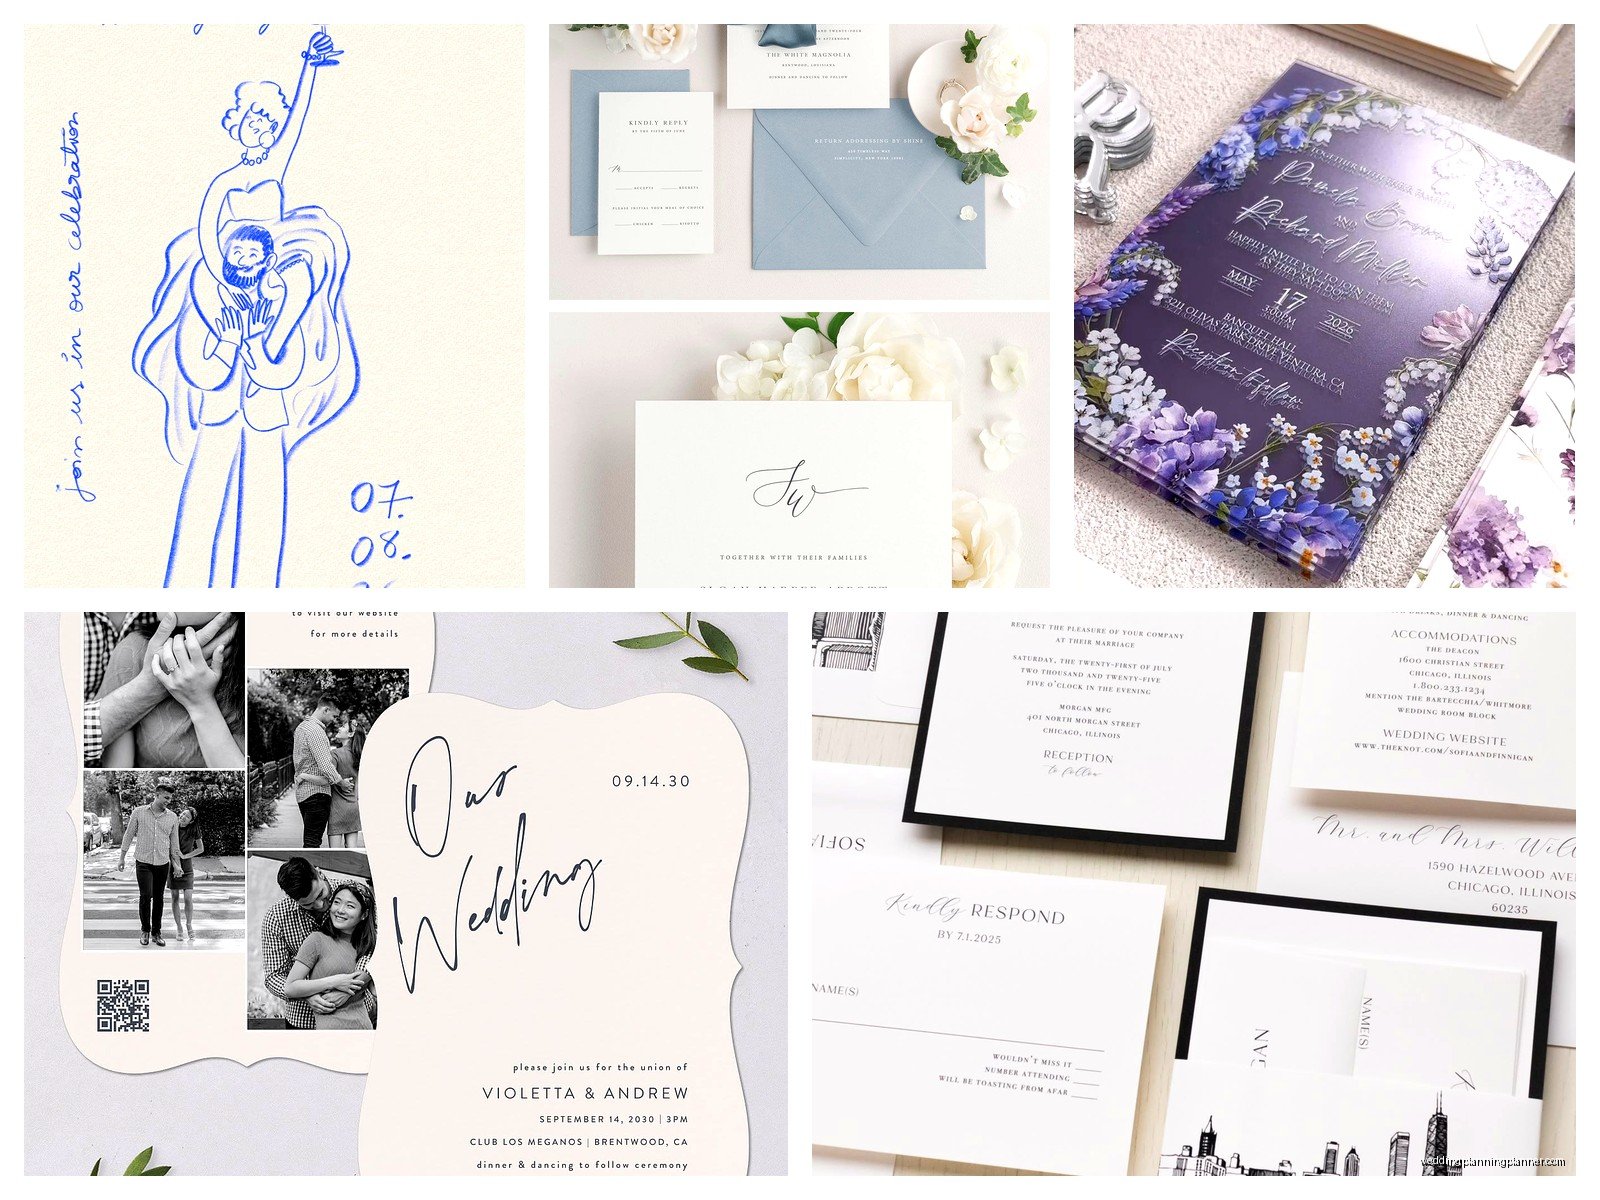
Matching Your Invitation Suite
If you’re doing custom names and dates on your main invitation, you’ll probably want matching pieces. Most couples order:
- Main invitation with names and date
- RSVP card (can include your names or monogram)
- Details card with venue info and maybe timeline
- Accommodations card if you have hotel blocks
- Envelope liners with a custom pattern or your wedding colors
Some designers offer package deals where all the pieces coordinate. Your names might appear in different sizes or styles on different cards but the overall look should be cohesive. I usually recommend putting your names prominently on the main invite and then using a monogram or just a design element on the smaller cards.
Digital Invitations vs Printed
Okay so digital invitations are becoming more acceptable even for formal weddings, though some older guests will judge you for it. The customization options are similar – you pick colors, fonts, add your names and date. The main difference is you’re not dealing with printing costs or postage.
Digital pros: cheaper, easier to track RSVPs, can include links and more info, environmentally friendly
Digital cons: less formal feeling, some guests won’t check email, can’t display it in your home later, doesn’t feel as special
Honestly for most weddings I still recommend printed invitations but you can do digital save-the-dates to save money. Or do printed for your older relatives and VIPs, digital for everyone else. Nobody’s gonna know unless they compare.
Save The Dates With Names and Dates
Oh right, save-the-dates are a whole separate thing. These go out 6-8 months before the wedding (or like 10-12 months if it’s a destination wedding). They should include your names and the date but don’t need all the formal details yet.
Save-the-dates can be more casual and fun than your formal invitations. Lots of couples do photo cards with their names and date overlaid on an engagement photo. Or a simple postcard design. You don’t need to match them exactly to your invitations, though it’s nice if the general vibe is similar.
The wording is usually just: “Save the Date | Emily and James | June 15, 2025 | Nashville, Tennessee | Invitation to Follow”
That’s it. You don’t need the venue name or time yet. Just enough info that people can block off the date.
Working With a Designer vs DIY Templates
You can totally DIY your invitations using Canva or Minted or one of those template sites. They’ve got tons of designs and the customization is pretty easy – just type in your names and date, pick your colors, done. This is the cheapest option and works great if you like one of their existing designs.
Working with a custom designer costs more but you get something unique. The designer will ask about your wedding style, colors, venue, all that, and create something specifically for you. Your names and date become part of the overall design rather than just plugged into a template. Expect to pay $500-2000+ for custom design depending on how elaborate you go.
Middle ground option: sites like Minted or Paperless Post where you can semi-customize templates. You get more options than basic DIY but it’s not fully custom. This is what like 60% of my clients do and the results are usually really nice.
Timing For Ordering Custom Invitations
Start looking at invitation designs like 4-6 months before your wedding. If you’re doing custom design, start even earlier because the design process takes time.
Timeline usually looks like:
- 4-6 months out: start researching and meeting with designers
- 3-4 months out: finalize design and order
- 2-3 months out: receive invitations, address envelopes, mail them
- 1 month before wedding: RSVP deadline
Rush orders are possible but they cost extra and you’re more likely to miss typos when you’re rushing. Don’t be the person ordering invitations 6 weeks before the wedding unless you absolutely have to.
Budget at least 2 weeks for printing after you approve the final proof. Letterpress and foil take longer, sometimes 3-4 weeks. And then you need time to address envelopes unless you’re paying for calligraphy or printed envelope addressing.
Little Details That Make Custom Invitations Special
Once you’ve got the basics down (names, date, all that), you can add extra personalized touches. Some couples include a custom illustration of their venue on the details card. Or a little map with their names and date. Or a timeline of their relationship leading up to the wedding date.
Envelope addressing can be customized too – calligraphy with your return address and names looks gorgeous. Or printed addressing in a font that matches your invitation. Some couples even do custom postage stamps with their photo or monogram.
Wax seals are having a moment right now. You can get custom wax seals made with your initials or wedding date. They’re not practical if you’re mailing invitations because they add thickness and cost more in postage, but they photograph really well and feel fancy. I usually suggest wax seals for hand-delivered invitations to VIPs or for the invitation you keep for yourself.
Ribbon, vellum overlays, belly bands with your names on them – there are so many ways to make your invitations feel custom and special beyond just the printed information. Just remember that every extra element adds to the cost and assembly time. If you’re doing 150 invitations and each one requires tying a ribbon and adding a wax seal, that’s hours of work. Make sure you have the time and patience for assembly or budget for the stationer to do it.