Planning Guides, Style Guide
Belly Bands for Wedding Invitations: Decorative Wrap Designs
May
Okay So Belly Bands Are Actually Super Useful
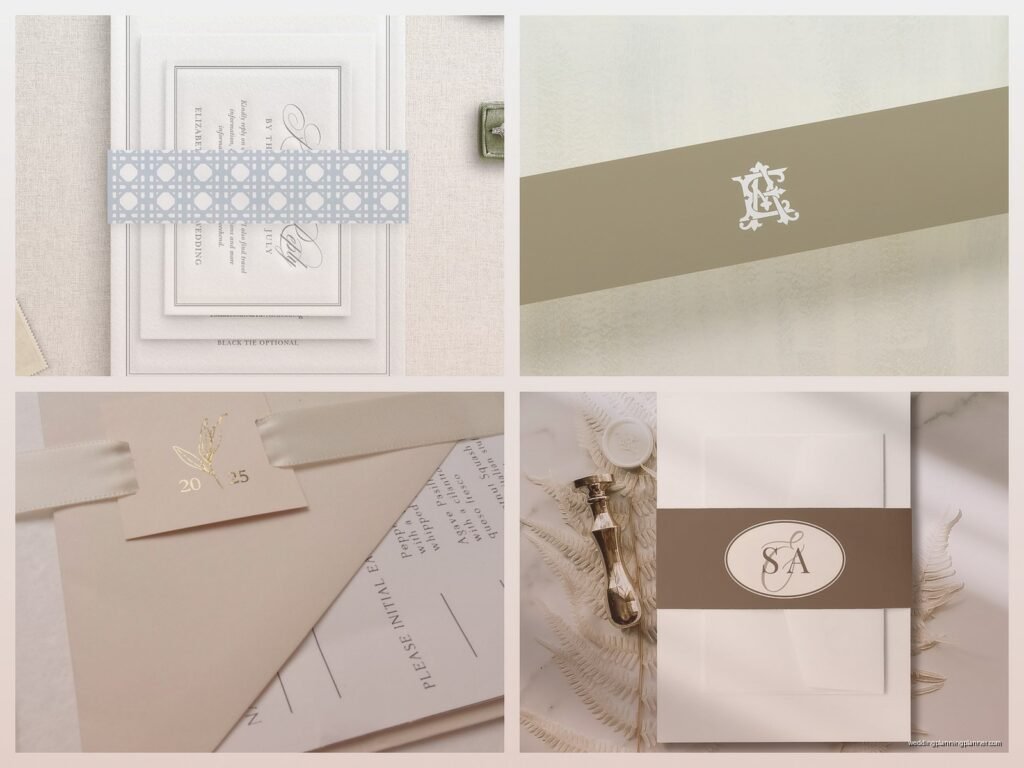
Belly bands are basically those decorative paper wraps that go around your wedding invitation suite to hold everything together. They’re like a little hug for your cards and I know that sounds cheesy but honestly that’s what they do. Instead of stuffing everything into an inner envelope or using a ribbon that might come undone, you slide a belly band around the whole stack and it keeps your invitation, RSVP card, details card, and whatever else from sliding around everywhere.
I had this bride back in spring 2023 who was adamant she didn’t need belly bands because they seemed “extra” and then she mailed out 150 invitations with just the envelopes and guess what happened? Her mom called me directly—not even the bride, her MOM—saying that half the guests were texting confused because the cards were arriving all jumbled up inside the envelopes. We ended up doing a whole second round with belly bands for the remaining invitations and it was just… anyway, lesson learned for everyone involved.
What Actually Counts As A Belly Band
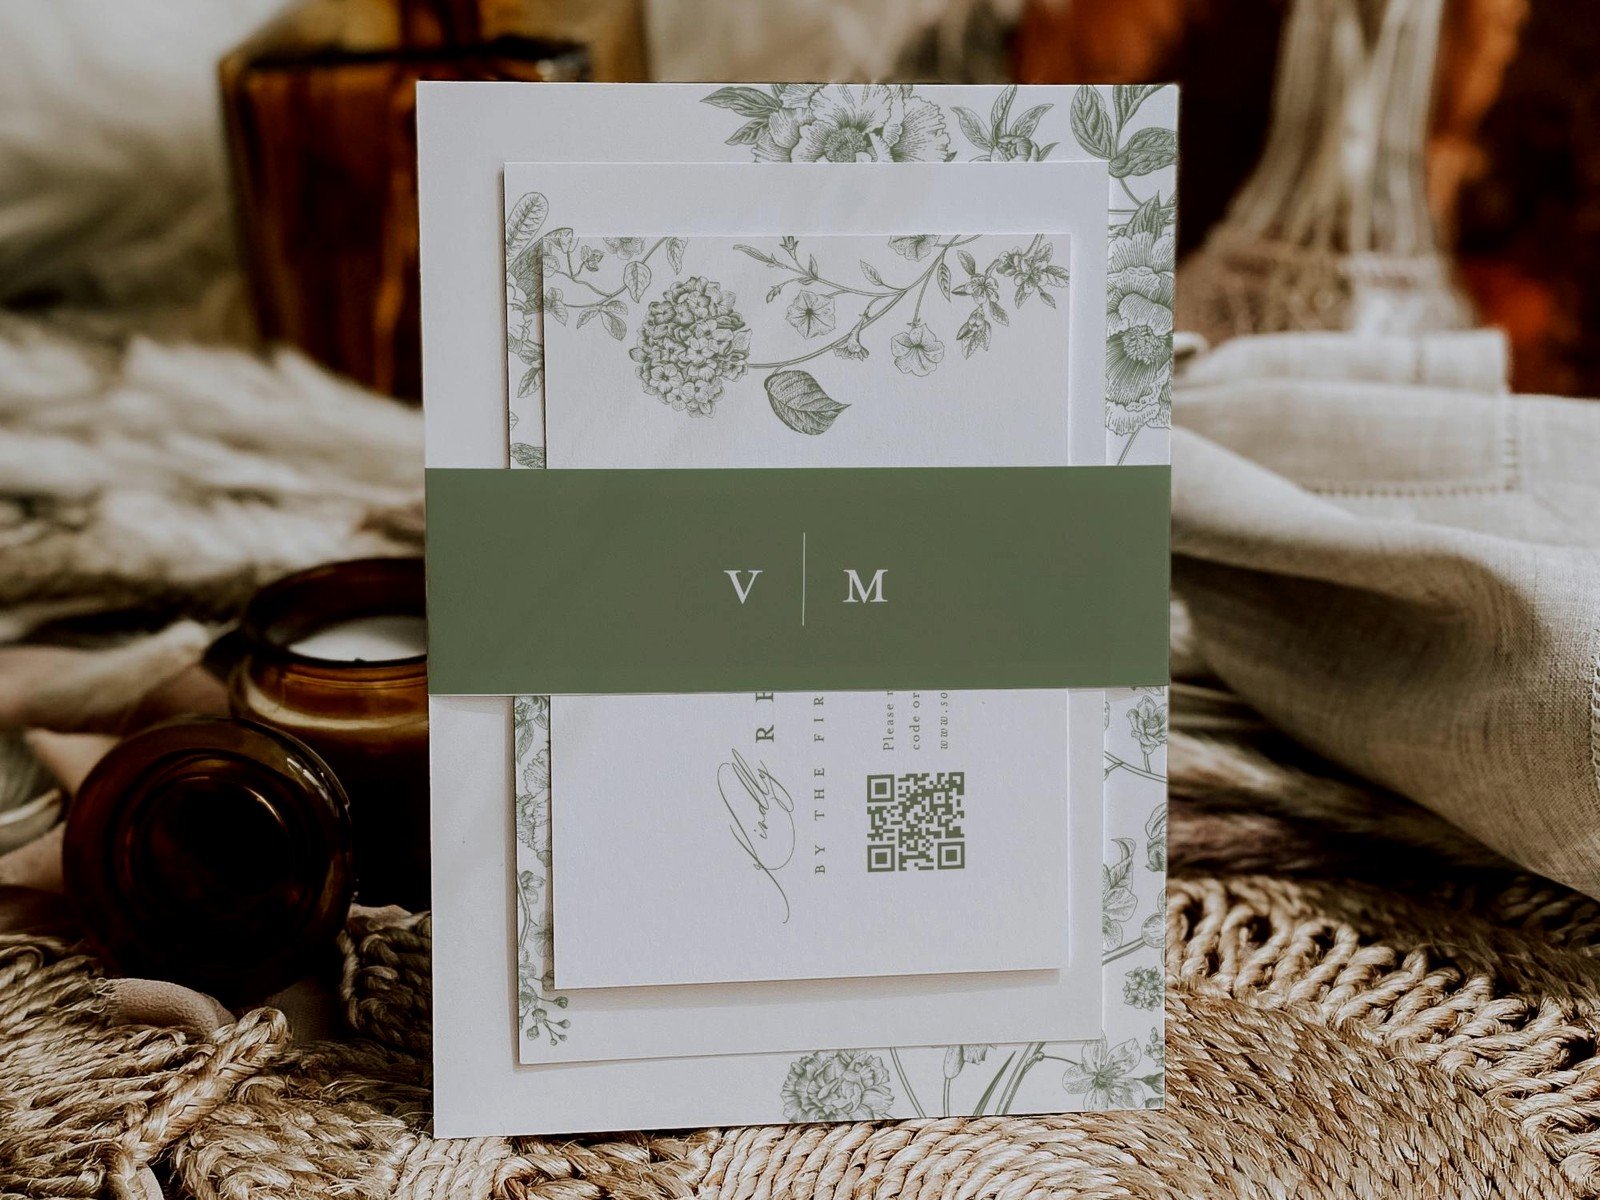
You’ve got options here. The most common belly band is just a strip of cardstock or specialty paper that wraps around your invitation suite, usually 2 to 3 inches wide. It can be plain, printed, textured, whatever you want. Some people do vellum belly bands which look really elegant and kinda ethereal if that’s your vibe. Then there’s ribbon belly bands which aren’t technically paper but serve the same purpose—they wrap around and tie or get secured somehow.
The width matters more than you’d think. If your band is too narrow like 1 inch or less, it’s gonna look skimpy and won’t hold things securely. Too wide like 4+ inches and it starts looking bulky and takes over the whole design. I usually tell clients to aim for 2.5 inches as a sweet spot but you gotta measure your actual suite first.
Paper Types That Work
Cardstock in 65-80 lb weight is your standard choice. It’s sturdy enough to stay in place but flexible enough to wrap without cracking. You can get it in literally any color and most print shops can handle custom printing on it.
Vellum is gorgeous but here’s what annoys me about it—it shows every single fingerprint and if you’re assembling 200 invitations yourself you WILL get fingerprints on it. Also it’s translucent so if you’re trying to hide messy edges or multiple layers underneath, vellum is not your friend. But when it works, it works beautifully.
Specialty papers like linen, cotton, or handmade paper with embedded flowers or whatever look amazing but they’re thicker and sometimes harder to work with. They also cost more obviously.
Measuring And Cutting The Right Size
This is where people mess up constantly. You need to measure your assembled suite—meaning stack everything together exactly how it’ll look when finished, then measure around it like you’re measuring someone’s waist for pants or something.
Take a flexible measuring tape or even just a strip of scrap paper and wrap it around your stack. You want it snug but not tight. Add about half an inch for overlap where the two ends meet. That’s your length. The width depends on your design but again, 2 to 3 inches usually looks proportional.
If your suite is 5 inches wide and you’ve got like 5 cards stacked together, your belly band length will probably be around 11 to 12 inches. But seriously measure yours because paper thickness adds up fast.
Securing The Band
You’ve got a few options and honestly this is where it gets fun or frustrating depending on your patience level. The easiest method is a small clear sticker or a glue dot on the overlap. It disappears and holds well. Just put it on the inside so guests don’t see it.
Wax seals are having a MOMENT right now and they look incredible on belly bands. You overlap the two ends, press them together, and stamp your wax seal right on top. It’s elegant and functional. Downside is wax seals add bulk and weight which might affect your postage, and they can break in the mail if you’re not careful with packaging.
Some people do a small printed label or monogram sticker on the outside of the overlap which serves as both decoration and closure. This works great if you’ve already got custom stickers made for other parts of your wedding.
There’s also the option of designing the belly band with a small slit or tab closure where one end tucks into a cut opening, kinda like those paper chains we made in elementary school. No adhesive needed but it requires precise cutting.
Design Ideas That Actually Look Good
Plain colored bands with nothing on them can look really sophisticated if the rest of your invitation is busy. Sometimes less is more and you just need that pop of color to tie things together.
Printed belly bands are where you can get creative. You can print your names, wedding date, a small graphic, a meaningful quote, your monogram, whatever. Just keep the text small and centered or it’ll look overwhelming. I had a couple do song lyrics on their belly band which was cute until we realized the lyrics were from a breakup song and umm that was an awkward conversation.
Patterns work really well—think florals, geometric designs, watercolor washes, or even a simple stripe or polka dot. Make sure the pattern doesn’t clash with your invitation design though. Everything should feel cohesive.
Vellum bands with metallic foil printing look expensive and elegant. The foil catches the light and adds texture. Gold, rose gold, and silver are the most popular but I’ve seen copper and even holographic foil that looked stunning.
Textures And Embellishments
Embossing or debossing on your belly band adds a tactile element that people notice. It’s subtle but fancy. You can emboss your monogram or a simple border design.
Laser cutting is another option where you cut intricate patterns into the paper itself. Think lace designs, floral cutouts, or geometric patterns. This works best with heavier cardstock so it doesn’t tear.
You can also add actual embellishments like a small dried flower, a wax seal, a ribbon bow, or even a tiny charm attached with twine. Just remember that anything three-dimensional will affect your mailing costs and might require hand-canceling at the post office.
DIY Versus Ordering Pre-Made
If you’re crafty and have time, DIY belly bands can save money. You’ll need a paper cutter or access to one because scissors will give you wonky edges and you’ll hate yourself by invitation number 30. Trust me on this.
You can buy pre-cut belly bands from paper suppliers or Etsy shops. They come in standard sizes and colors. This is the middle-ground option—you still assemble everything yourself but you’re not cutting hundreds of paper strips.
Having them professionally made as part of your invitation suite is obviously the easiest but most expensive route. Your stationer handles everything including printing, cutting, and sometimes even assembly.
I usually tell couples to do a test run first. Order or make like 10 belly bands, assemble 10 complete invitations, and see how long it takes and how they look. Then decide if you wanna do all of them yourself or if you’d rather pay someone. There’s no shame in realizing that assembling 200 invitations sounds fun until you’re actually doing it at 11pm on a Tuesday while your cat is sitting on half your supplies.
The Assembly Process
Stack your cards in the order you want with the invitation on the bottom usually and everything else layered on top. Some people do biggest to smallest, some do it by importance of information. There’s no wrong answer really.
Slide your belly band around the stack and position it where you want it—centered is traditional but you can also do it closer to the bottom for a different look. Secure the overlap on the back side of the invitation so guests see the clean front when they open the envelope.
If you’re adding a wax seal or embellishment, do that after the band is in place. Let wax seals cool completely before stacking invitations or you’ll end up with wax everywhere.
Common Mistakes I See All The Time
Making the band too loose is probably the biggest issue. It needs to actually hold things together not just slide around loosely. Test it by turning the whole suite upside down—if cards slip out, your band is too loose.
Using paper that’s too thick or inflexible causes cracking when you wrap it around the suite. You’ll see a white crease line where the paper bent and it looks unfinished.
Not accounting for postage is another big one. Belly bands add weight and bulk which might bump you into a higher postage tier. Take a fully assembled invitation to the post office and have them weigh it before you buy stamps for all of them. I cannot stress this enough because I’ve had multiple clients need to add extra postage after the fact which is just… it’s a whole thing.
Forgetting to test how the belly band affects stuffing the invitation into the envelope. Sometimes a belly band makes your suite too bulky for your chosen envelope size and you don’t realize until you’re trying to stuff 200 of them. Always do a test assembly of the complete package including the envelope.
Coordinating With Your Overall Design
Your belly band should feel like part of the invitation suite, not an afterthought. If your invitations are rustic with kraft paper and twine, a shiny metallic belly band is gonna look weird. If your invitations are formal and elegant with letterpress printing, a burlap belly band probably isn’t the move.
Color matching matters. If you’re using a specific shade of navy throughout your wedding, make sure your belly band navy actually matches. I learned this the hard way when a client ordered belly bands from one supplier and invitations from another and the “blush pink” shades were completely different and we had to reorder everything.
Consider how the belly band interacts with your envelope liner, envelope color, stamps, and wax seals if you’re using them. Everything should work together as a cohesive package. Sometimes that means keeping the belly band simple so other elements can shine, or sometimes the belly band is the star and everything else is neutral.
Practical Stuff About Timing
If you’re ordering custom printed belly bands, add at least 2-3 weeks to your timeline for production and shipping. More if you’re doing specialty techniques like foiling or letterpress.
Assembly takes longer than you think. Plan on 3-5 minutes per invitation if you’re including a belly band with wax seal or embellishments. That’s 10-16 hours for 200 invitations. Schedule assembly parties with your wedding party or family and bribe them with pizza and wine.
Order extra belly bands—like 10-15% more than you need. You’ll mess some up during assembly or printing, and it’s nice to have extras for your own keepsakes or last-minute additions to the guest list.
Budget Considerations That Actually Matter
Plain cardstock belly bands are the most budget-friendly, running maybe 25-50 cents each depending on where you source them. Custom printed ones cost more, usually 75 cents to $2 each. Add specialty techniques like foiling or laser cutting and you’re looking at $2-5 per band.
If budget is tight, you can do belly bands for just your formal invitations and skip them for other pieces like save-the-dates or thank-you cards. Nobody’s gonna judge you for that.
Another money-saving option is to do a simple ribbon instead of a printed paper band. Ribbon can be cheaper depending on the type, and you can buy it in bulk from craft stores. Satin, organza, and grosgrain ribbons all work well and you just tie them around the suite.
The hidden costs are in the tools if you’re DIYing—a good paper cutter runs $30-100, a bone folder for crisp creases is like $5, adhesive dots or glue, and your time is worth something too even if you’re not paying yourself.