Planning Guides, Style Guide
Vellum Belly Band: Translucent Invitation Wrap Design

May
What Even Is a Vellum Belly Band Anyway
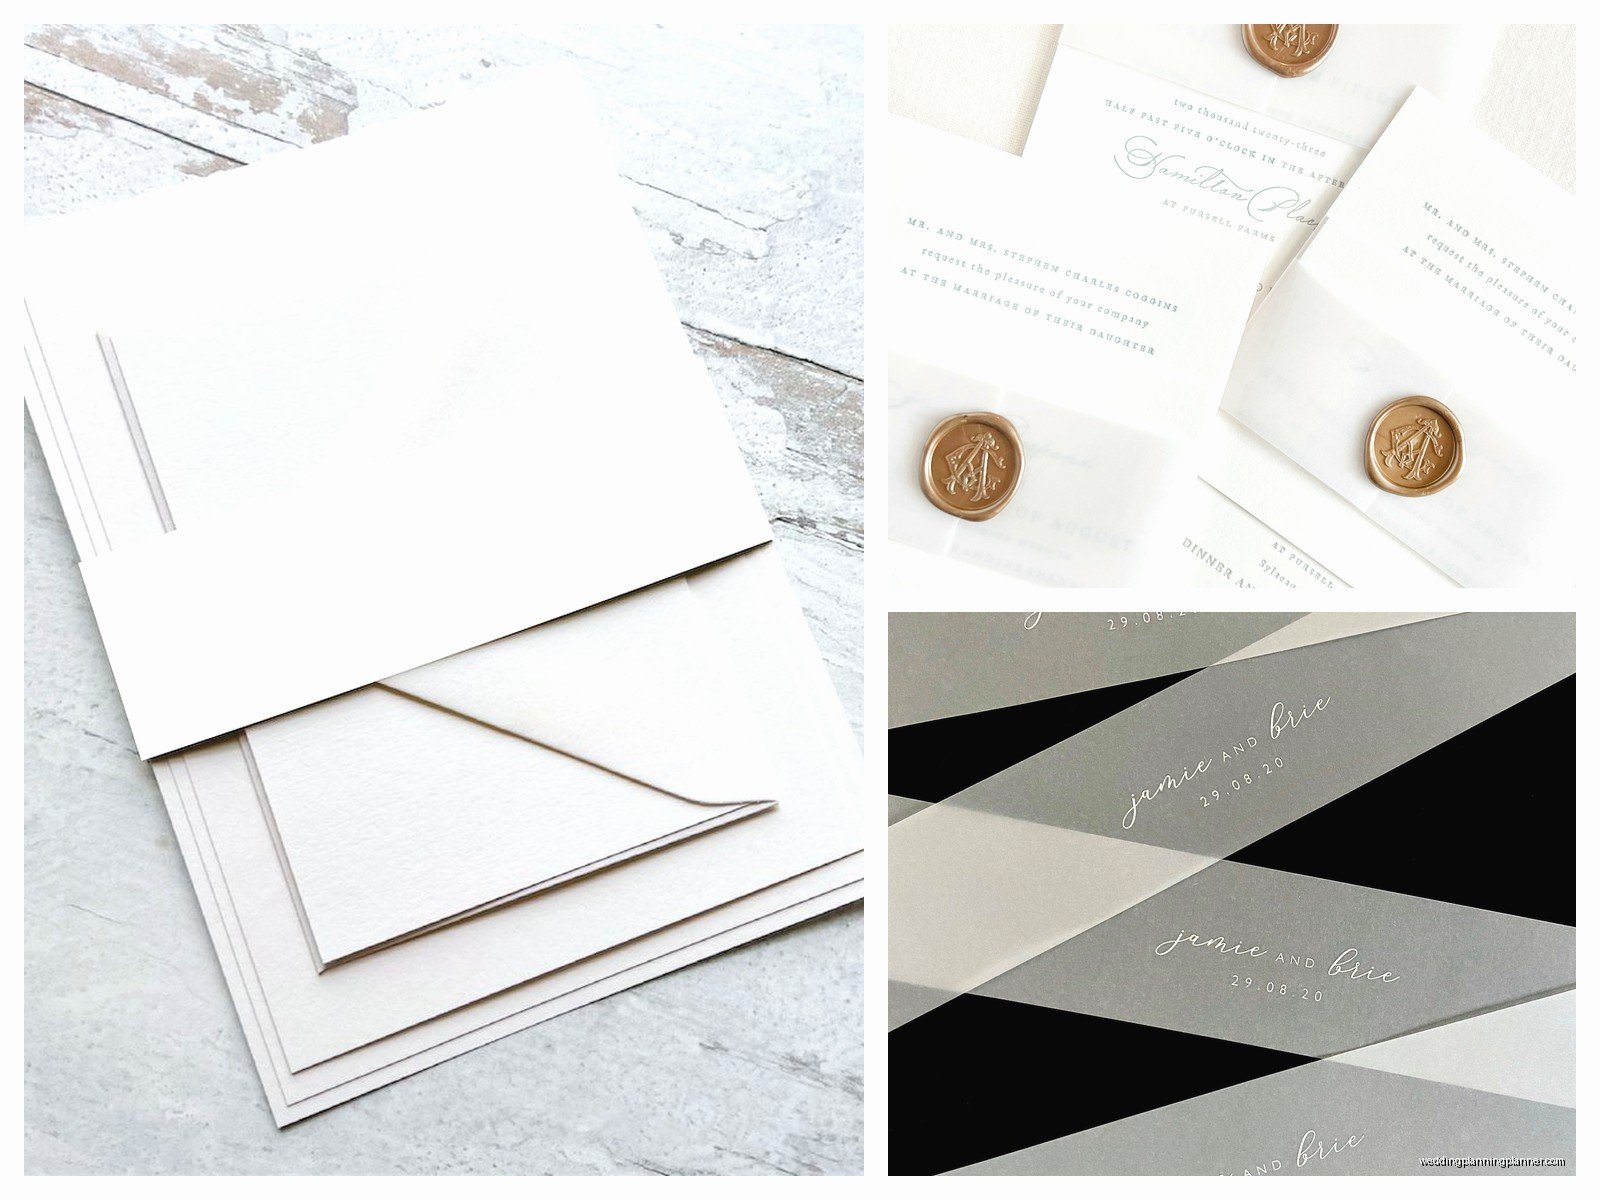
Okay so vellum belly bands are basically translucent paper wraps that go around your invitation suite to hold everything together. Think of them like a paper hug for your invitations but make it elegant. They’re usually about 2 inches wide and wrap horizontally around the middle of your stacked cards—hence the “belly band” name which I kinda hate but whatever, it stuck.
The vellum part is key because it’s that semi-transparent paper that looks super sophisticated and lets you peek through to see the invitation underneath. I got obsessed with these back in spring 2023 when a bride asked for something “ethereal but not too whimsical” and honestly vellum belly bands saved my life on that project.
Why You’d Actually Want to Use These Things
So there’s practical reasons and aesthetic reasons. Practically speaking, they hold your invitation suite together without an envelope liner or ribbon that might add bulk. If you’re doing a 5-piece invitation set with the main invite, RSVP card, details card, direction card, and maybe a weekend events card—that’s a lot of stuff sliding around. The belly band keeps it all neat.
Aesthetically they’re just gorgeous. The translucent quality adds this layered dimension that you can’t get with regular cardstock. You can print on vellum too which means you can add text, monograms, botanical illustrations, whatever. I had one couple who printed their wedding hashtag on the belly band and it looked so much classier than I expected a hashtag could look.
They also work with literally any wedding style. Modern minimalist? Yep. Garden romance? Absolutely. Vintage glam? Sure. Black tie formal? Of course.
Choosing Your Vellum Weight and Type
This is where people get confused and honestly it annoyed me for YEARS that suppliers don’t explain this better. Vellum comes in different weights measured in pounds or GSM (grams per square meter). For belly bands you want something between 29-48 lb text weight or about 110-180 GSM.
If you go too light like 17 lb, it’s gonna feel flimsy and won’t hold its shape around the cards. Too heavy like 65 lb cover weight and it won’t wrap smoothly—it’ll be stiff and awkward. The sweet spot is 30-40 lb for most projects.
There’s also different finishes. Clear vellum is the most popular—it’s completely translucent. Frosted vellum has a slightly cloudy appearance which can be really pretty if you want more privacy for what’s underneath. Metallic vellum exists too with shimmer embedded in it but I’d save that for other invitation elements because it can look busy as a wrap.
Oh and one time my cat knocked over an entire box of vellum sheets and they scattered everywhere and because they’re so light and staticky they stuck to literally every surface in my office. Took me an hour to collect them all. Anyway.
Where to Buy Vellum
You can get vellum from paper suppliers like Paper Source, LCI Paper, or online from Cards & Pockets. For DIY brides I always recommend ordering sample packs first because vellum photographs really differently than it looks in person. What seems perfectly clear online might have a yellow or blue undertone that clashes with your invitation colors.
Measuring and Cutting Your Belly Bands
Alright so here’s the math part but don’t panic. You need to measure the perimeter of your stacked invitation suite. Stack everything together how you want it arranged, then measure around the middle with a flexible measuring tape. Let’s say your suite is 5 inches wide and 0.5 inches thick when stacked. The perimeter would be (5 + 0.5 + 5 + 0.5) = 11 inches.
Add about 0.5 inches for overlap where you’ll seal the band. So you’d cut strips that are 11.5 inches long. For width, 2 inches is standard but you can go anywhere from 1.5 to 3 inches depending on your invitation size and how much coverage you want.
I use a paper trimmer with a fresh blade because vellum can tear if your blade is dull. Cut slowly and don’t press too hard. Some people prefer a scoring blade first then cutting but honestly for belly bands I just… cut straight through works fine.
If you’re doing like 150 invitations, invest in a good paper cutter or outsource the cutting to a print shop. During that spring 2023 project I mentioned, I cut 200 belly bands by hand with a craft knife and ruler because my paper trimmer broke and I was stubborn about waiting for a replacement, and let me tell you my wrist hurt for days. Don’t be like me.
Printing on Vellum Belly Bands
You can totally print on vellum but it’s trickier than regular paper. Laser printers work better than inkjet because inkjet ink can smudge on vellum’s smooth surface. If you only have an inkjet, you gotta let it dry for like 24 hours and even then be careful handling it.
For laser printing, use a low heat setting if your printer allows it. High heat can curl or even melt vellum. Print a test strip first—always. I can’t stress this enough.
What to print on your belly band? Common options include the couple’s names, wedding date, monogram, a decorative pattern, or a meaningful quote. Keep text centered and simple because the band isn’t that wide. I usually recommend one or two lines maximum.
Font size matters too. Nothing smaller than 14pt or it’ll be hard to read through the translucent material. I learned this the hard way when a groom insisted on 10pt text for their entire wedding poem on the belly band and it just looked like a blurry mess. Sometimes you gotta push back on client ideas even when they’re paying you.
Alternative Printing Methods
If printing isn’t working, consider these options. Calligraphy looks stunning on vellum with the right ink—I recommend Finetec gold or white ink. Foil stamping is gorgeous but requires professional equipment or outsourcing. Letterpress on vellum is tricky because vellum is delicate but some specialty printers can do it. Or you can use adhesive foil sheets with a laminator which is a DIY method that actually works pretty well.

Assembling the Belly Band Around Your Suite
Stack your invitation pieces in order. Typically the main invitation goes on bottom (face up), then you layer additional cards on top. Some planners put the RSVP card on top, some tuck it behind. There’s no universal rule so do what looks best.
Wrap the vellum belly band around the middle of the stacked suite. The overlap should be on the back (the side that faces down when someone picks it up). This keeps the front looking clean.
Now for securing it—you’ve got options. Clear stickers or glue dots are most common. I prefer glue dots because they’re less visible and don’t yellow over time like some stickers can. Put one small glue dot at each end of the overlap.
Double-sided tape works too but can be visible if not placed carefully. Some people use a wax seal over the overlap which looks amazing and adds that vintage touch… though it adds cost and time obviously.
There’s also clear label stickers that you can have custom printed with names or monograms that serve both as decoration and closure. Those are kinda genius actually.
Design Ideas and Customization
So beyond just a plain wrap, you can get creative. Botanical illustrations printed on vellum look incredible—eucalyptus, ferns, wildflowers, whatever matches your wedding flowers. Geometric patterns work for modern weddings. Watercolor washes give a soft romantic vibe.
You can layer vellum too. Like a printed vellum belly band over a colored cardstock belly band creates dimension. Or use two thinner vellum strips instead of one wide one for a striped effect.
Some couples add embellishments. A small dried flower tucked under the band. A silk ribbon bow on top of the band. A metal charm or tag attached with twine. Just be careful about bulk if these are going in envelopes.
Color-wise, vellum comes in subtle tints—blush, champagne, gray, sage. These can coordinate with your wedding colors while maintaining that translucent quality. Though honestly clear/white vellum is the most versatile and…
Common Problems and How to Fix Them
Vellum curls. It just does. Especially if you’re printing on it or if humidity is high. Store it flat with weight on top. If it’s already curled, you can try gently rolling it the opposite direction or placing it under heavy books overnight.
Fingerprints show on vellum like crazy. Wear cotton gloves when handling large quantities or keep your hands super clean and dry. I keep a microfiber cloth nearby to gently wipe away oils if needed.
The belly band won’t stay in place. You probably didn’t use enough adhesive or the suite is too thick. Add a second glue dot or try a stronger adhesive. Sometimes wrapping the band slightly tighter helps too.
Text looks blurry when printed. This usually means your printer settings are wrong or the vellum is too thin. Try a heavier weight vellum or adjust your printer to “transparency” or “vellum” mode if it has one.
The edges look rough after cutting. Your blade is dull. Replace it. Or use a metal ruler and cut against a cutting mat with a very sharp craft knife. One smooth motion is better than sawing back and forth.
Pricing and Budget Considerations
If you’re DIYing this, vellum costs about $0.50-$1.50 per sheet depending on quality and where you buy it. You can usually get 4-6 belly band strips from one 8.5×11 sheet. So materials cost per invitation is pretty minimal—maybe $0.25-$0.40 each.
The real cost is time. Cutting, printing, assembling—it adds up. For 100 invitations, plan on at least 3-4 hours if you’re efficient. More if you’re adding custom elements or if anything goes wrong.
Hiring it out? A stationery designer will charge anywhere from $2-$8 per invitation for belly band design and assembly depending on complexity and their market. Worth it if you don’t have the time or equipment.
Envelope Considerations
Vellum belly bands do add a tiny bit of thickness to your suite. Usually it’s fine for standard envelopes but if you’ve got a really thick multi-card suite, you might need to size up your envelope. A 5×7 invitation might need an A7 envelope instead of the exact-fit option.
Test your fully assembled invitation in the envelope before ordering 150 envelopes. Seriously. I once had a bride who didn’t test and the envelopes were too tight and we had to reorder which delayed everything by two weeks and she was NOT happy.
Also consider postage. The vellum itself is light but the overall thickness might bump you into a higher postage tier. Take a fully assembled invitation to the post office and have them weigh it before you buy stamps in bulk.
Alternatives If Vellum Isn’t Working
Sometimes vellum just isn’t the right choice. If your invitation design is super intricate and colorful, a translucent wrap might compete with it visually. In that case, try a solid colored paper belly band or even a fabric ribbon instead.
If you’re struggling with vellum printing, consider leaving the belly band blank and adding a printed sticker or wax seal as the decorative element. Sometimes simpler is better anyway.
Glassine is another option—it’s similar to vellum but slightly different texture. More like wax paper. Can work well for certain aesthetics though it’s less common for wedding invitations.
Timing Your Production
Don’t wait until the last minute. Vellum can be finicky and you’ll probably need to do test runs. Order supplies at least 6-8 weeks before you need to mail invitations. Assemble everything 2-3 weeks before your mail date.
If you’re doing this for a client, build in buffer time. Things go wrong. Printers jam. Vellum gets damaged. You run out of glue dots at 11pm on a Sunday and stores are closed and you’re stress-eating pizza while watching old episodes of The Office instead of working. Not that this happened to me or anything.
I always order 10-15% extra supplies to account for mistakes and last-minute guest additions. Better to have leftover vellum than to scramble for more halfway through assembly and find out your supplier is backordered for three weeks.