Planning Guides, Style Guide
Bridal Tea Invitations: Afternoon Tea Party Cards
May
Getting Started With Bridal Tea Invitations
So bridal tea invitations are actually way more specific than regular bridal shower invites and honestly I learned this the hard way back in spring 2023 when a bride’s mother called me literally crying because the invitations her daughter ordered said “bridal shower” but they were planning this whole elaborate afternoon tea situation with tiered stands and proper tea service. The vibe was completely wrong and we had to scramble to get new ones printed.
The main thing with afternoon tea party cards is they need to communicate formality level immediately. Like, guests need to know if this is a casual tea-and-cookies thing or if they’re supposed to show up in semi-formal attire ready for a proper three-tiered service. You gotta be super clear about this upfront because nobody wants to be the person who shows up in jeans when everyone else is wearing sundresses and fascinators.
Wording That Actually Works
The wording for tea invitations is different from standard bridal shower invites. Instead of “You’re invited to celebrate” you want something like “Please join us for an Afternoon Tea in honour of” or “You are cordially invited to a Bridal Tea Party.” I always tell clients to use “afternoon tea” specifically if that’s what you’re doing – not high tea, because high tea is actually a working-class dinner thing and people get this mixed up constantly and it drives me absolutely bonkers.
Here’s what needs to be on the invitation no matter what:
- The bride’s full name (or just first name if it’s super casual)
- Date and time – be specific like “2:00 PM to 4:00 PM” because tea service has a natural timeframe
- Full address of the venue
- RSVP details with a deadline at least 2 weeks before
- Dress code if there is one
- Registry information (though some people put this on a separate insert)
One thing that really matters is the time specification. Afternoon tea is traditionally 3:00 to 5:00 PM but I’ve done successful tea parties anywhere from 1:00 to 4:00 PM. Just make sure you‘re not scheduling it at like 11:00 AM because that’s more brunch territory and the whole vibe shifts.
Design Elements To Consider
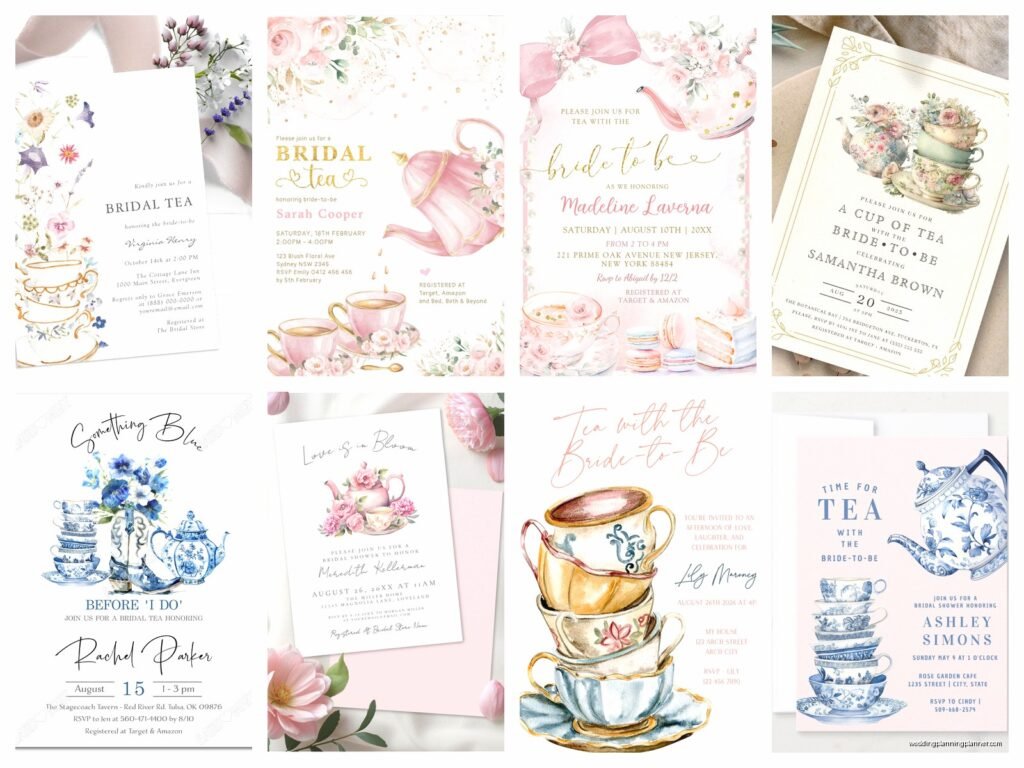
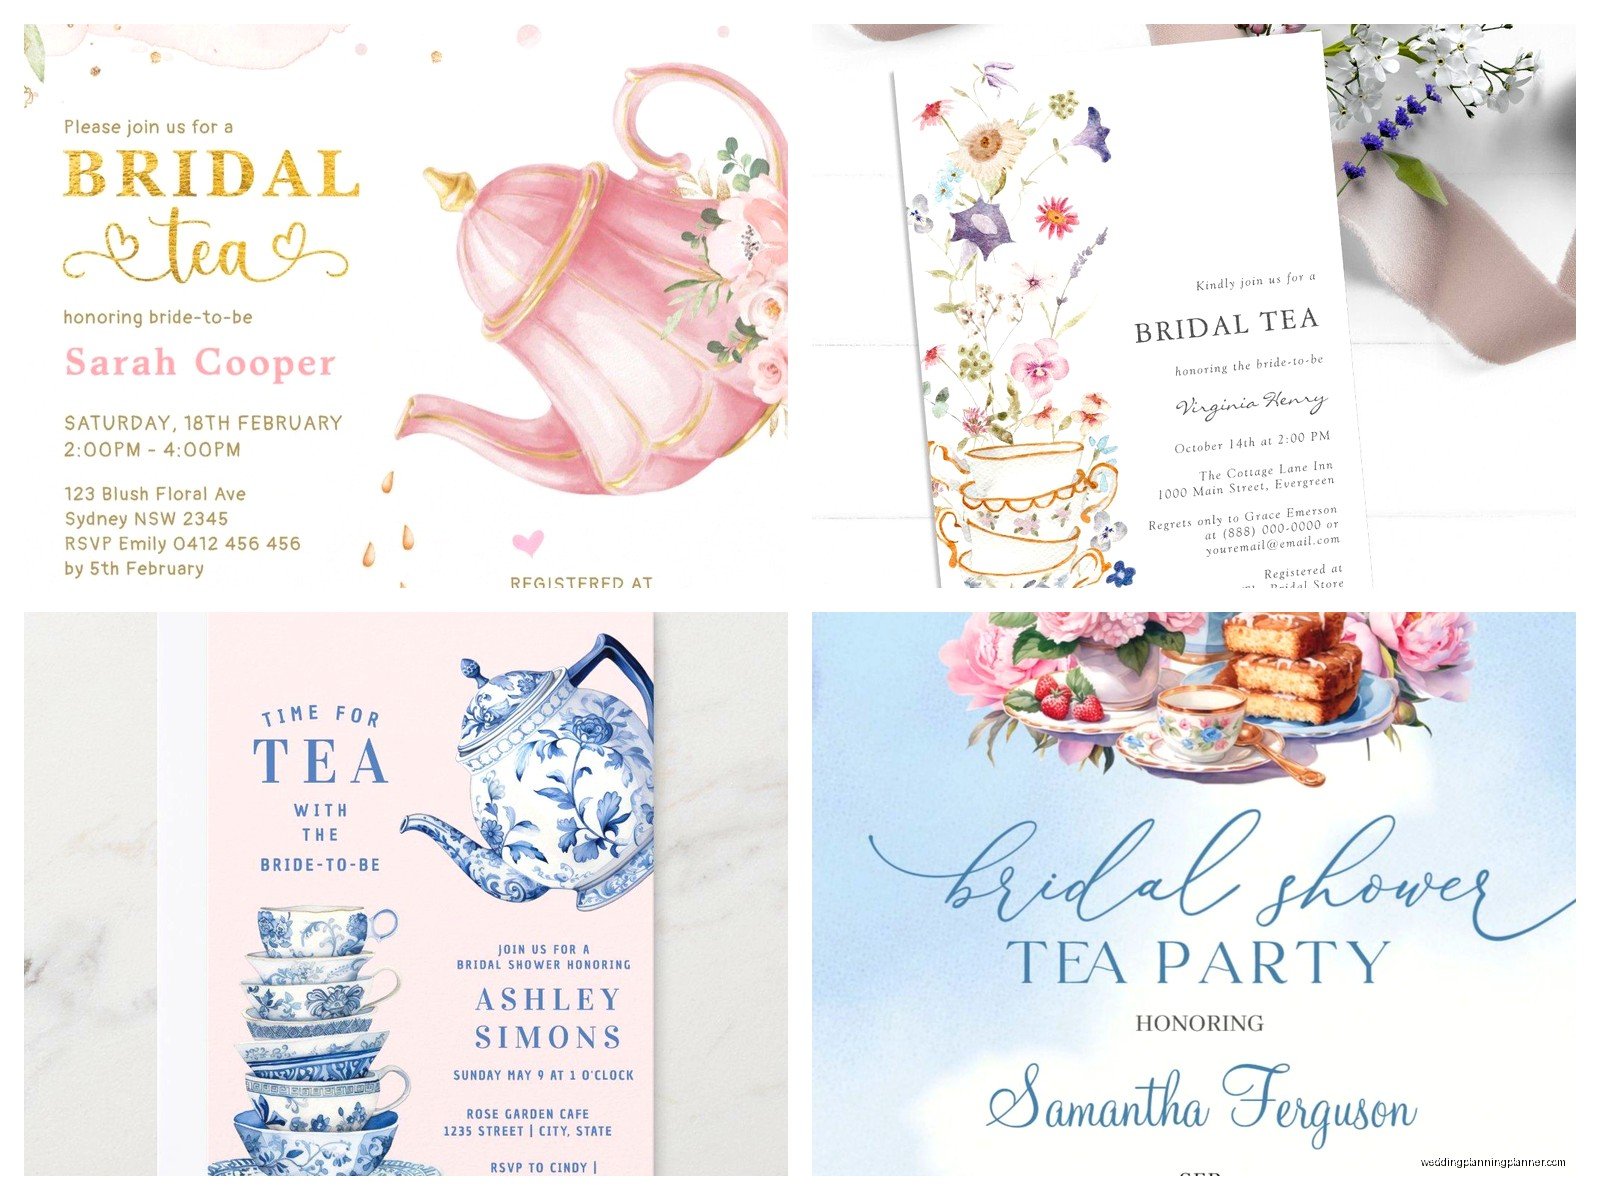
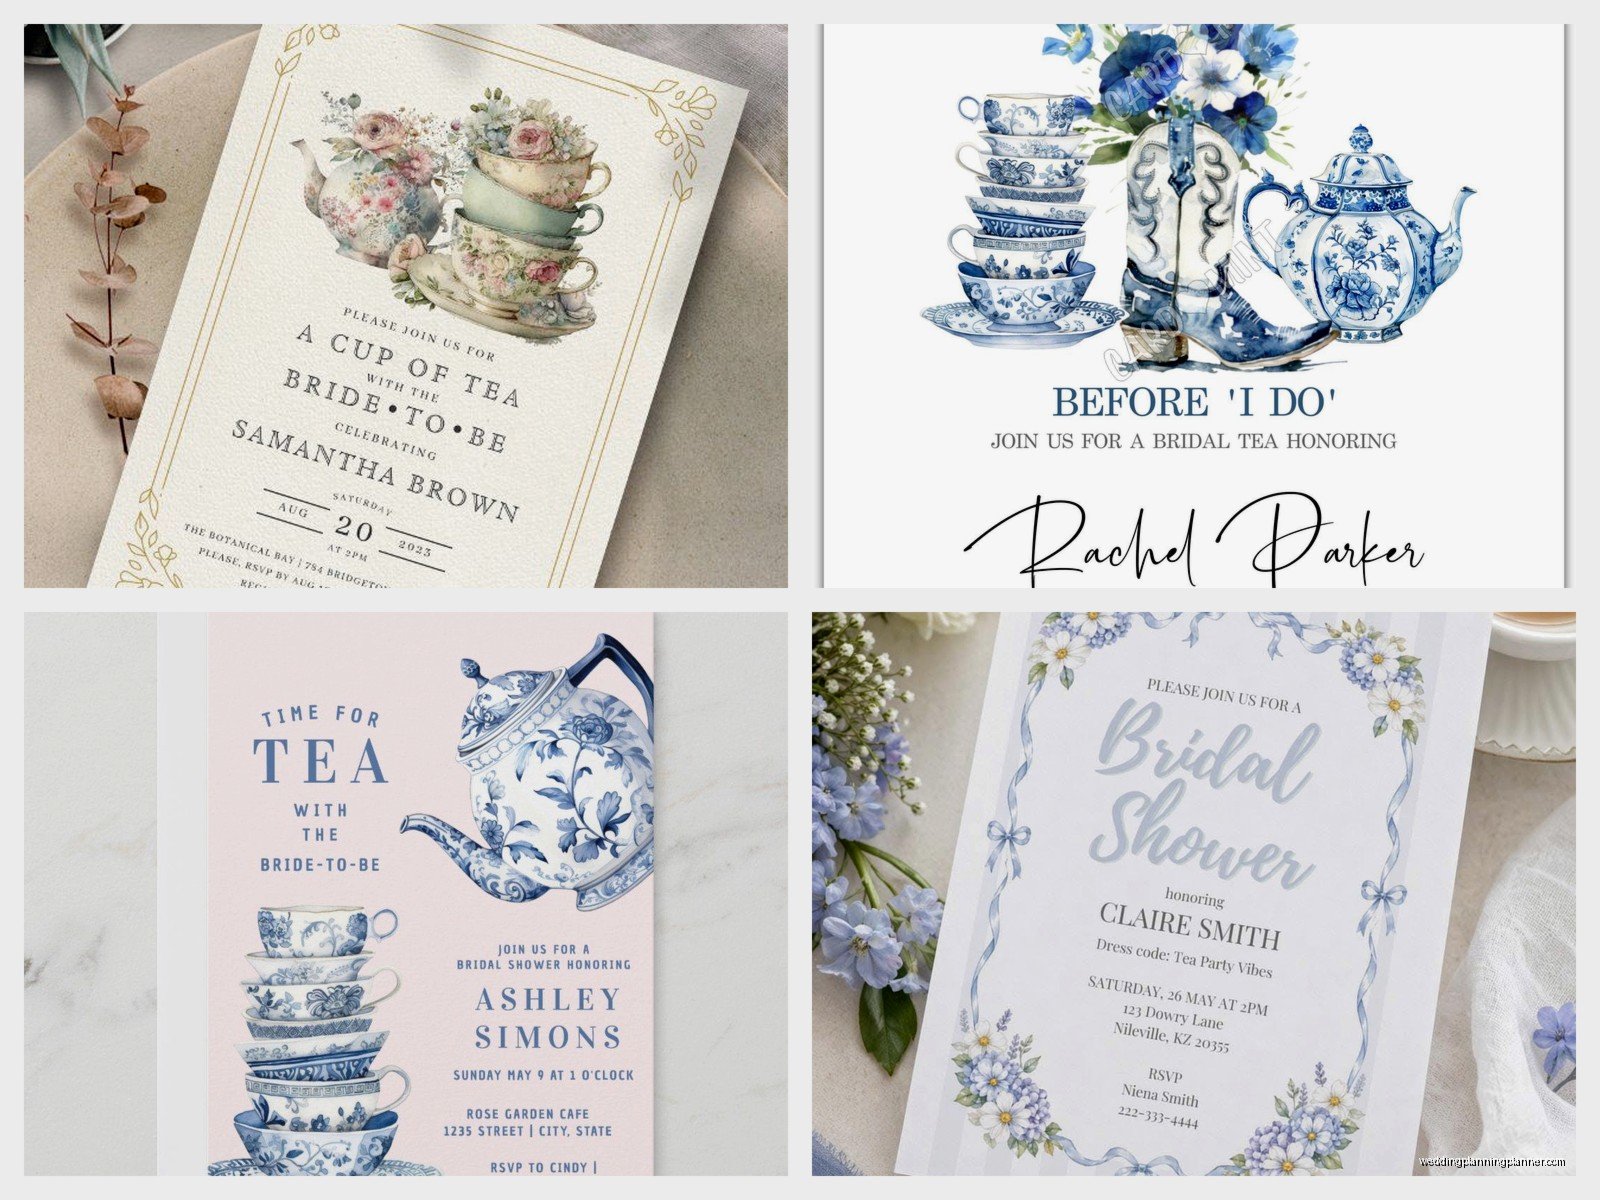
Okay so design-wise, tea party invitations have some pretty established visual language. You’re looking at florals, teacups, teapots, delicate patterns, watercolor effects, or vintage china illustrations. But here’s where it gets tricky – you don’t want it to look like a little girl’s tea party unless that’s specifically the theme.
I worked with this bride in summer 2021 who wanted a garden tea party and she initially picked these invitations with cartoon teacups that looked like something from a children’s birthday party. We switched to invitations with botanical illustrations and gold foil accents and suddenly the whole thing felt elegant instead of… I don’t know, like we were celebrating a six-year-old’s birthday.
Color schemes that work really well:
- Blush pink with gold or rose gold accents
- Sage green with cream and white
- Lavender and silver
- Classic cream with navy or forest green for a more sophisticated look
- Mint green with coral (very spring/summer)
The paper quality matters more for tea invitations than almost any other bridal event invitation. You want a nice cardstock, at least 110 lb, because it needs to feel substantial. Matte finishes work beautifully, or a subtle shimmer. I’m not huge on glossy for tea invitations because it feels too modern for the traditional vibe, but that’s just my preference and you can obviously do whatever.
Format and Size Options
Standard invitation sizes are 5×7 inches but for tea parties I actually really like 5.5×8.5 or even square 5.5×5.5 invitations. The square ones are gorgeous but they cost more to mail because they’re not standard size, so just factor that into your budget.
Formats you can choose from:
- Single card – just one flat card with all the info
- Folded card – opens like a greeting card, lets you put a nice message inside
- Invitation suite – main invite plus RSVP card, details card, maybe a recipe card or tea blend card as a cute extra
- Postcard style – more casual and cheaper to mail but doesn’t feel as special honestly
- Pocket fold – very formal, has a pocket that holds all the inserts
If you’re doing a full invitation suite, which I usually recommend for afternoon tea because it just feels more appropriate to the formality level, you’ll want the main invitation, an RSVP card with envelope, and maybe a details card that has things like parking information, registry details, or a note about the dress code.
Timing For Sending Invitations
Send these out 6-8 weeks before the event. I know some people say 4-6 weeks is fine but for a tea party specifically, you want people to have enough time to 1) clear their schedule for a weekend afternoon, 2) shop for an appropriate outfit if needed, and 3) not feel rushed about RSVPing.
The RSVP deadline should be 2-3 weeks before the event because you need accurate headcount for food and seating arrangements. Tea parties are harder to wing than like a casual backyard shower because you’re dealing with specific place settings and tiered service portions.
Specific Wording Examples That I Use All The Time
For formal afternoon tea: “You are cordially invited to an Afternoon Tea celebrating [Bride’s Name]. Please join us for tea, finger sandwiches, and sweet treats as we honour the bride-to-be.”
For garden tea party: “Please join us for a Garden Tea Party in celebration of [Bride’s Name]. Enjoy an afternoon of tea, conversation, and laughter surrounded by blooming flowers.”
For casual tea: “Let’s get together for Tea & Treats! We’re hosting a bridal tea for [Bride’s Name] and would love for you to join us.”
For themed vintage tea: “Step back in time for a Vintage Tea Party celebrating [Bride’s Name]. Don your favorite vintage attire and join us for an elegant afternoon.”
Honestly the wording should match your venue and setup. If you’re doing this at a fancy tea room, go formal. If it’s in someone’s backyard with mismatched vintage teacups, you can be more relaxed with the language.
Digital vs. Printed Invitations
Okay so this is gonna be controversial but I actually think printed invitations are pretty much required for a proper afternoon tea. Digital invites are fine for casual events but afternoon tea has this inherent formality that deserves a physical invitation. It sets the tone before anyone even walks through the door.
That said, if budget is tight or you’re dealing with a smaller guest list (like under 15 people), you can do digital invitations that are really well-designed. Use a service like Paperless Post that has beautiful tea party templates, not just a Facebook event or basic Evite. The key is making it look intentional and elegant even if it’s digital.
My cat literally just knocked over my tea while I’m writing this which feels very on-brand for this topic but anyway…
If you’re printing invitations, order at least 10% extra. You’ll need them for last-minute additions, mistakes, or keepsakes. I always order extras because something always comes up – someone’s address is wrong, an envelope gets ruined, the bride decides to invite her coworker at the last minute, whatever.
Envelope Addressing and Assembly
This is where people either go all out or completely phone it in. For afternoon tea invitations, I really recommend at least semi-formal envelope addressing. You don’t need calligraphy necessarily, but don’t just scrawl addresses in ballpoint pen.
Options that work well:
- Professional calligraphy (expensive but gorgeous)
- Digital calligraphy printing (looks like calligraphy but it’s printed)
- Your own nice handwriting in a good pen
- Printed labels with an elegant font – not my favorite but better than messy handwriting
- Return address stamps for the back flap
Use full names and proper titles. “Ms. Sarah Johnson” not “Sarah J.” This is one of those things where the formality of the event should match the formality of the invitation presentation, and yes, that includes the envelope.
For assembly, if you have multiple pieces, the order from bottom to top is: invitation (face up), reception card if you have one, RSVP card face up on top of its envelope (don’t put it inside the envelope), any other inserts. Then everything goes into the main envelope with the printed side facing the back flap so when someone opens it, they see the invitation first.
Special Touches That Make Them Memorable
This is where you can get creative without going overboard. Some things I’ve seen work really well:
- Wax seals on the envelopes – very elegant and not as expensive as you’d think
- Belly bands or ribbon wraps around the invitation
- Vellum overlays with the bride’s monogram
- Tea bag favors attached to the invitation or included in the envelope
- Pressed flower elements (real or printed)
- Vintage postage stamps if you can find them
- Custom monogram or crest design
What drives me crazy is when people add so many embellishments that the invitation becomes bulky and costs extra to mail. Like there’s a point where you need to weigh the thing at the post office because it’s over one ounce and suddenly you’re paying double postage. Just… be reasonable about it or factor in the extra postage cost from the beginning.
Budget Breakdown
Let me give you realistic numbers because invitation pricing is all over the place. For printed afternoon tea invitations:
- Budget option: $1.50-$3.00 per invitation (basic cardstock, simple design, DIY assembly) – you’re looking at maybe $50-$100 for 30-40 invitations
- Mid-range: $4-$7 per invitation (nicer paper, maybe one special element like a ribbon or shimmer, semi-custom design) – around $150-$250 for 30-40 invitations
- High-end: $8-$15+ per invitation (custom design, letterpress or foil stamping, full suite with multiple pieces, calligraphy) – easily $300-$600+ for 30-40 invitations
Don’t forget to budget for postage. Standard stamps are fine but if your invitations are over 1 oz or square-shaped, you’ll need additional postage. And honestly, get the pretty stamps. The USPS has beautiful floral and vintage designs that coordinate perfectly with tea party themes.
DIY vs. Professional Printing
I’ve seen both work beautifully and both fail spectacularly, so here’s my honest take. DIY is great if you have design skills, a good printer, access to quality cardstock, and honestly enough time to do it properly. It’s not actually that much cheaper once you factor in your time, printer ink, paper, cutting supplies, and the inevitable mistakes.
Where DIY makes sense is if you’re doing a smaller event (under 20 people) or if you genuinely enjoy the crafting process. If you’re thinking “ugh I have to make these invitations” then just pay someone to print them. Your time and sanity are worth something.
Professional printing gives you consistent quality, access to printing techniques you can’t do at home (foil stamping, letterpress, embossing), and usually better paper options. Plus they handle the cutting and most offer assembly services or at least sell you pre-cut pieces.
Online printing services I actually recommend: Minted, Zazzle for more budget-friendly options, Shutterfly if you want something simple, or local print shops which sometimes have surprisingly good pricing and you can see paper samples in person.
Common Mistakes People Make
Not proofreading multiple times – I had a client once who sent out 50 invitations with the wrong date and we had to… well, it wasn’t great. Read it yourself, have someone else read it, then read it again out loud.
Forgetting to include an RSVP method – you need either a response card with envelope or very clear instructions to RSVP by email or phone. Don’t just assume people will figure it out.
Making the font too small or too fancy – if your grandmother can’t read it easily, the font is wrong. Elegant doesn’t mean illegible.
Not considering the venue formality – your invitation should match where you’re actually having this party. Don’t send ultra-formal invitations for a casual backyard tea or super casual invites for a fancy tea room.
Ordering too close to the event – printing takes time, especially if you’re doing anything custom. Give yourself at least 8-10 weeks before the event to order invitations, which means you need to have them designed and approved even earlier.
What To Include With The Invitation
Besides the main invitation, consider including a details card with practical information. This can have things like parking instructions, what to expect (will there be games, is it just tea and socializing, etc.), dress code specifics, or even a sweet note from the host.
Some people include registry information directly on a small card. Traditionally this wasn’t done but honestly it’s practical and guests appreciate knowing where the bride is registered. Just keep it simple: “The bride is registered at [Store Name]” or list the website.
If you’re doing a themed tea party, you might include a note about the theme so people can dress accordingly or know what to expect. Like if it’s a hat party, mention that guests are encouraged to wear fancy hats or fascinators.
Another cute option is including a recipe card or tea blend recommendation card that guests can take home. This doubles as a party favor idea and ties into the tea theme really nicely. I did this for a shower where we included the bride’s favorite scone recipe and guests loved having that keepsake.
Etiquette Stuff You Should Probably Know
The host’s name should appear on the invitation as the person inviting guests. This is usually the maid of honor, the bride’s mother, or whoever is actually hosting and paying for the event. It’s kinda rude to put the bride’s name as the host when someone else is throwing the party for her.
If multiple people are hosting, you can list them all: “Jane Smith and Mary Johnson invite you to…” or “The bridesmaids of [Bride’s Name] request the pleasure of your company…”
For addressing envelopes, use proper titles and full names. If you’re inviting someone with a plus-one, address it to both people by name if you know them, or “Ms. Sarah Johnson and Guest” if you don’t. Don’t just write “Sarah Johnson +1” because that looks sloppy.
Children – decide upfront if kids are invited and make this clear. If it’s adults-only, the envelope should only have the adults’ names. If kids are welcome, include “and family” or list the children’s names on the inner envelope if you’re using one.
Send invitations to everyone at the same time if possible. It’s awkward when some people get them two weeks before others and start talking about it. Order all your invitations together, address them all, and mail them in one batch.