Planning Guides, Style Guide
Invitation Card Design Handmade: Design & Ordering Guide
Apr
Okay so handmade invitation cards are having this massive moment right now
Like seriously every third bride I work with wants something “handmade” or “artisanal” and I get it because mass-produced stuff can feel really impersonal. But here’s the thing—handmade doesn’t mean you just grab some cardstock and go wild. There’s actually a process if you want it to look good and not like a middle school art project.
First thing you gotta figure out is whether you’re actually making these yourself or ordering from someone who makes handmade invitations. Because those are two totally different paths and I’ve seen people confuse them. Last spring I had this bride who kept saying she wanted “handmade invitations” and we went through like four consultations before I realized she thought ordering from an Etsy seller counted as making them herself. Which, no judgment, but we had to recalibrate the whole timeline.
If You’re Actually Making Them Yourself
Alright so DIY route. You need supplies first and this is where people underestimate the cost. Cardstock isn’t expensive until you need 150 sheets of it in a specific weight and color. I usually tell people to budget at least $200-300 for supplies if you’re doing like 100 invitations, and that’s being conservative.
- Cardstock (get 110lb or heavier, trust me on this)
- Envelopes that actually fit your card size
- Adhesive—I like tombow glue or double-sided tape
- Cutting tools (paper trimmer is essential, scissors will make you cry)
- Embellishments if you want them (ribbon, wax seals, dried flowers, whatever)
- Printer that can handle cardstock OR access to a print shop
The thing that annoyed me SO much last year was this couple who insisted on making their own invitations but they only had a regular inkjet printer. Do you know what happens when you print 100 invitations on an inkjet? The ink cartridges cost more than just ordering from a professional. Plus the quality was—I’m gonna be honest—not great. Inkjet on cardstock can look streaky and the colors never match what you see on screen.
Design Phase Is Where Everything Falls Apart
You can use Canva for design which is what most people do now. They have wedding invitation templates and you can customize them pretty easily. But here’s what you need to know about designing for handmade cards:
Your margins matter SO much more than digital stuff. If you’re cutting these by hand you need at least a quarter inch margin on all sides, preferably more. I learned this the hard way in summer 2021 when I was helping my sister with her invitations and we designed everything with tiny margins and then when we cut them… half the text was gone on like 30 cards. Had to reprint and recut everything.
Font size needs to be bigger than you think. What looks good on your computer screen will look smaller printed. Nothing under 10pt for body text, and honestly 11-12pt is better. Your older guests will thank you.
Colors print differently than they appear on screen. This is just a fact of life. If you’re going for a specific shade of blush pink or sage green, do a test print first. Actually do like three test prints on the actual cardstock you’re using because paper color affects how ink colors show up.
The Actual Assembly Process
This is where handmade invitations get their charm but also where you’ll lose your mind if you’re not prepared. Set aside way more time than you think you need. Like if you think it’ll take a weekend, block out two weekends.
I always tell clients to do an assembly line approach. Don’t complete one invitation start to finish and then move to the next. Instead do one step for all invitations, then move to the next step. So you’d cut all the cardstock first, then print all the pieces, then glue all the layers, then add all the ribbons, etc.
Get your workspace organized before you start. You need a big table (dining room table works), good lighting, and all your supplies within reach. My cat knocked over an entire jar of wax seal beads once while I was working on a client sample and I’m still finding little gold beads in my carpet.
Layering And Dimension
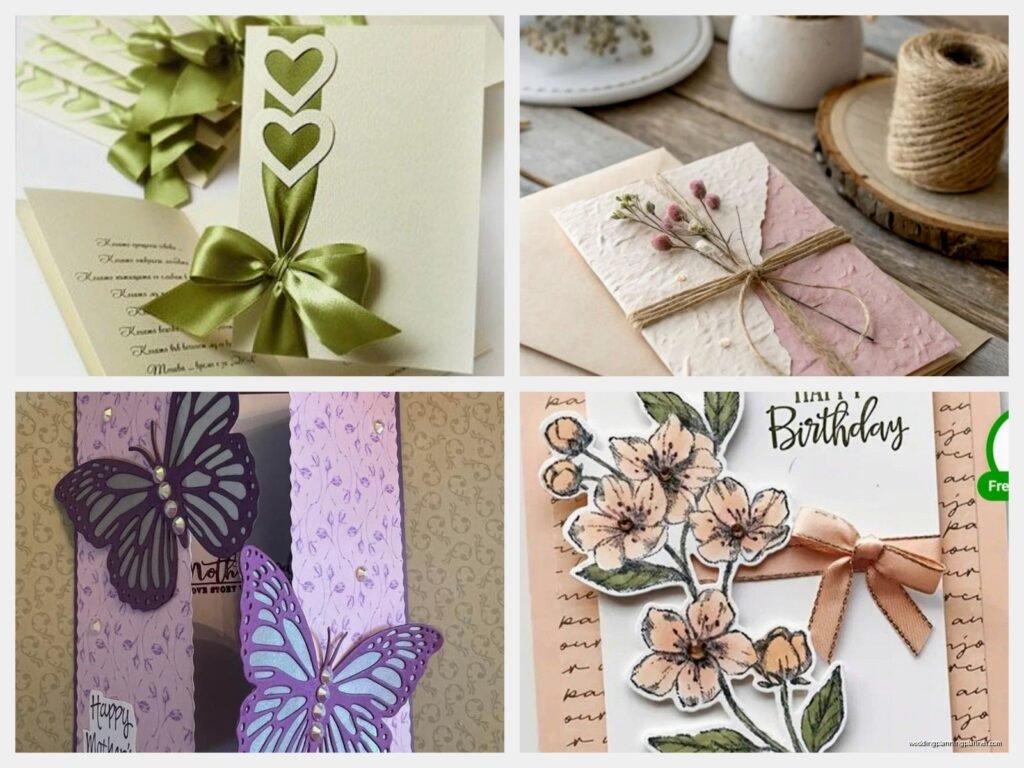
The cool thing about handmade invitations is you can add dimension. Multiple layers of cardstock in different colors, raised elements, textured paper. But each layer adds time and cost.
A basic two-layer invitation (base card plus a printed panel) is manageable. You cut your base cards, cut your top panels slightly smaller, print on the panels, glue them to the base. That’s like… maybe 2-3 minutes per invitation once you get in a rhythm.
But if you start adding ribbon belly bands, wax seals, vellum overlays, dried flowers, those little envelope liners—you’re looking at 10-15 minutes per invitation easily. For 100 invitations that’s like 25 hours of work. Just so you know what you’re getting into.
Wax Seals Deserve Their Own Section
Because everyone wants wax seals now and they’re actually kinda tricky. You can buy a wax seal kit with a melting spoon and wax beads pretty cheap on Amazon. But the technique takes practice and you WILL burn yourself at least once.
The wax needs to be hot enough to melt completely but if it’s too hot it’ll be too thin and won’t hold the seal impression. You gotta find that sweet spot. Also wax seals add weight to your envelopes which can bump you into the next postage tier so factor that in.
Some people use glue gun sealing wax which is easier because you just use a glue gun, but it doesn’t look quite as authentic. Your call on whether the ease is worth the slight difference in appearance.
If You’re Ordering Handmade From Someone Else
This is honestly what I recommend for most people unless you genuinely enjoy crafting and have the time. There are tons of artists on Etsy, independent stationers, and small businesses who specialize in handmade invitations.
Finding The Right Seller
Look at their reviews first obviously but also look at how they respond to questions in the reviews. You want someone who’s communicative because you’ll need to go back and forth on customization.
Check their production time. Handmade stuff takes longer—usually 3-4 weeks minimum, sometimes 6-8 weeks during busy season (April through October). Then add shipping time and the time you need to address and mail them. You should order like 4 months before your wedding date to be safe.
Look at what’s included in their base price. Does it include envelopes? Envelope addressing? RSVP cards? Some sellers list a price that seems great but then every add-on costs extra and suddenly your $3 per invitation is actually $8 per invitation.
Communication With Your Seller
Be specific about what you want but also be open to their suggestions. These people make invitations all day every day so they know what works. If they tell you that your idea won’t print well or won’t hold up in the mail, listen to them.
Send them your color palette, your wedding style, any inspiration photos you have. But don’t send like 47 different inspiration images that all look completely different. Pick 3-5 that really capture your vibe.
Ask about their revision policy upfront. Most sellers include 1-2 rounds of revisions in their price but after that you might pay extra. Get the proof approved before they print everything because once they’ve printed 100 invitations there’s no going back.
Things To Specify In Your Order
You need to tell them:
- Exact quantity (order 10-15% extra for mistakes and keepsakes)
- Card size—this affects postage costs
- Paper type and weight
- Colors—be specific, use color codes if possible
- Text and wording
- Any embellishments you want
- Envelope style and color
- Whether you want envelope liners or addressing
- Your deadline
The wording thing trips people up because invitation wording has all these etiquette rules depending on who’s hosting and whether it’s formal or casual and… that’s a whole other topic but make sure you research proper wording before you finalize your text.
Budget Real Talk
Handmade invitations from a professional seller usually run $5-15 per invitation for something nice. Really elaborate ones with tons of layers and handmade paper and calligraphy can go up to $20-30 each. Which for 100 invitations plus RSVP cards and envelopes you’re looking at like $800-2000 easily.
That seems like a lot but compare it to the time cost of DIY. If you value your time at even $20/hour and it takes you 30 hours to make your invitations, that’s $600 worth of your time plus supplies. Sometimes ordering makes more sense.
There’s also this middle ground option where you order partially assembled invitations and finish them yourself. Like the seller prints and cuts everything and you just add the ribbon or the wax seal or whatever. That can save money and still give you that handmade touch without starting from scratch.
Technical Stuff That Actually Matters
Okay so this is gonna sound boring but it’s important—postage.
Square invitations cost more to mail. Anything over 1 ounce costs more. Anything thicker than a quarter inch costs more. Wax seals sometimes can’t go through the sorting machines and need hand canceling which costs more.
Take a finished invitation to the post office and have them weigh it and tell you the exact postage before you buy 100 stamps. I had a client in 2023 who bought all these custom stamps and then found out her invitations needed extra postage and she had to buy more stamps anyway. Just check first.
Addressing Envelopes
You can hand address them which looks beautiful but takes forever. I can address maybe 10 envelopes an hour in nice handwriting and that’s if I’m focused. For 100 invitations (so 100 outer envelopes plus maybe 100 RSVP envelopes) that’s like 20 hours of work.
You can print labels but they look kinda cheap on handmade invitations honestly. There’s this middle option where you print directly on the envelopes using your printer which looks better than labels but you need to make sure your envelopes will feed through your printer without jamming.
Or you can hire a calligrapher which costs like $2-5 per envelope usually but looks amazing. Some Etsy sellers offer this as an add-on service.
Timeline For DIY Projects
If you’re making them yourself here’s a realistic timeline:
- Design and finalize: 2-3 weeks (you’ll change your mind a lot)
- Order supplies: 1 week for delivery
- Print and cut: 1 weekend
- Assemble: 2 weekends
- Address envelopes: 1-2 weeks
- Mail: 6-8 weeks before wedding
So you should start like 4-5 months before your wedding date. Maybe more if you’re slow or if you can only work on them one evening a week or whatever.
Common Mistakes I See All The Time
Not doing a test assembly before ordering all your supplies. Make one complete invitation first to make sure everything fits together and looks how you want.
Forgetting about RSVP cards and envelopes. Your guests need a way to respond and you need to factor in the cost of postage for the return envelopes too.
Using glitter or confetti. I know it seems fun but your guests will hate you and the post office might hate you too. Glitter gets everywhere and confetti falls out and makes a mess. Just… don’t.
Not accounting for printing bleed. If your design goes all the way to the edge of the card you need to design it with bleed (extra image area beyond the cut line) or you’ll get white edges when you cut.
Choosing a card size that doesn’t have readily available envelopes. Standard sizes are your friend—A7 (5×7), A6 (4.5×6.25), or square 5×5 or 6×6. Custom sizes mean custom envelopes which get expensive.
Storage And Organization
You need a place to store all these invitations once you make them because they can’t just sit in a pile getting bent and dirty. Get some big plastic bins or boxes and keep them flat. Same with supplies while you’re working—keep everything organized or you’ll lose pieces and waste money replacing them.
I actually watched this whole series on Netflix while assembling invitation samples one weekend and it made the time go faster so maybe like queue up some shows or podcasts or something because repetitive tasks are easier with entertainment.
What Makes Handmade Actually Look Handmade
The details. Little imperfections are actually good—they show it’s handmade. But there’s a difference between charming imperfections and sloppy work.
Deckled edges (those rough torn-looking edges) instantly make something look artisanal. You can buy a deckle edge ruler or just carefully tear the paper against a ruler.
Visible texture—handmade paper, cotton paper, linen cardstock. These feel different in your hands and photograph beautifully.
Hand-tied ribbons, real stamps instead of printed postage, actual wax seals instead of stickers that look like wax seals.
Natural elements like dried flowers or leaves but be careful because these add bulk and weight and might not survive the mail journey.
When To Give Up On DIY
If you’re three weeks in and you hate everything and you’ve cried twice and you’re fighting with your partner about invitation assembly… it might be time to just order from someone. Your mental health is worth more than saving a few hundred dollars. I’ve seen people push through and finish their DIY invitations but resent them forever because of the stress.
Also if your wedding is in less than 3 months just order from someone who can do a rush order. You don’t have time for DIY at that point unless you’re having like 20 guests.
Or if you’re genuinely not crafty. Some people just aren’t and that’s totally fine. I can’t bake to save my life so I’m not gonna attempt a DIY wedding cake either you know.