Planning Guides, Style Guide
Vellum Wrapped Wedding Invitations: Translucent Layer
Jun
What Actually Is Vellum and Why Everyone Suddenly Wants It
Okay so vellum wraps are basically this translucent paper layer that goes over your actual invitation and it’s having like a MAJOR moment right now. I’ve been doing wedding stationery since 2015 and honestly the vellum thing exploded around 2019 and hasn’t stopped. It’s this semi-see-through material that can be plain, printed, or decorated and you wrap it around the invitation suite or just place it on top.
The whole point is it adds this ethereal, romantic layer without being too much. You can still see the invitation underneath which is kinda the appeal. Some couples use it to soften bold colors, others use it as an actual design element with printed names or monograms or florals on the vellum itself.
Types of Vellum You’ll Actually Find
There’s regular translucent vellum which is what most people mean when they say vellum. Then there’s frosted vellum which has more of a matte finish, and you’ve got metallic vellum which has shimmer but is still see-through. I had this bride in spring 2023 who was CONVINCED she wanted rose gold metallic vellum and we ordered samples from like four different suppliers because the color varied so much and… honestly it was exhausting but she ended up going with plain vellum anyway because the metallic competed with her foil printing.
Weight matters too. You’ll see 17lb, 29lb, 48lb vellum. The lighter weight is more translucent and delicate but it’s also more prone to tearing and fingerprints which drives me absolutely nuts. The heavier vellum feels more luxe but you lose some of that dreamy transparency.
How to Actually Attach the Vellum Without Losing Your Mind
This is where people get stuck. You can’t just slap vellum on with regular glue because it shows through the translucent paper and looks terrible. I learned this the hard way in like summer 2021 when I tried to use a glue stick for a DIY bride’s sample and it looked… well it looked like a kindergarten project.
The Belly Band Method
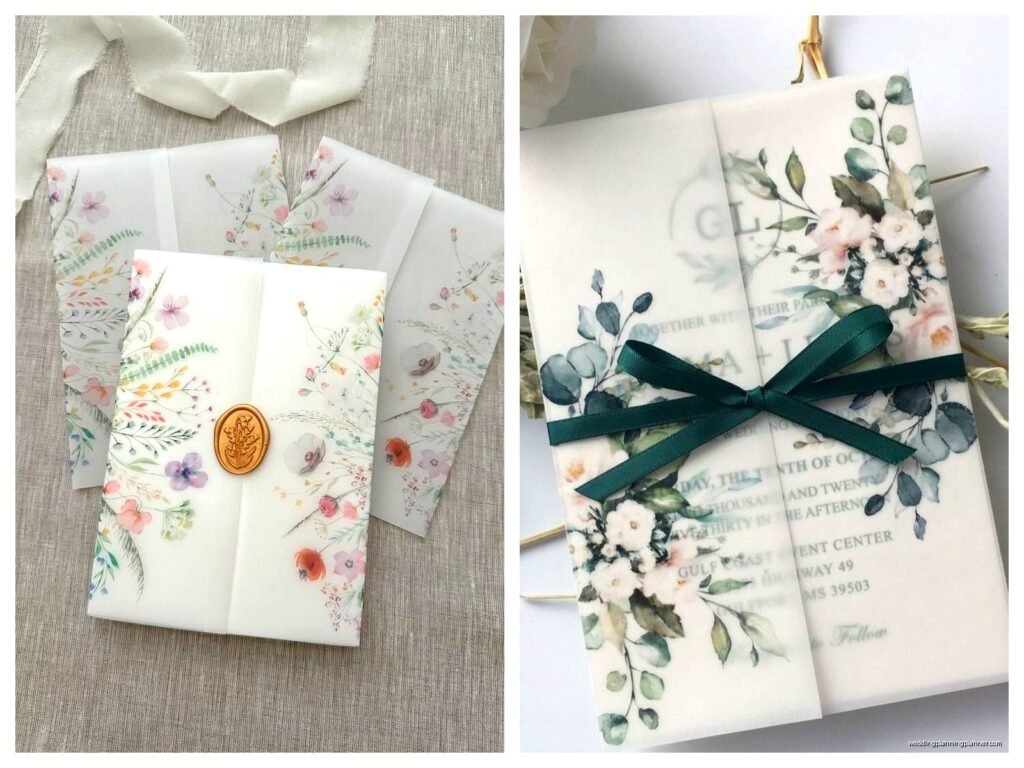
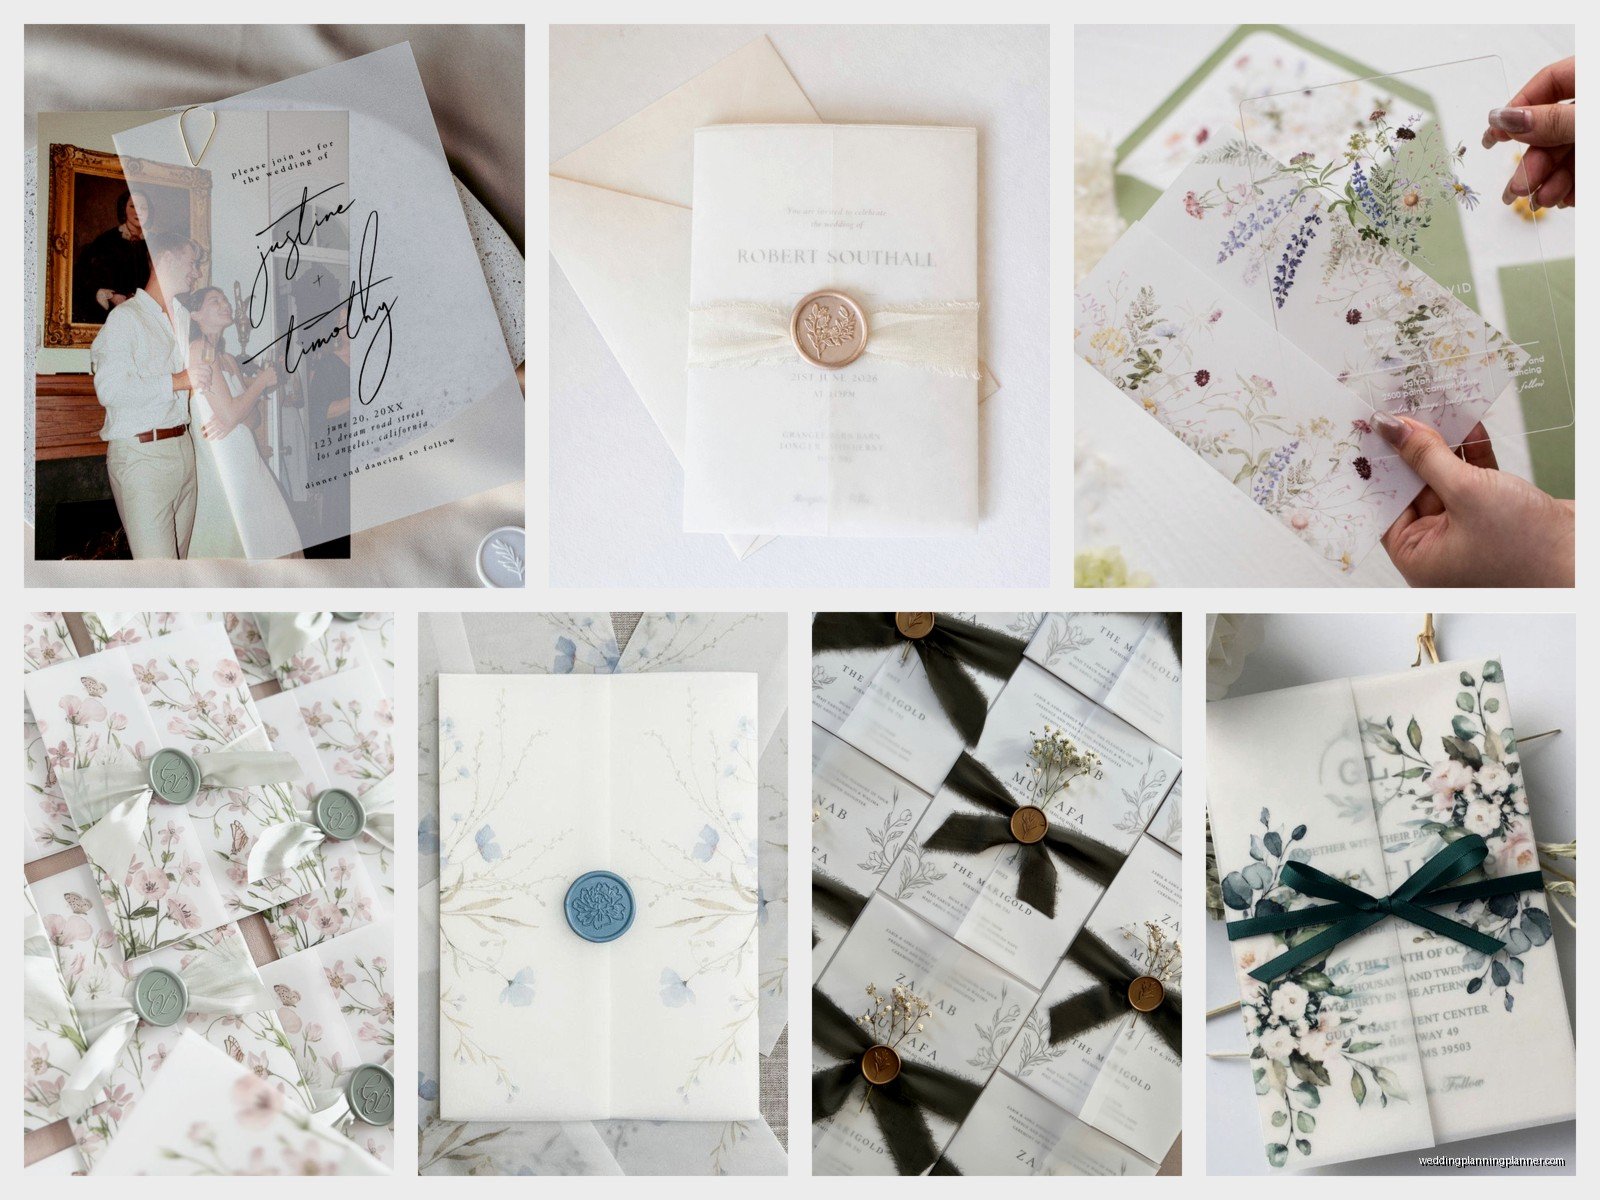
This is probably the easiest and most popular. You wrap the vellum around the entire invitation suite and then secure it with a paper band, ribbon, or twine around the middle. The band hides where the vellum edges meet so you don’t have to attach the vellum directly to anything.
You just cut your vellum slightly larger than your invitation, wrap it around, and then add your belly band. Some people do a paper band with a wax seal, some do silk ribbon, some do that natural twine with a sprig of dried flowers tucked in. The options are kinda endless which is nice but also overwhelming for indecisive couples.
Vellum Jackets or Wraps
Similar concept but the vellum acts more like a jacket. You fold it around the invitation and the fold itself holds it in place, sometimes with a small clear sticker dot on the back where no one sees it. This works better with heavier vellum that holds a crease.
Corner Attachment
You can use tiny clear sticker dots in just the corners to attach vellum to the invitation. The key is TINY dots and only in corners where they’re less noticeable. Some people use photo squares cut into quarters. This method is cleaner looking but you gotta be careful about fingerprints on the vellum.
Wax Seals
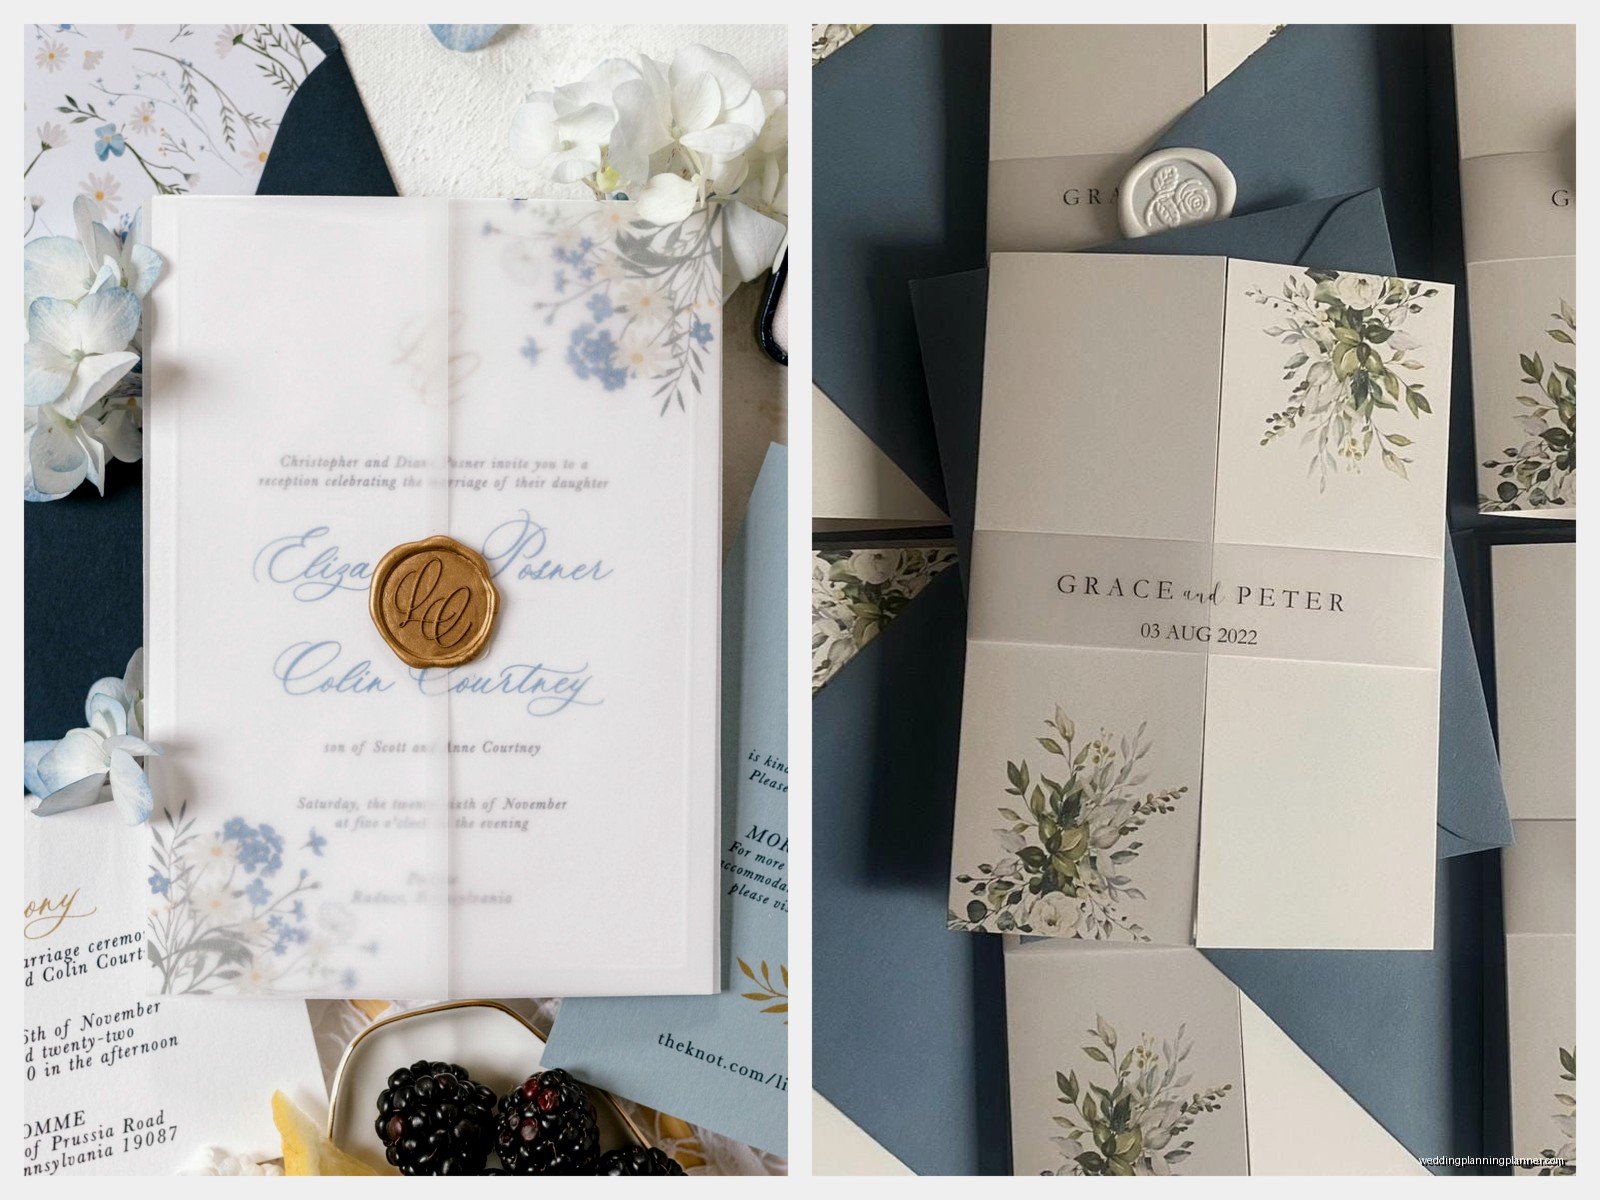
Okay this is my favorite even though it’s more work. You place the vellum over the invitation and use a wax seal to hold everything together. The wax seal becomes both functional and decorative. You can do one seal at the top or bottom, or go fancy with multiple seals.
The annoying thing about wax seals though is they add thickness and weight which means you’re gonna pay more for postage. I always tell couples to make a complete mock-up and actually take it to the post office to weigh it before ordering 150 wax seals because that extra ounce or two really adds up.
Printing on Vellum vs Using Printed Invitations Underneath
You can print directly on the vellum or have the vellum be blank and let the printed invitation underneath show through. Both work but they create different looks.
Printing on vellum is tricky because not all printers handle it well. Laser printers can melt vellum if it’s too thin, and inkjet ink sometimes doesn’t dry properly on the slick surface. I usually recommend having a professional print on vellum if you’re going that route. You can get names, dates, monograms, or even full floral designs printed on the vellum layer.
If you’re DIYing it you’ll want to test your printer first with the exact vellum you’re using. And let it dry completely before touching it or the ink will smudge and you’ll be… well you’ll be starting over which is not fun when you’ve already cut 100 sheets.
Using blank vellum over a printed invitation is easier and honestly just as pretty. The vellum softens the printing underneath and adds that layered dimensional look without the printing headaches.
Color Considerations
Vellum comes in colors beyond just white or cream. You can get blush, grey, navy, even black vellum. Colored vellum over white invitations creates this really cool tinted effect where the invitation looks like it’s bathed in that color.
I had a couple do navy vellum over white invitations with gold foil printing and when you looked at it the whole thing had this moody blue tone but you could still read everything clearly. It was gorgeous and way more interesting than just… navy invitations I guess.
Assembly Tips That Actually Matter
Work with clean hands or those white cotton gloves because vellum shows every fingerprint and oil smudge. I learned to keep baby wipes nearby for wiping down each sheet before assembly which sounds excessive but trust me.
Cut vellum on a proper cutting surface with a sharp blade or paper trimmer. Dull blades create rough edges and tears. You want clean smooth cuts especially since vellum highlights imperfections.
If you’re doing belly bands measure everything first. The vellum needs to wrap around completely with a slight overlap, and your band needs to fit snugly but not too tight or it warps the paper layers. I usually do test assemblies with scrap paper before cutting into the real vellum.
Envelope Considerations
Vellum adds bulk. Even thin vellum adds a layer that affects how the invitation fits in the envelope and how much it weighs. Always do a complete mock-up with envelope and take it to the post office.
Some couples do vellum envelope liners too which looks amazing but again adds weight and cost. You can also get full vellum envelopes which are stunning but kinda impractical because you can’t write on them easily and they’re delicate for mailing.
Oh and speaking of envelopes, if you’re using wax seals on the vellum wrap, the invitation might not fit back into the envelope the same way. Wax seals add like a quarter inch of thickness right where they sit so you might need to go up an envelope size or use envelopes with a side-loading design instead of top-loading.
Cost Reality Check
Vellum isn’t super expensive on its own but it adds up. A sheet of letter-size vellum runs anywhere from 30 cents to over a dollar depending on quality and where you buy it. Specialty vellum with printing or metallic finishes costs more.
Then you’ve got the assembly time. Adding a vellum layer doubles or triples assembly time especially if you’re doing belly bands or wax seals. If you’re hiring someone to assemble, that labor cost increases. If you’re DIYing it, just know you’re gonna spend way more time than you think.
I tell couples to budget about $1-3 per invitation extra just for the vellum and assembly supplies. That doesn’t sound like much but for 150 invitations that’s $150-450 on top of your printing costs.
Common Mistakes I See All The Time
Using glue that shows through. Seriously this is the number one mistake and it ruins the whole translucent effect. Only use clear sticker dots in hidden spots or don’t use adhesive at all.
Not testing the printer. You cannot just assume your home printer will work with vellum. Test it first with the exact paper you’re using or you’ll waste expensive printed invitations.
Forgetting about postage. That extra layer means extra weight and thickness which means extra cost at the post office. Hand-canceling might also be required if you’ve got wax seals or thick belly bands.
Handling vellum with dirty hands. It shows everything. I once watched a bride’s mom eat Cheetos and then touch the vellum wraps and I wanted to cry. Just… don’t do that.
Cutting vellum without a sharp blade creates those stringy torn edges that look unprofessional. Replace your blade after every 30-40 cuts or so.
Design Ideas That Actually Work
You can print just names and date on the vellum in a simple font and let the full invitation show through underneath. This creates a personalized layer without blocking the main design.
Botanical prints on vellum over simple text invitations work really well. The flowers are on the vellum layer and the text underneath stays readable. It’s like the florals are floating over the invitation.
Monogram at the top center of the vellum with a wax seal at the bottom creates this formal elegant look. Very classic, very timeless, very popular with traditional weddings.
Full wrap with contrasting belly band and fresh or dried flowers tucked into the band. This is very organic, garden wedding, slightly bohemian. My cat actually knocked over a bundle of these once during assembly and I had to redo like twenty of them which was… anyway.
Ombre or watercolor printed on vellum over white creates this soft artistic effect. The color is there but muted through the translucent layer.
When Vellum Doesn’t Make Sense
If you’ve already got a super busy invitation design, adding vellum might make it harder to read or just visually cluttered. Sometimes less is more and vellum is an extra layer you don’t need.
Super tight budget situations where every dollar matters. Vellum is beautiful but it’s not necessary and if you’re trying to save money there are other ways to make invitations special.
Very casual weddings or backyard celebrations might not need the formality that vellum brings. Like if you’re doing a BBQ reception, vellum wraps might feel too fancy or disconnected from your vibe.
If you’re already stressed about DIY assembly, adding vellum will stress you out more. It’s fussy and time-consuming and if you’re already overwhelmed just… nah, skip it.
Working With Vendors vs DIY
Professional stationery designers can source better quality vellum and handle printing and assembly which saves you time and potential mistakes. But it costs more obviously.
DIY is totally doable if you’re patient and detail-oriented. Order samples first, test everything, watch YouTube tutorials, and give yourself way more time than you think you need. What you think will take an afternoon will actually take a full weekend or longer depending on your guest count.
Some couples do a hybrid where they order printed invitations professionally but assemble the vellum wraps themselves. This works well because the hardest part (printing) is handled but you still save on assembly labor costs and you can customize as you go.
Just remember that if something goes wrong with DIY you might not have time to fix it before your mail-by date. I’ve had panicked couples contact me six weeks before their wedding because their DIY vellum project failed and they need professional help to salvage it or start over and that timeline is tight and stressful for everyone.
Practical Supplies You’ll Need
Paper trimmer or cutting mat with metal ruler and sharp craft knife. Scissors don’t cut vellum cleanly enough.
Clear adhesive dots or photo squares if you’re attaching directly. Get the smallest size possible.
Belly band material whether that’s cardstock strips, ribbon, twine, or silk. Measure carefully so you order enough.
Wax seal supplies if you’re going that route including wax sticks or beads, a melting spoon, and stamps in your chosen design.
Cotton gloves or just clean hands and patience.
Somewhere clean and flat to work where you can spread out and leave things to dry if needed.
The actual vellum obviously, and I always recommend ordering 10-15% extra to account for mistakes, printing errors, or damage during assembly or mailing.