Planning Guides, Style Guide
Wedding Arbor Plans: Complete Guide
May
So You Want to Build or Choose a Wedding Arbor
Okay first thing – you need to decide if you’re actually building this thing yourself or buying/renting one because that changes literally everything. I had this couple back in spring 2023 who were dead set on DIY-ing their arbor and then two weeks before the wedding they panicked and called me asking if I could find them something to rent. Not fun for anyone involved.
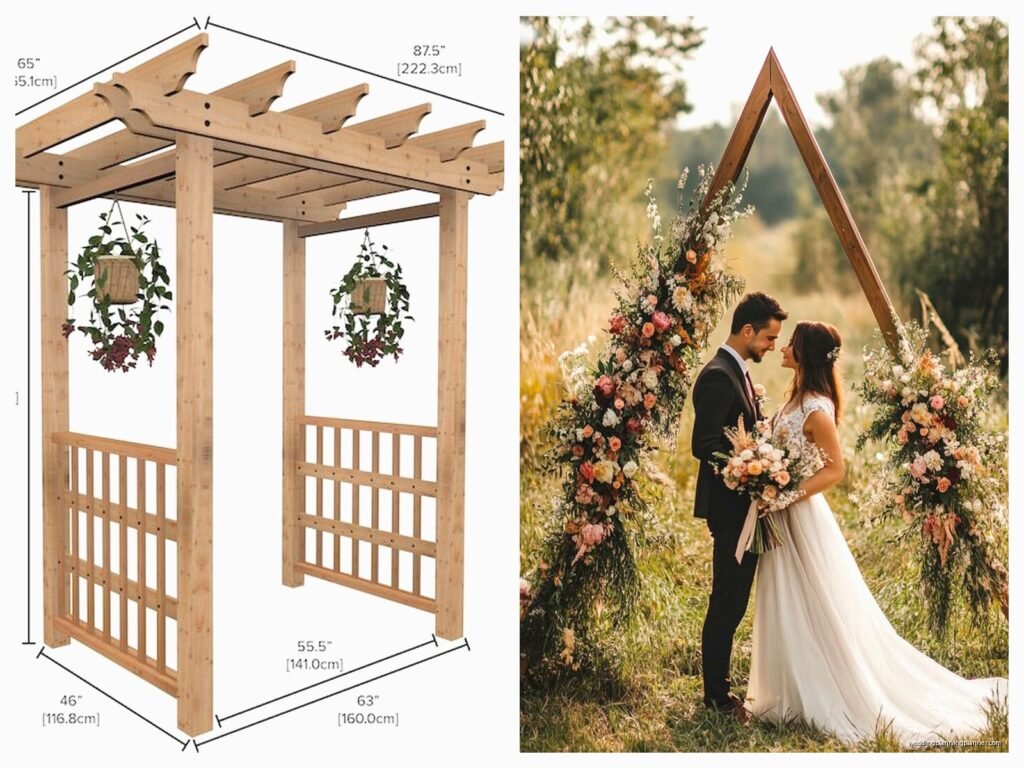
If you’re going the DIY route, measure everything twice. I know that sounds obvious but you’d be shocked how many arbors I’ve seen that are like weirdly short or so tall they look ridiculous in photos. Standard height is around 7-8 feet, width about 5-6 feet. But honestly it depends on your venue and how many people are gonna be standing under it during the ceremony.
Materials You Can Actually Work With
Wood is the classic choice and it’s pretty forgiving if you’re not super experienced with building stuff. Cedar and pine are your best bets – cedar lasts longer if it’s gonna be outside but pine is cheaper. You’ll need four posts (4×4 lumber works great), some crossbeams, and depending on your design, maybe some diagonal support pieces.
Here’s what kinda bugs me though – people always forget about the base. An arbor just standing there without proper anchoring is basically a sail waiting for wind to knock it over during your ceremony. You need either ground stakes if you’re on grass, weighted bases if you’re on concrete or inside, or my personal favorite which is those Christmas tree stand type bases that you can hide with fabric or flowers.
Metal arbors are another option and honestly they’re lighter to move around which is nice. Wrought iron looks elegant, copper piping can give you that modern industrial vibe. The problem with metal is you usually need welding skills or you’re stuck with pre-made kits.
Bamboo is having a moment right now and it’s actually pretty sturdy if you get thick poles. Great for beach weddings or tropical themes. Just make sure you’re lashing it together properly with rope or wire, not just like… hoping it stays together.
Basic Construction Steps for Wood Arbor
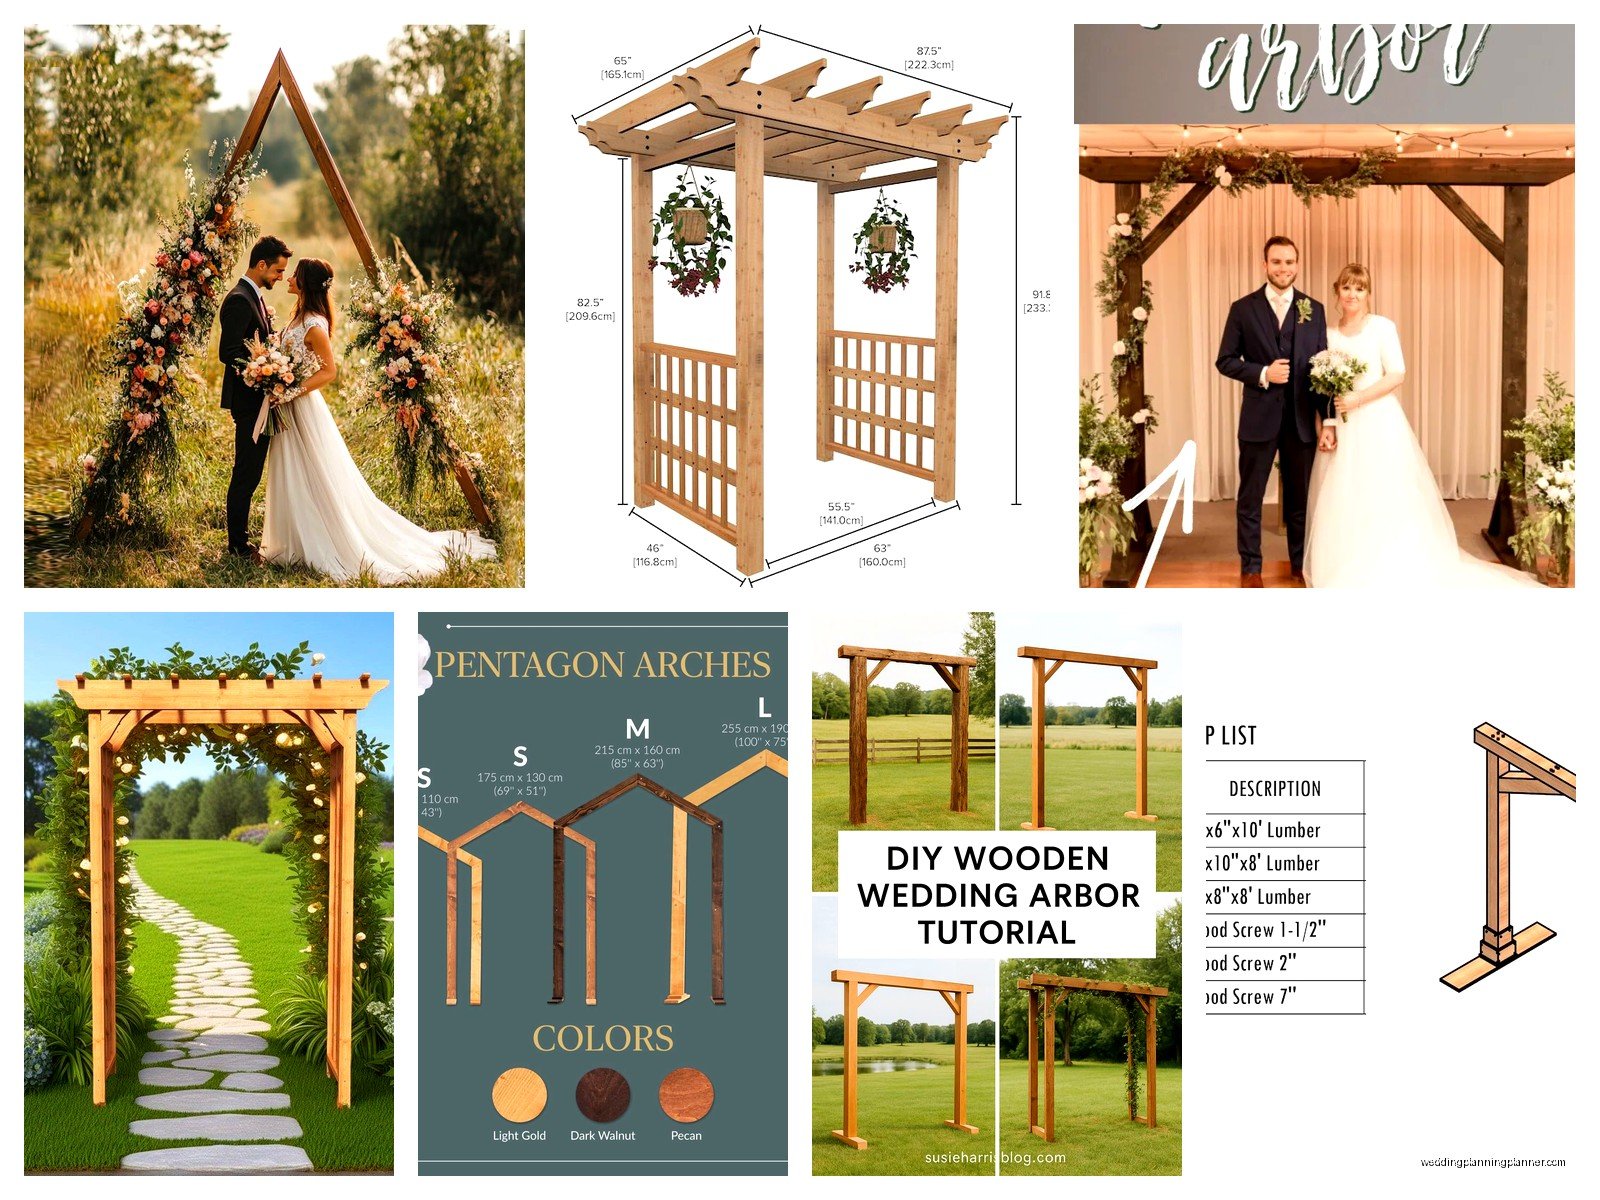
Alright so if you’re building from scratch with wood, here’s the general process. Cut your four vertical posts to height – remember they need to be a bit longer if you’re sinking them into the ground or into bases. Sand everything down because splinters in wedding photos are not the vibe.
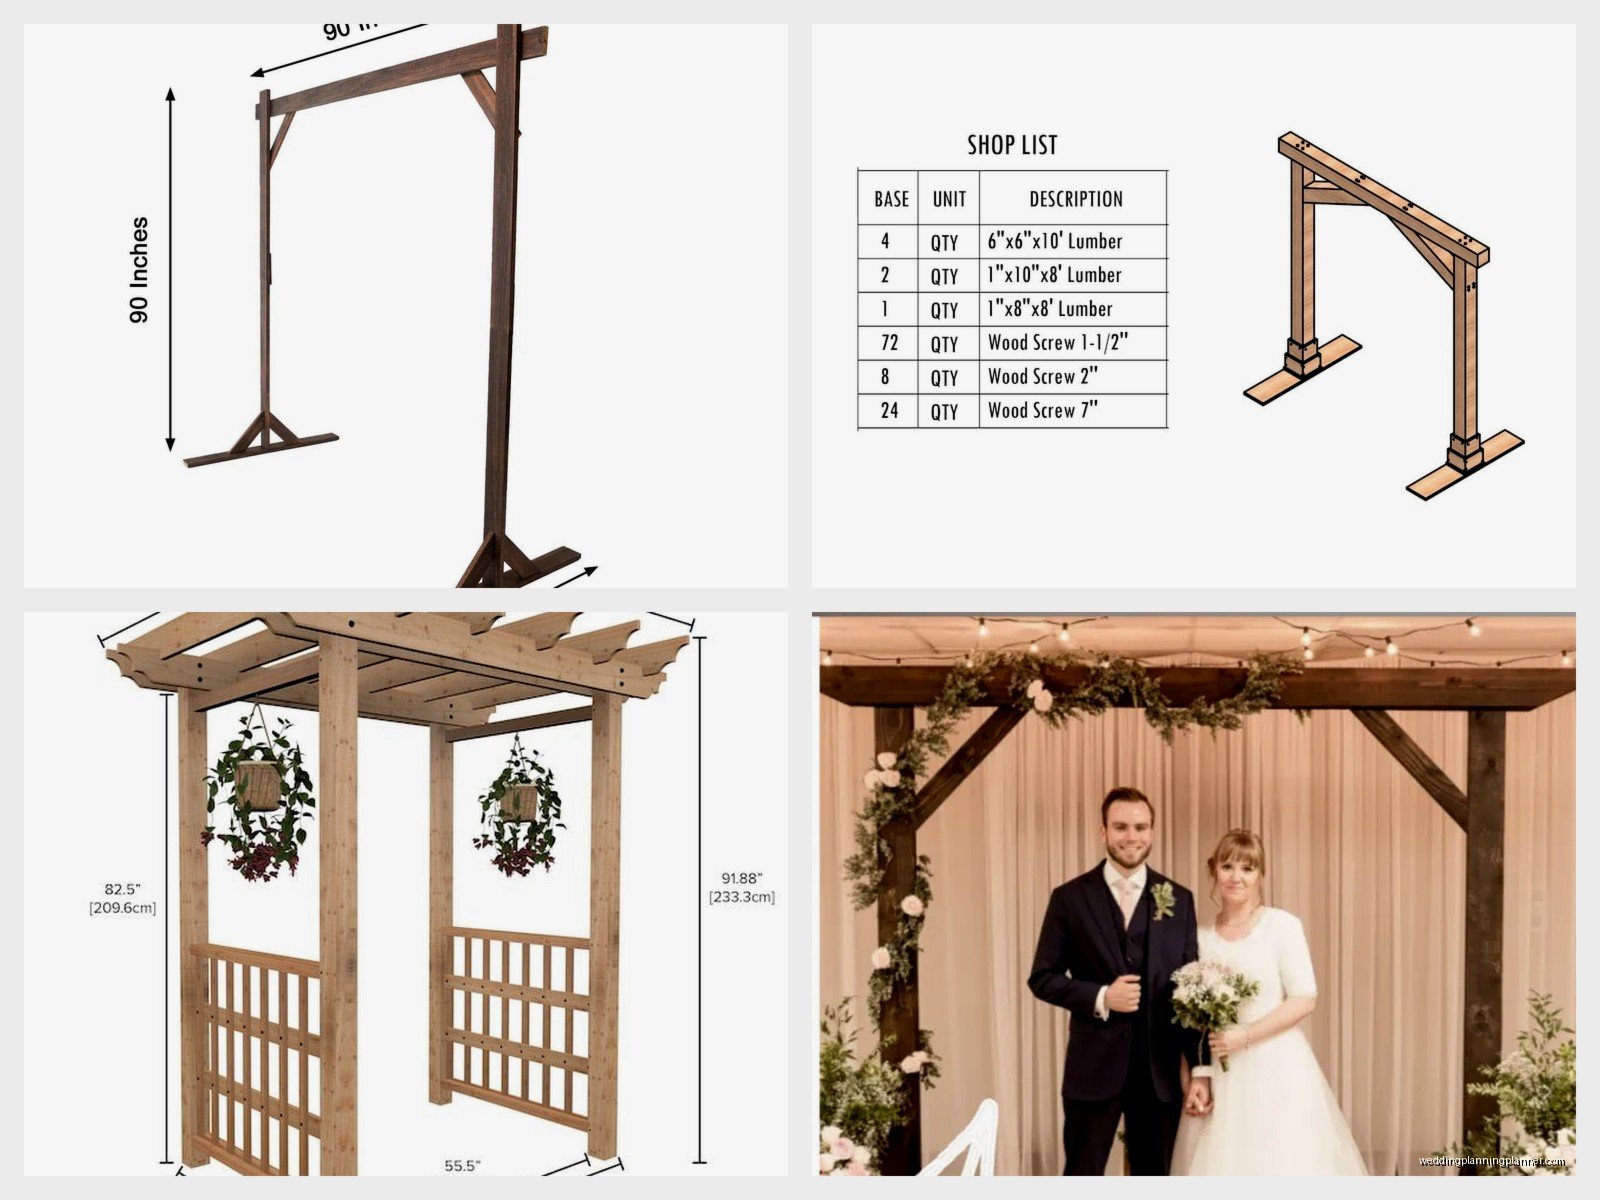
For the top, you’ll want two crossbeams. The front one and the back one should be the same length, usually around 6 feet. You can attach these with wood screws and L-brackets on the inside where nobody will see them. Some people get fancy with mortise and tenon joints but unless you’re really into woodworking, just use the brackets.
The side pieces connecting front to back can be just decorative or they can add structural support. I usually tell people to add at least one crossbeam on each side about a foot down from the top because it makes the whole thing way sturdier and gives you more places to attach flowers or fabric.
Pre-drill your holes before screwing anything together. Wood splits so easily and there’s nothing worse than getting almost done and having a post crack on you.
Painting and Finishing
If you’re painting, do it before assembly if possible. So much easier. White is classic and photographs beautifully but it shows every single dirt mark and scuff. Natural wood stain is more forgiving and has that rustic thing going on.
Weather-proof everything even if your wedding is inside because you might be storing it outside or you might end up lending it to a friend (this always happens). Outdoor polyurethane or weather-resistant paint will save you so much headache.
My cat knocked over an entire can of white paint while I was working on stationery samples for a client last year and I’m still finding tiny white paw prints in weird places, but anyway – point is, protect your work surface and let everything dry completely before you start assembling or you’ll have sticky spots forever.
Decorating Your Arbor
This is where it gets fun but also where budgets explode if you’re not careful. Fresh flowers are gorgeous but they’re expensive and they wilt. For a summer wedding you’re looking at flowers that can handle heat – or you need to decorate like an hour before the ceremony starts.
Greenery is your friend. Eucalyptus, ivy, ferns – they’re cheaper than flowers, they last longer, and they fill space really well. You can weave them through the arbor structure or attach them with floral wire or zip ties (cut off the ends and hide them).
Fabric draping is another classic option. Chiffon, tulle, organza – they all photograph beautifully and they move in the breeze which looks romantic. You’ll need way more fabric than you think though. Like double whatever amount you’re imagining. And you need a plan for attaching it that doesn’t involve just throwing it over the top and hoping, because wind exists.
I usually use a combination of small nails or cup hooks at strategic points, then drape and secure with hidden safety pins or more floral wire. The goal is to make it look effortless while actually being super secured.
Lighting Elements
String lights or fairy lights can transform an arbor for evening ceremonies. Battery-operated ones are easiest but make sure you have fresh batteries and maybe backups. Solar ones are hit or miss – they’re great in theory but if it’s cloudy the day of your wedding they might not charge properly.
Lanterns hanging from the top beam look amazing in photos. Just make sure they’re secured really well because a lantern falling during vows is… not ideal. Been there, witnessed that, it was awkward.
Edison bulbs give you that vintage vibe but they need actual power unless you find battery versions. I’ve seen people use extension cords hidden along the back of the arbor which works fine if you’re near an outlet.
Rental vs Purchase vs DIY Cost Breakdown
Okay let’s talk money because this is usually the deciding factor. Renting an arbor typically runs anywhere from $75 to $300 depending on your area and how fancy it is. The rental company usually delivers, sets up, and takes it away which is super convenient.
Buying a pre-made arbor from somewhere like Home Depot or online – you’re looking at $100 to $500. The cheap ones are kinda flimsy honestly but they work fine if you’re gonna decorate them heavily anyway. The expensive ones are usually metal or really nice wood and they’re actually worth it if you think you might use it again or sell it after.
Building from scratch, materials will run you probably $80 to $200 depending on wood choice and finish. But then you need tools if you don’t already have them, and you need time. I always tell people to factor in their time because spending 10 hours building an arbor when you could be doing other wedding prep… sometimes the rental makes more sense even if it costs a bit more.
Pre-Made Kits
There are tons of kits available now that come with everything you need and instructions. These are honestly a great middle ground. You get the satisfaction of assembling it yourself but you’re not starting from total scratch or trying to figure out measurements.
Just read reviews before buying because some kits have parts that don’t fit together properly or instructions that are confusing. Also check if they include the base/anchoring system or if that’s separate.
Venue Considerations You Can’t Ignore
Some venues have restrictions on arbors – like if you’re in a historic building or a garden with specific rules. Always check before you build or buy something. I’ve had venues that don’t allow anything to be staked into the ground, venues that won’t let you use nails or screws anywhere, venues with ceiling height restrictions.
Indoor arbors can be lighter and less sturdy since there’s no wind to worry about, but you still need proper bases so it doesn’t tip if someone bumps it. Outdoor arbors need to be heavy-duty and properly anchored. I cannot stress this enough. Wind will find a way.
Think about your backdrop too. An arbor against a gorgeous natural landscape or beautiful architecture – amazing. An arbor against a parking lot or dumpster area – you’re gonna want to add a lot more decorative elements or a fabric backdrop.
Transportation and Storage
If you’re building an arbor, make sure it can come apart for transport or that you have a way to move it. A fully assembled 8-foot arbor doesn’t fit in most cars. I learned this the hard way trying to help a bride transport hers in summer 2021 – we ended up needing to borrow a truck at the last minute.
Storage after the wedding is another thing people don’t think about. Where are you gonna keep this thing? Will it fit in your garage? Are you okay with it living in your basement forever? Some couples build them intending to sell after but then get attached or lazy about listing them.
Alternative Arbor Ideas
You don’t have to do the traditional four-post rectangular arbor. Circular arbors are really popular right now – you can make them with hula hoops wrapped in greenery or flowers, or you can buy metal circular frames. They photograph really uniquely.
Triangle or geometric arbors have that modern minimalist thing going on. Copper piping works great for these. You can also do asymmetrical designs where one side is taller than the other or the crossbeam is diagonal instead of straight.
Living arbors using actual trees or large potted plants as the posts – these are stunning but you need big sturdy plants and probably professional help arranging them. The upside is you can plant the trees after the wedding as a cute symbolic thing.
Doorframe arbors using old vintage doors are having a moment. You can lean them against a simple frame structure or attach them to posts. They look amazing for rustic or vintage themed weddings.
Backdrop Walls Instead
Sometimes what people really want isn’t an arbor but a backdrop wall. This is more like a flat panel situation that you stand in front of. Easier to transport, easier to decorate, takes up less space. You can make these with wood frames and fabric, or use those pipe-and-drape systems that photographers use.
Flower walls are incredibly popular but also incredibly expensive if you’re using fresh flowers. There are good artificial flower panel options now that look realistic in photos and you can reuse them or sell them after.
Day-Of Setup Tips
Give yourself way more time than you think you need. Setting up an arbor always takes longer than expected especially if you’re also decorating it on site. I usually tell people to plan for at least 2 hours if you’re doing it yourself with helpers.
Bring extra supplies – extra zip ties, extra floral wire, duct tape (you can get white or clear), scissors, and a small hammer if you’re using any nails or stakes. You will need at least one of these things unexpectedly.
Have someone assigned to check on the arbor throughout the event if it’s outside. Wind picks up, decorations shift, things happen. You want someone who can quickly reattach a draping or straighten a flower arrangement without making a big deal about it.
Take photos of your decorated arbor before the ceremony starts, during golden hour if possible, because once guests arrive and the ceremony happens you might not get that perfect empty shot.
Weather Backup Plans
If there’s any chance of rain, have a plan. Can the arbor move inside? Do you have a tent? Some arbors don’t work well in rain because the decorations get destroyed or the structure gets slippery or unstable.
Extreme heat can wilt flowers faster than you’d think. Shade your arbor if possible before the ceremony or use more greenery and less delicate flowers. Or just embrace the artificial flowers for summer weddings – nobody’s gonna judge and they won’t droop.
Cold weather makes some materials brittle. If you’re having a winter wedding, test your arbor setup beforehand in similar temperatures to make sure nothing cracks or breaks.
Common Mistakes I See All The Time
Making the arbor too small – then the couple plus the officiant are all cramped underneath and it looks weird in photos. Go bigger than you think you need.
Not securing decorations properly and having them fall off mid-ceremony. Test everything, tug on it, make sure it’s actually attached.
Forgetting that people need to walk around the arbor to get to their seats or positions. Leave space on the sides, don’t push it right up against walls or other structures.
Using flowers or greenery that are out of season and paying a fortune for them when there are beautiful in-season options that would work just as well.
Not thinking about what happens to the arbor after the ceremony – does it stay up for photos? Does it need to be moved for the reception? Who’s moving it? When?
Over-decorating to the point where you can’t even see the arbor structure anymore. Sometimes simple is better and you’re just wasting money on extra flowers that aren’t even visible in the final look… or under-decorating and having this bare wooden frame that looks unfinished.
The whole thing is really about balance and planning ahead and not waiting until the last minute to figure out logistics which I know everyone says about every wedding thing but it’s especially true for arbors because they’re big physical objects that need to be built or acquired and transported and set up and it all takes time