Planning Guides, Style Guide
Acrylic Invitations: Clear Modern Statement Designs
May
Okay So Acrylic Invitations Are Having A Moment
Look, acrylic invitations are basically like the iPhone of the wedding stationery world right now – everyone wants them, they look sleek as hell, but nobody really understands what they’re getting into until they’re knee-deep in the process. I had this bride back in spring 2023 who saw ONE acrylic invite on Pinterest and suddenly her entire vision changed, which… fine, but we were already three months into planning with a completely different aesthetic and I had to basically start over with the stationery timeline.
The thing about acrylic invites is they’re not paper. I know that sounds obvious but you’d be surprised how many people don’t think through what that actually means for their budget, their timeline, and honestly their stress levels.
What You’re Actually Getting With Acrylic
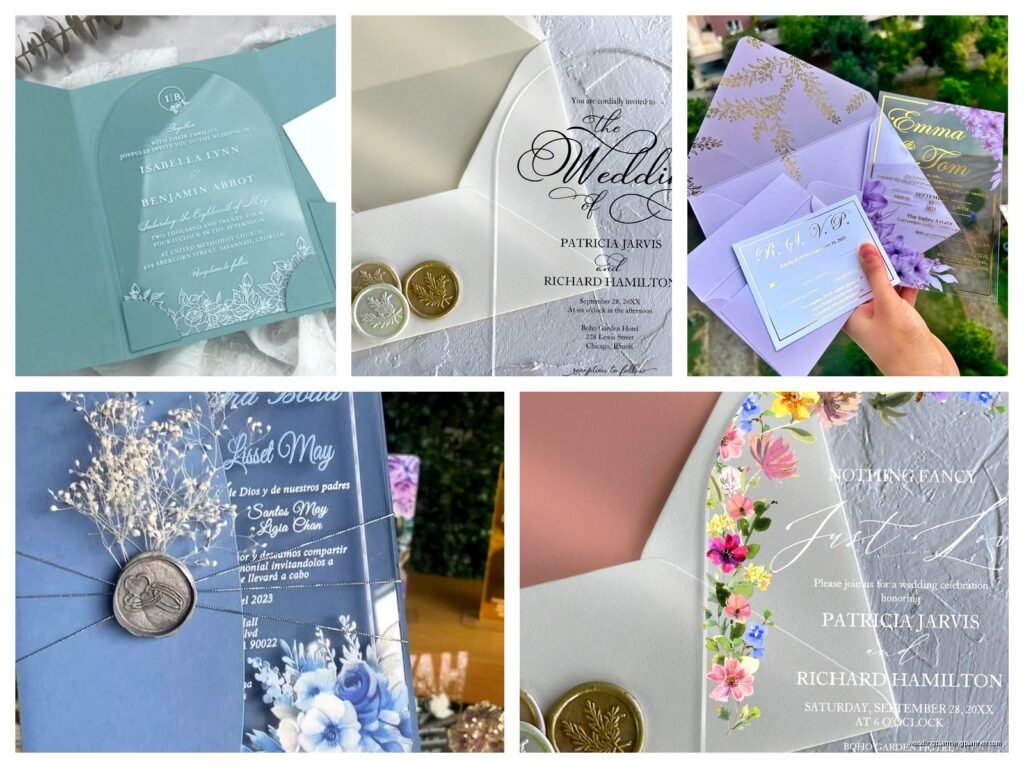
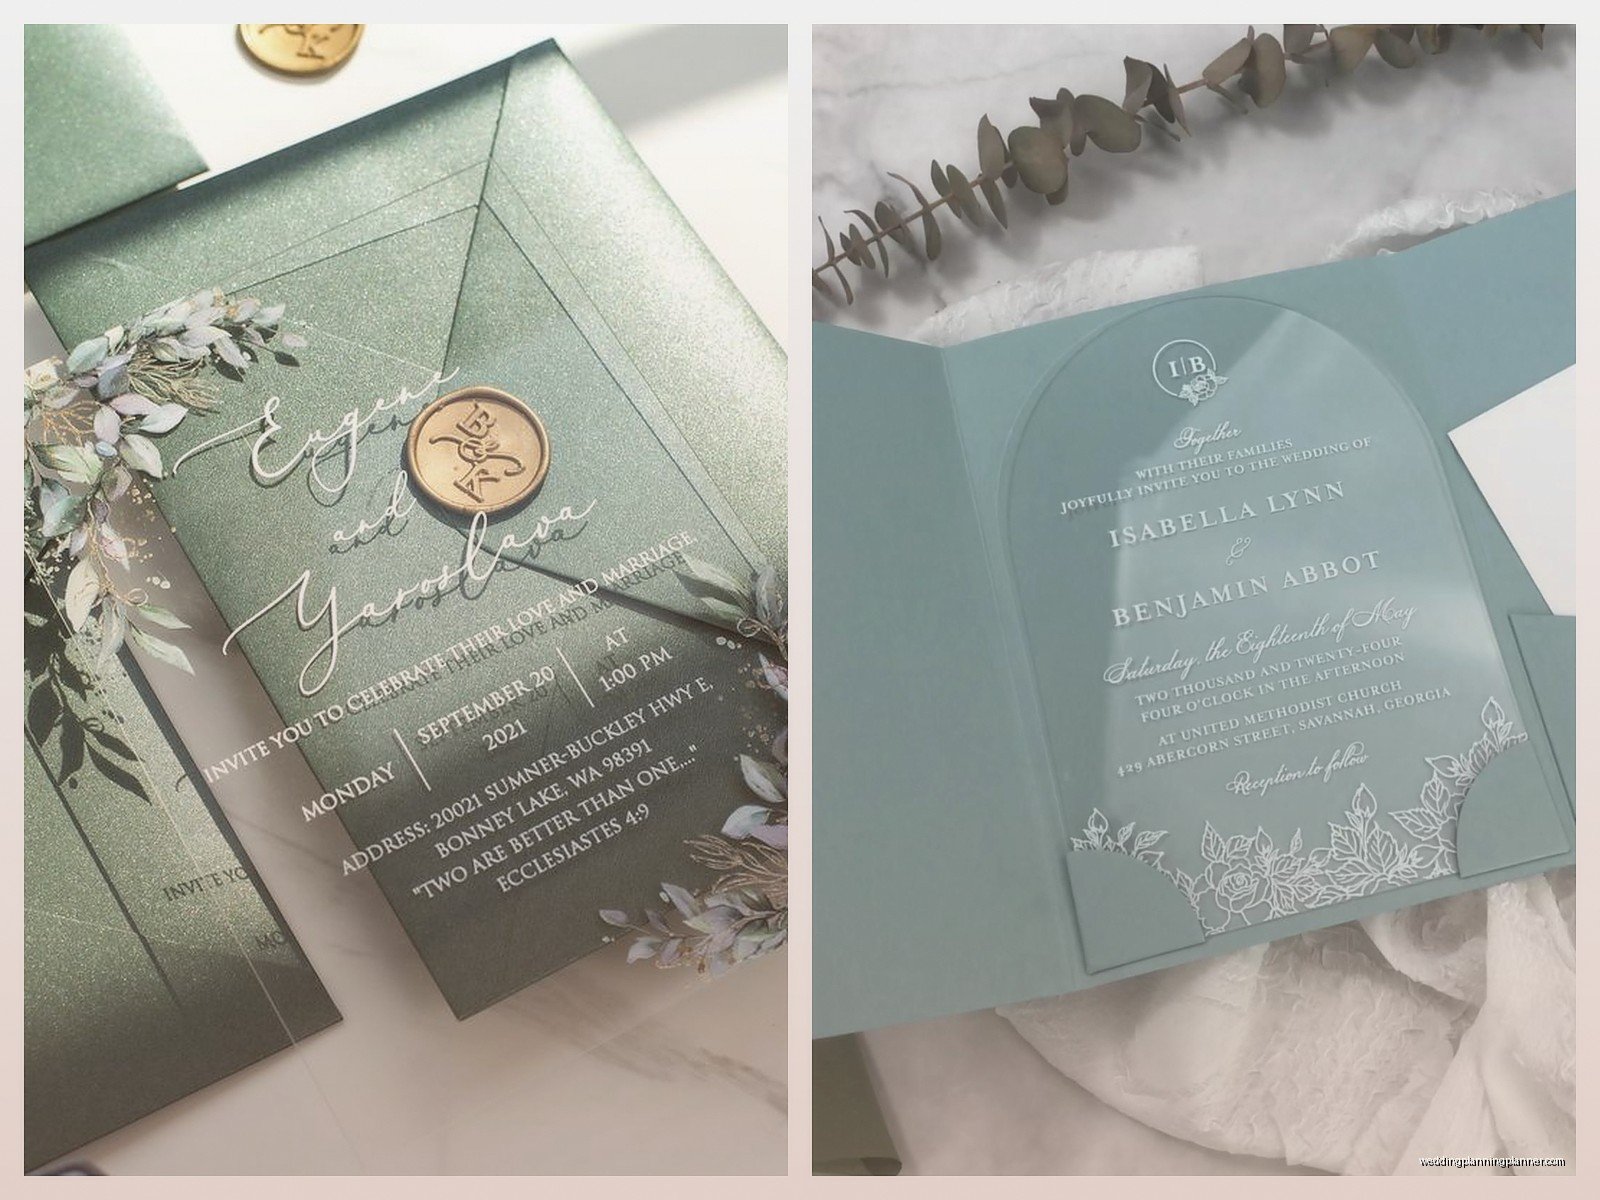
These are clear plexiglass sheets – usually around 1/8 inch thick, sometimes 1/16 if you’re going budget-friendly – with your invitation details printed directly onto the surface. The printing methods vary and that’s gonna affect your whole vibe and cost. You’ve got UV printing (the most common), which lays ink directly on the acrylic and gives you that super crisp modern look. Then there’s engraving, where they actually etch into the acrylic itself, and that’s more subtle and expensive.
The clear modern look is what sells people. It photographs like a dream – light passes through it, you can layer it over colored paper or fabric for photos, and it just screams “we paid attention to details.” But here’s what annoys me: vendors often don’t explain that fingerprints show up on these things like you wouldn’t believe. You’ll spend half your time wiping them down before photos.
Sizing and Shape Options
Standard sizes are usually 5×7 or 4×6 for the main invite. You can do custom shapes – circles, hexagons, arches – but that’s where costs jump because custom cutting is labor intensive. I usually tell clients to stick with rectangles unless they’ve got budget to spare or… actually, if you’re already spending money on acrylic, you’re probably not worried about budget in the first place.
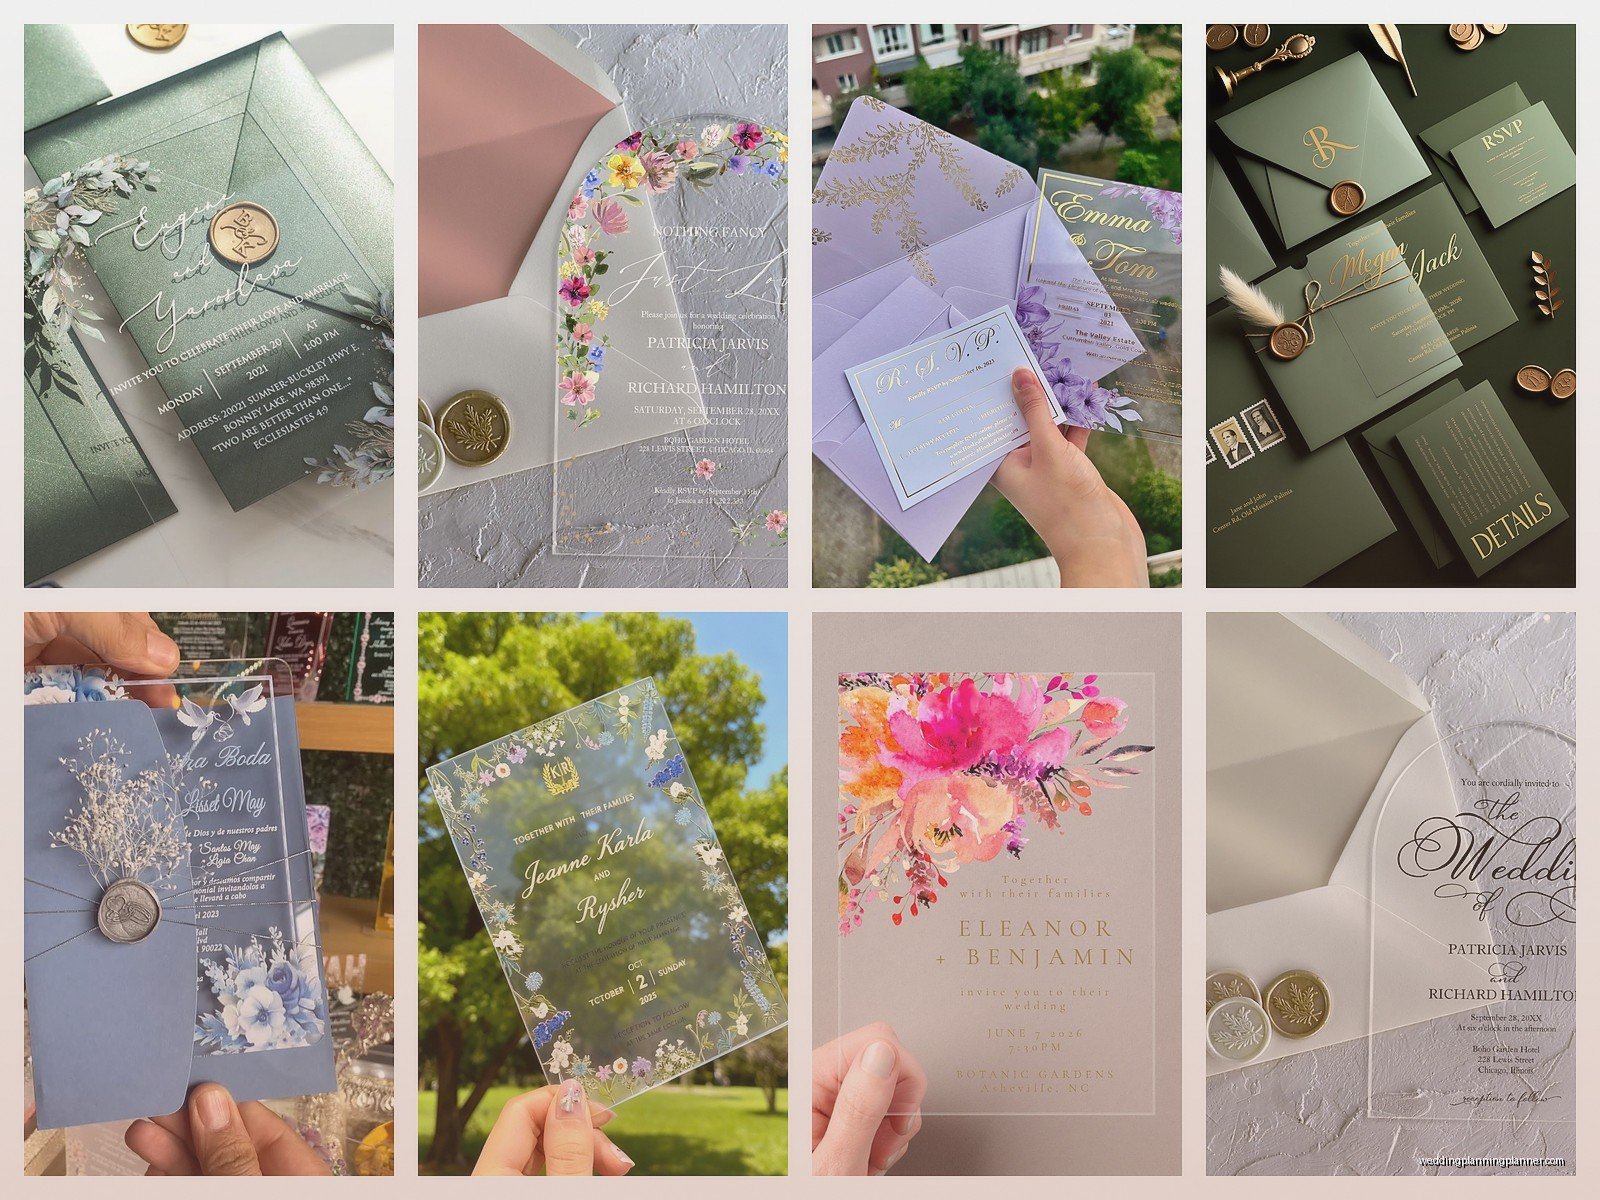
Thickness matters more than you think. The 1/8 inch feels substantial and doesn’t bend or feel cheap. The 1/16 can feel kinda flimsy and I’ve had them arrive cracked more often. Spend the extra money on thickness, seriously.
Design Considerations That Actually Matter
You can’t just take your paper invite design and slap it on acrylic. The whole approach is different. With paper you’re working with texture and layers – with acrylic you’re working with transparency and negative space.
White ink is your best friend for readability. Black ink looks amazing and modern but only if you’re placing the invite on a dark surface or background. I learned this the hard way during a beach wedding where the couple wanted black text and then couldn’t read their own invitations in the photos against the sand. We had to bring dark napkins to put under them for all the detail shots.
Text and Layout
Keep your text relatively large – nothing smaller than 10pt font because acrylic can create slight visual distortions depending on the angle. Sans serif fonts work better than serif for readability. I’m personally obsessed with minimalist layouts for acrylic – lots of white space, centered text, maybe one geometric element.
You can do full bleed designs where the entire surface is covered with color or patterns, but then you’re kinda losing the whole “clear and modern” thing that makes acrylic special. My cat knocked over my coffee on a full-bleed acrylic sample once and I couldn’t even tell where the stain was, which I guess is a benefit?
The Suite Situation
Here’s where it gets tricky – do you make your entire suite acrylic or just the main invite? Full acrylic suites look incredible but the cost is gonna make you cry. We’re talking potentially $15-30 per invitation SET once you factor in the invite, details card, RSVP, and any other inserts.
What I usually recommend is acrylic for the main invite and then high-quality cardstock for the inserts. You can even do a cool layering effect where you bind them together with a vellum wrap or silk ribbon. This gives you that modern acrylic statement piece without destroying your budget.
Envelopes Are Weird
Acrylic invites need special envelopes because they’re rigid and can crack. You need envelopes with padding or you need to use box mailers. Most people go with clear sleeves inside a colored envelope, which looks super polished when your guests open them. But then you’re adding another cost layer and another thing to assemble.
I had a bride who wanted to hand-deliver all her acrylic invites to avoid postage costs and envelope issues, and honestly? If you’ve got a small wedding (like under 50 people) and everyone’s local, that’s not the worst idea.
Printing Methods Breakdown
UV printing is the standard and gives you the most color options. The printer basically shoots UV light at ink droplets to cure them instantly on the acrylic surface. You can do full color, white, metallic – pretty much anything. Turnaround is usually faster with UV printing, maybe 2-3 weeks once you approve the proof.
Engraving or etching gives you that frosted look where the text appears white or translucent against the clear acrylic. It’s more expensive and takes longer but it’s also more durable – the text won’t scratch off because it’s literally carved into the material. If you’re doing a destination wedding where invites might get beaten up in transit, engraving is smarter.
There’s also vinyl application where they cut vinyl lettering and apply it to the acrylic, but nah, don’t do this for wedding invites. It looks cheap and the vinyl can peel.
Actual Costs Because Nobody Talks About This Enough
Budget acrylic invites from online vendors start around $3-5 per invite for just the acrylic piece with basic printing. Mid-range custom options run $8-15 per invite. High-end with custom shapes, engraving, metallic inks, and fancy packaging can hit $20-40 per invite easily.
But wait, you also need to factor in: envelopes or mailers ($1-3 each), assembly time if you’re DIY-ing any part of this, extra postage because these are rigid and might need hand-canceling ($0.20-0.40 extra per invite), and the reality that you’ll probably need to order 10-15% extra because some will arrive damaged or you’ll mess up addressing.
For a 100-person wedding (so roughly 60-70 invitations), you’re looking at anywhere from $400 on the extreme budget end to $2500+ for the full luxury experience.
Working With Vendors
Not all stationery designers work with acrylic because it requires different equipment and expertise. You’ll probably need to work with a specialty vendor or a printer that specifically offers acrylic printing. Etsy has tons of options but quality varies wildly – always order a sample before committing to your full order.
Ask these questions: What’s the thickness? What printing method do you use? What’s the turnaround time? Do you offer proofs? What’s your damage/replacement policy? Can I see photos of actual client orders, not just mockups?
That last one is important because acrylic photographs beautifully in styled mockups but the actual product might look different. I’ve seen vendors use professional photography with perfect lighting that makes their acrylic look flawless, and then the real invites show up with visible printing lines or uneven edges.
Timeline Stuff
You need more time than paper invites. Figure at least 6-8 weeks from design approval to delivery, maybe longer during peak wedding season (spring and early summer). Then you need time to assemble if you’re adding inserts or wrapping, address them – which takes longer on acrylic because you can’t just run them through a printer, you need to either hand-write or order printed labels – and then get them to the post office.
Send your invites 8-10 weeks before the wedding instead of the standard 6-8 because acrylic invites feel more formal and impressive, so people kinda expect more lead time? I don’t know if that’s actually true but it’s what I tell my clients.
DIY vs Professional
You can technically DIY acrylic invites if you have access to a UV printer or you’re willing to do vinyl application (which again, I don’t recommend for the main invite). Some people buy blank acrylic sheets and use paint pens or special markers, which can look cool and artsy but it’s super time-consuming.
The bigger issue with DIY is cutting. Unless you have access to a laser cutter, you’re stuck with whatever pre-cut sizes you can buy online. And honestly after pricing out materials, equipment time, and your own labor… it’s usually not worth it unless you’re doing like 20 invites total or you genuinely enjoy the craft aspect.
I watched a YouTube video once where someone tried to DIY 100 acrylic invites and by the end she was basically crying over smudged ink and uneven vinyl application, so.
Addressing and Mailing Nightmares
This is the part that everyone forgets about until it’s too late. You cannot run acrylic through your home printer. You can’t use traditional calligraphy because the ink might not adhere properly to the smooth surface. Your options are: printing directly on the envelope (boring but functional), hiring a calligrapher who has experience with unconventional surfaces, using high-quality printed labels, or doing what one of my clients did and including a separate paper card with mailing information.
Post offices can be weird about rigid mailers. Sometimes they require hand-canceling which costs extra. Sometimes they’ll try to tell you it needs to go as a package instead of a letter which REALLY costs extra. I always recommend taking one fully assembled invite to your local post office before you mail all of them, just to confirm postage and any special requirements.
What Actually Looks Good
Minimalist designs with lots of negative space – think simple sans serif font, maybe a single line border or geometric accent, and that’s it. The acrylic itself is the statement.
Metallic inks (gold, silver, rose gold) on clear acrylic look expensive and modern without being too flashy. White ink on clear acrylic is classic and works with literally any wedding aesthetic. Black ink is dramatic and architectural but you gotta think about background.
Layering effects where you print on both sides of the acrylic or where you layer acrylic over colored cardstock create depth and visual interest. I did an invite once where we layered clear acrylic with white text over a watercolor paper in dusty blue and it was… okay I’m still thinking about how good that looked.
Edge finishing matters – polished edges look more expensive than raw cut edges. Some vendors offer beveled edges or even painted edges which is a cool detail.
Things That Don’t Work
Too much text. Acrylic invites should be simple and elegant, not packed with information. Use inserts for your details, directions, accommodation info, etc.
Tiny decorative elements that get lost against the transparency. If you’re gonna add floral illustrations or patterns, make them substantial enough to read clearly.
Trying to match acrylic invites with a rustic or vintage wedding aesthetic. Like, you can try, but acrylic is inherently modern and sleek. It works best with contemporary, minimalist, industrial, or glam wedding styles.
Real Talk About Durability
Acrylic can crack if dropped or if it’s too thin. It scratches easier than you’d think – not the surface printing necessarily, but the acrylic itself can get fine scratches. It’s also heavier than paper which affects postage costs and makes them feel more substantial (which is good) but also means they’re more likely to damage other mail (which is bad for your karma or whatever).
The printing can fade if exposed to direct sunlight for extended periods, so if your guests are the type to display wedding invites on their fridge for months, the colors might shift. UV printing is more fade-resistant than other methods.
They’re not great for outdoor ceremonies if you’re planning to use them as signage or programs because they can get hot in direct sun and they’re slippery when wet. Just… keep that in mind if you’re thinking of multi-purposing them.