Planning Guides, Style Guide
Gold Foil Wedding Invitations: Metallic Pressed Designs

May
Getting Started with Gold Foil Invitations
So gold foil wedding invitations are having this massive moment right now and honestly they’ve been popular for like five years straight which tells you something. The metallic pressed designs—that’s the real foil stamping process—create this dimensional effect that you just can’t get with digital printing or that fake foil stuff they try to pass off sometimes.
First thing you gotta know is that real foil stamping uses heat and pressure to apply actual metallic foil onto paper. It’s not printed. A metal die gets heated up, presses the foil onto your cardstock, and the foil adheres where the die makes contact. This creates a slightly raised surface that catches light differently depending on the angle. When clients hold these invitations they always do that thing where they tilt them back and forth to watch the gold shimmer and I never get tired of seeing that reaction.
The Different Types of Gold Foil
There’s like way more variety than people realize. You’ve got your standard shiny gold which is what most people picture—very mirror-like and reflective. Then there’s matte gold which is more subtle and sophisticated, kinda like brushed metal. Rose gold has been absolutely everywhere since 2019 and honestly I’m not sick of it yet even though I thought I would be. Champagne gold is lighter and more vintage-feeling.
I had this bride in spring 2023 who was dead set on rose gold foil because it matched her ring, but when we got the samples she realized it clashed with the actual rose gold decorations she’d chosen for the venue because metallics are weirdly hard to match across different materials and… anyway we ended up going with champagne gold and it looked way better with her blush color scheme.
Light gold or pale gold is super delicate and works amazing on darker cardstock. And then there’s antique gold which has this slightly tarnished vintage look that’s perfect for old-world elegant weddings.
Choosing Your Paper Stock
The paper you choose matters SO much with foil stamping. You want something thick enough to handle the pressure—I usually recommend at least 100lb cover weight, but 120lb or even 130lb feels more luxurious. Cotton paper works beautifully because it has texture that complements the smoothness of the foil.
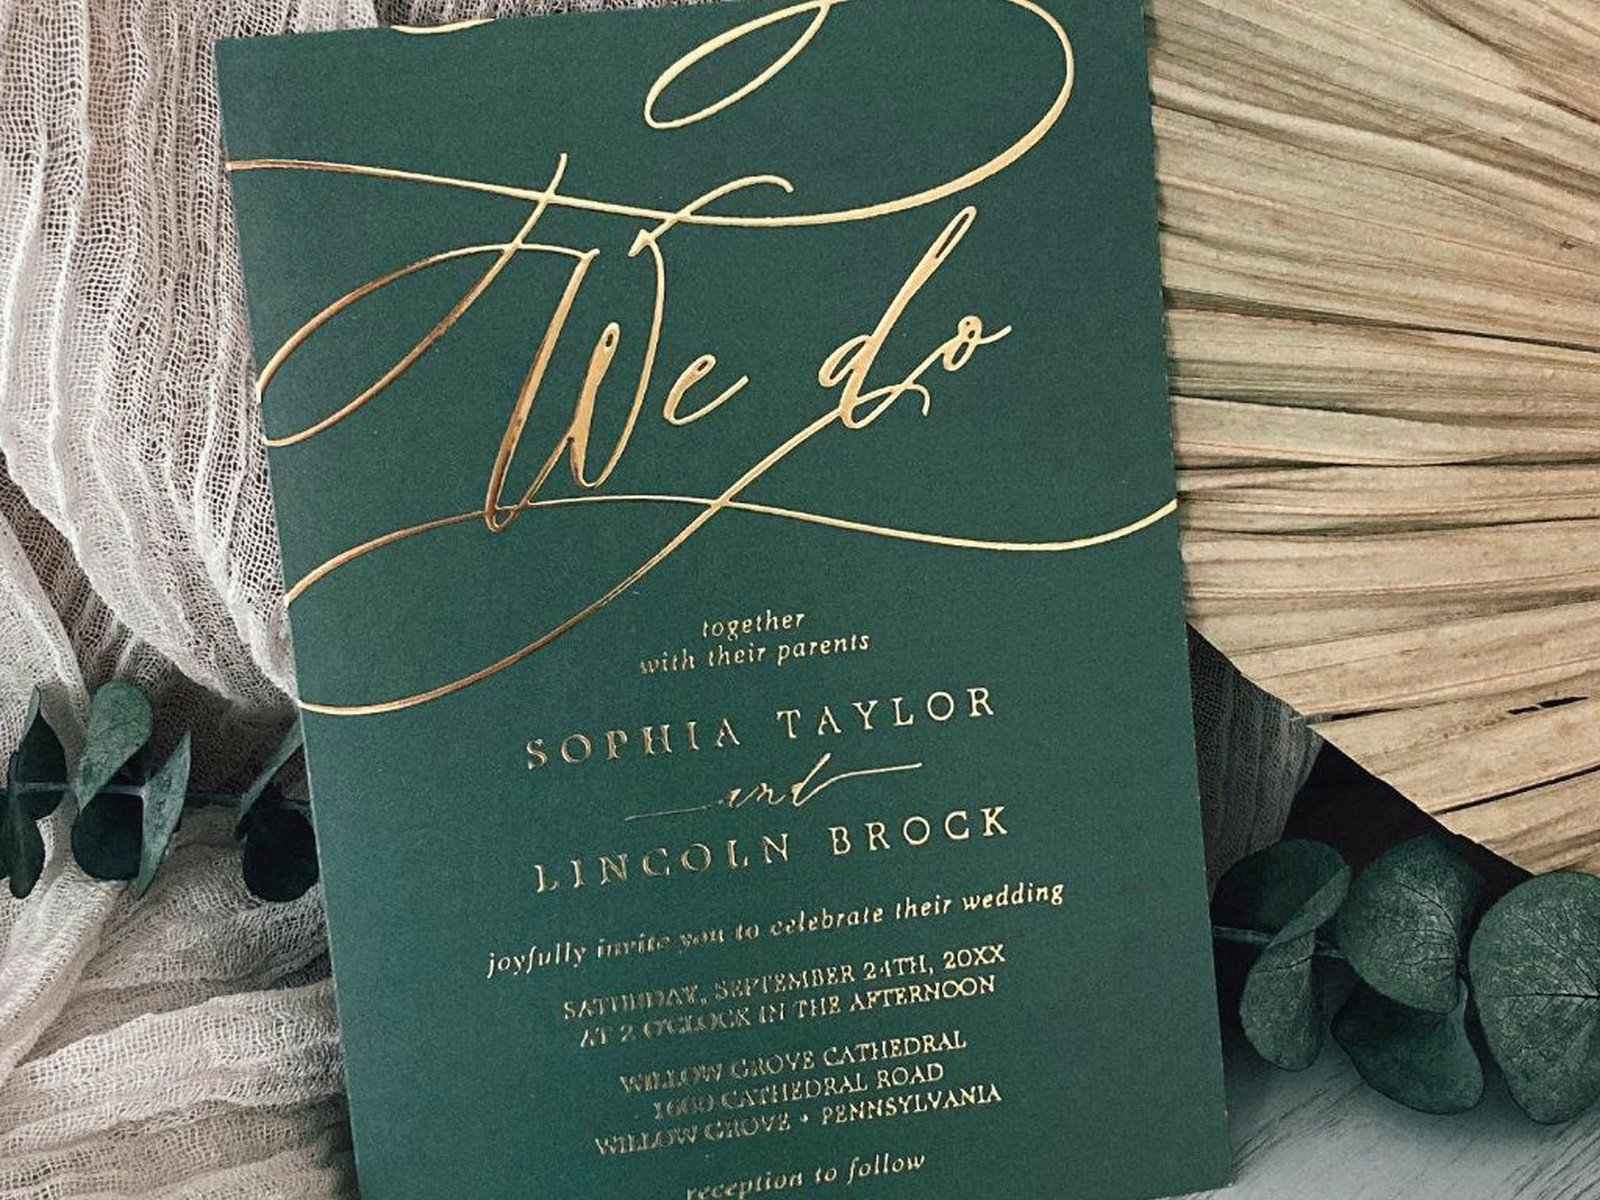
Colored cardstock shows off gold foil really well. Navy blue with gold foil is classic and elegant. Forest green with gold looks expensive and moody. Black cardstock with any gold foil is dramatic as hell—very formal wedding vibes. White or cream is obviously traditional and you can’t go wrong with it, but the foil doesn’t pop quite as much.
Textured papers like linen or laid finish add another dimension but be careful because really heavy texture can sometimes interfere with the foil adhesion. I learned this the hard way with a client order where we used this gorgeous handmade paper with visible fibers and the foil didn’t adhere evenly in some spots and we had to reorder everything which pushed us right up against the timeline.

Design Considerations That Actually Matter
You can’t just take any design and slap foil on it. Well you can but it might look weird. Foil works best for certain elements—borders, names, monograms, decorative flourishes, elegant script fonts. It’s less great for body text because reading shiny text in paragraph form is actually kinda difficult and annoying for guests.
My cat knocked over my coffee onto a sample board once and honestly the foil invitations survived better than the digitally printed ones which is a weird quality test but there you go.
Keep your foil design elements bold enough to make an impact. Super thin lines or tiny details might not transfer well during the stamping process. Script fonts should be at least 14-16pt, and decorative elements should have some substance to them. Those hair-thin botanical line drawings that are trendy right now? They don’t always translate well to foil stamping.
One thing that really annoys me is when couples want to foil literally everything on the invitation. The entire background, all the text, every little detail. It’s expensive obviously but also it just looks… too much? The whole point of metallic accents is that they’re accents. When everything is shiny nothing stands out and your eye doesn’t know where to look first.
The Cost Breakdown Nobody Warns You About
Alright so gold foil invitations are expensive and you need to know this upfront. The process requires creating a custom metal die which is basically a one-time setup fee that ranges from like $50 to $150 depending on the complexity of your design. Then each invitation costs more to produce because it’s a manual process.
You’re probably looking at $8-15 per invitation for single-color foil on a standard design. If you want multiple foil colors that’s a separate die and separate pressing for each color so costs go up significantly. Rose gold names plus regular gold border? That’s two setups, two pressing runs.
Double-sided foil stamping costs more because they have to run the paper through twice. Foil on colored cardstock sometimes costs a bit extra. Edge painting or other customizations add up quickly and before you know it you’re at $20+ per invitation.
For a 100-guest wedding that’s 100 invitations plus you should order extras for keepsakes and mistakes (always order extras), so you’re looking at maybe 115-120 pieces. Do the math on that and yeah it adds up fast.
Timeline and Ordering Process
Foil stamping takes longer than digital printing. Like significantly longer. After you approve the design the printer needs to create the die, then do a test pressing, send you a proof, make any adjustments, and then do the full print run. This whole process usually takes 3-4 weeks minimum, sometimes up to 6 weeks during busy wedding season.
You should order your invitations at least 4-5 months before your wedding date. That gives you time for the production process plus addressing and mailing them out 6-8 weeks before the wedding like you’re supposed to.
I always tell clients to order their save-the-dates with foil if they’re gonna do foil invitations because it establishes the aesthetic early. But honestly save-the-dates can be simpler—maybe just foil on your names or a small design element rather than going all out.
Working with Printers and Designers
Not every printer offers foil stamping because it requires specific equipment. You need to find a specialty stationer or a print shop that specifically mentions foil stamping or letterpress services. Places like Minted and Zazzle offer “foil” options but read the fine print because sometimes it’s digital foil printing which is not the same thing at all—it’s just shiny ink that approximates the look of foil.
Real foil stamping will always be described as “hot foil stamping” or “foil pressed” or “metallic pressed designs” in the product description. If you’re not sure just ask them directly whether they use actual foil and a heated die press.
When you’re working with a designer make sure they understand the technical requirements of foil stamping. Your designer needs to provide the printer with specific files—usually a separate layer or file showing exactly where the foil should be applied. If your designer hasn’t worked with foil before there can be issues with how the files are set up and that delays everything.
Envelope Considerations
Don’t forget about envelopes because they’re part of the whole presentation. You can get foil on the envelopes too—return address, guest address, or decorative elements on the envelope flap. Envelope liners with foil accents look incredibly fancy.
But here’s the thing about foil on envelope addressing: it’s gorgeous but if you’re doing individual guest names in foil that means a custom die for each envelope which is insanely expensive and completely impractical. What people usually do is foil stamp their return address on the back flap which is the same for every envelope, or they have a monogram or design element on the flap.
For guest addressing you’ll probably want to do digital printing or calligraphy. Mixing foil elements with other printing methods is totally fine and actually creates nice visual interest.
Invitation Suite Components
Your full invitation suite might include the main invitation, RSVP card, details card, accommodations card, and maybe a weekend events card. You don’t have to foil every single piece—in fact you probably shouldn’t because of cost and also visual hierarchy.
I usually recommend putting the most foil on your main invitation since that’s the star of the show. Maybe foil on just your names and a border or decorative element. Then the RSVP card could have a smaller amount of foil, like just a little accent or your monogram. The other enclosure cards can be printed digitally in coordinating colors.
This approach keeps costs manageable while still giving you that luxury foil look. Everything feels cohesive but you’re not spending $25 per invitation suite which gets real intense real fast when you’re inviting 150 people.
Assembly and Mailing
Gold foil invitations are thick and heavy which means postage is gonna be more than a regular invitation. A fully assembled suite with multiple enclosure cards, belly band, and envelope liner can easily require $1.50-2.00 in postage rather than the standard forever stamp.
Take a fully assembled invitation to the post office and have them weigh it before you buy all your stamps. Those little details like ribbon or wax seals might push you into a higher postage tier. Also non-standard sizes or square envelopes cost extra to mail.
Hand-canceling is smart for fancy invitations because it prevents the post office machines from crushing or bending them. You can request this at the post office though not all locations are cooperative about it which is honestly annoying but that’s a whole different rant.
Common Mistakes to Avoid
Using too many fonts with foil is a big one. Stick to maybe two fonts maximum—one for names or headers, one for body text. When you start mixing script and serif and sans-serif all in gold foil it looks chaotic.
Another mistake is not ordering samples before committing to the full order. Most printers offer sample packs or will do a small proof run. Spend the extra money on this because seeing the actual foil on actual paper in actual lighting is completely different from looking at a design on your computer screen. I’ve had brides who were convinced they wanted shiny gold and then saw the sample and immediately switched to matte.
Not proofreading carefully enough is brutal with foil because once that die is made any typos or errors are expensive to fix. You’re not just reprinting, you’re creating a whole new die. I had a client in summer 2021 who approved a design with her fiancé’s name spelled wrong—we caught it thankfully—but she’d been staring at it for so long she just stopped actually reading it and started just looking at the overall aesthetic which is… understandable but also you gotta really focus on those final proofs.
Mixing Foil with Other Printing Techniques
You can absolutely combine gold foil with other methods. Foil plus letterpress is stunning but very expensive because you’re doing two separate printing processes. Foil plus digital printing is more budget-friendly—maybe foil for names and borders with digital printing for all the text information.
Foil plus watercolor designs works beautifully if the watercolor is printed digitally and then specific elements are highlighted with foil. Just make sure the design is planned from the beginning to accommodate both techniques rather than trying to add foil to an existing design as an afterthought.
Alternatives If Budget Is Tight
If you love the gold foil look but can’t swing the full cost there are ways to get the aesthetic for less. Use real foil stamping only on the main invitation and print everything else digitally. Or just foil your names and monogram rather than elaborate border designs.
Belly bands or envelope seals with foil are small pieces that require less material and smaller dies so they’re cheaper ways to incorporate real foil into your suite. A simple circular monogram seal in gold foil on your envelope costs way less than a fully foiled invitation but still gives you that metallic moment.
Digital foil printing has gotten better and from a distance it looks pretty convincing. It doesn’t have the dimensional quality or the same light reflection as real foil but if budget is your main concern it’s an option worth considering. Just know what you’re getting and don’t expect it to look identical to pressed foil.