Planning Guides, Style Guide
Foil Wedding Invitations: Metallic Stamped Designs
May
What Foil Stamping Actually Is
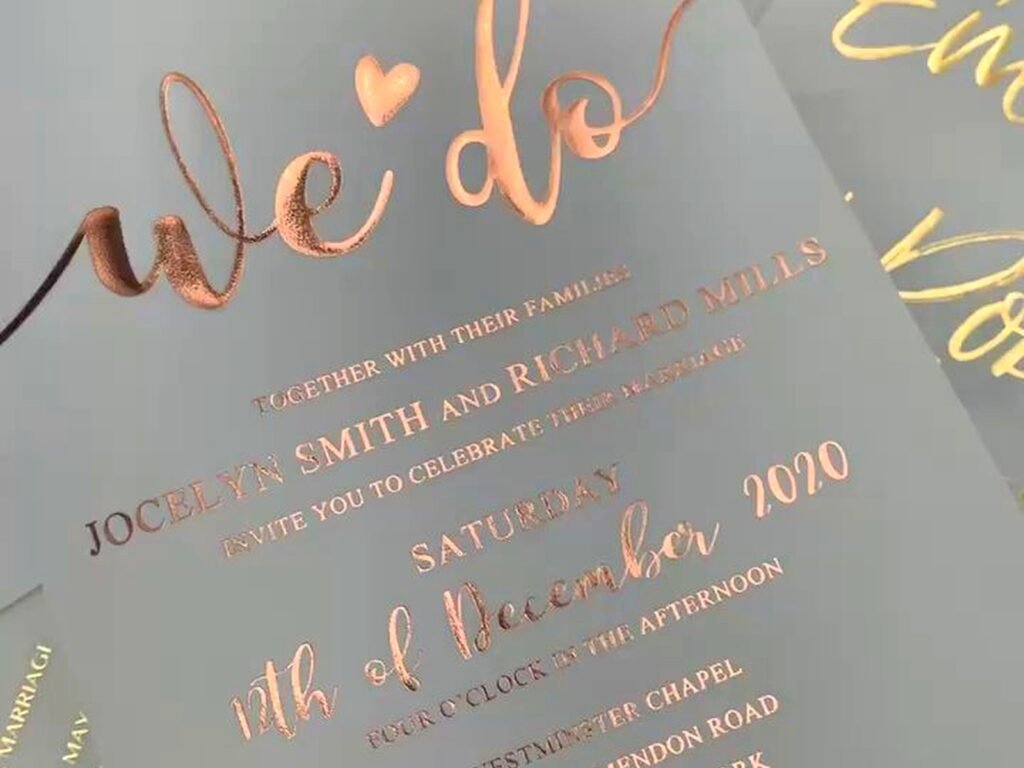
Okay so foil stamping is basically when you press metallic foil onto paper using heat and pressure, and it creates this raised, shiny design that catches light in a way that regular printing just can’t match. The foil comes in tons of colors – gold, silver, rose gold, copper, even holographic options – and when you run your fingers over it, you can actually feel the texture which is kinda the whole point.
The process uses a metal die (think of it like a custom stamp) that gets heated up, then it presses the foil onto your paper through serious pressure. The heat makes the foil adhere to the paper in the exact shape of your die. What’s left behind is this gorgeous metallic design that doesn’t smudge or rub off like some people worry about.
Why Couples Are Obsessed With It Right Now
I’ve been seeing foil invitations in probably 60% of my consultations since late 2022, and honestly it makes sense. People want that luxury feel without going full letterpress (which is insanely expensive). Foil gives you that premium look – your guests will actually stop and go “wow” when they open the envelope, which is what you want.
The metallic finish photographs incredibly well too, so when couples are doing those flat lay photos for Instagram or their wedding website, the foil catches the light and looks way more expensive than it actually is. Not gonna lie, that matters to a lot of people now.
Different Types of Foil You Can Choose
So there’s way more variety than most people realize when they first start looking:
- Standard metallics: Your classic gold, silver, copper, rose gold – these are the most popular and usually the most affordable options
- Holographic foils: These shift colors depending on the angle and lighting, super cool but can look tacky if you’re not careful with the design
- Pigment foils: These are matte metallic colors like navy, burgundy, or emerald that have a subtle sheen rather than full shine
- Specialty foils: Think pearl, opal, or even textured foils that have patterns within them
I had this bride in spring 2023 who was absolutely set on this rainbow holographic foil for her invitation, and I tried so hard to talk her into just using it as an accent instead of covering the entire design. She didn’t listen, and when the final invitations came back, even she admitted they looked like those holographic Pokemon cards from the 90s. We ended up rushing a reorder with regular rose gold foil and just using a tiny bit of holographic on her monogram. Lesson learned.
What Actually Works Design-Wise
Here’s the thing about foil – less is genuinely more, even though that sounds like boring advice. The most stunning foil invitations I’ve worked with use foil strategically rather than just slapping it everywhere.
Good places to use foil:
- Your names or monogram
- Delicate border designs or corner flourishes
- Key words like the date or venue name
- Subtle background patterns or geometric shapes
- Envelope liners (yes, you can foil those too)
What usually doesn’t work as well is covering large solid areas with foil or trying to foil really thin, delicate script fonts. The foil needs enough surface area to properly adhere, so if your font is too thin or has lots of swirly details, it might not stamp cleanly.
Paper Selection Makes a Huge Difference
You can’t just foil stamp on any paper – well, technically you can, but it won’t look good. The paper quality and texture really affect how the foil adheres and how it looks afterward.
Best paper options for foiling:
- Cotton papers: These are my favorite, usually 100% cotton or cotton blend, they have a slight texture that makes the foil really pop
- Smooth cardstock: Works great if you want a more modern, clean look – the foil will be super shiny and perfect
- Colored papers: Navy, black, burgundy, or emerald papers with gold or silver foil look incredible
Papers that are tricky:
- Really textured papers like linen – the foil might not adhere evenly
- Super thin papers – they can wrinkle under the heat and pressure
- Glossy or coated papers – the foil just slides right off sometimes
My cat knocked over my coffee onto a sample book of foil-stamped papers last week and I’m still annoyed about it because those samples are expensive and now half of them are… well, they smell like French roast and have brown stains.
The Cost Breakdown Nobody Tells You Upfront
Alright, so here’s where it gets real about pricing. Foil stamping is more expensive than digital or offset printing, but way less than letterpress in most cases.
Typical costs you’re looking at:
- Die creation fee: Usually $75-150 per custom die, and this is a one-time setup cost
- Per invitation cost: Depending on complexity, anywhere from $3-8 per invitation for foil stamping
- Additional colors: Each foil color needs a separate die and separate run, so that adds cost
- Paper costs: Good quality paper for foiling runs $1-3 per sheet typically
So if you’re inviting 150 guests, you’re probably looking at $800-1500 for nice foil invitations including envelopes. That’s not cheap, but it’s also not wildly expensive compared to other wedding costs, and honestly your invitations are the first impression of your wedding.
Combining Foil With Other Printing Methods
This is where things get really interesting, and where you can create something that looks super custom and expensive. You can layer foil stamping with other printing techniques:
Digital printing + foil: This is probably the most common combo I recommend. You print your main text and details digitally (which is affordable), then add foil stamping just for accent elements. Keeps costs reasonable while still getting that wow factor.
Letterpress + foil: Okay this is gorgeous but expensive. The letterpress creates an impression in the paper, and then you add foil on top or in different areas. Super tactile, super luxe.
Embossing + foil: Sometimes called “foil stamping” but technically you’re creating a raised impression with foil on top. This gives you even more dimension and texture.
I worked with this couple who wanted to combine foil with edge painting (where you paint the edges of the paper), and we did rose gold foil with burgundy edge painting and it was stunning, but coordinating all those different vendors and making sure the timing worked was… let’s just say I earned my fee that month.
Timeline Considerations You Need to Know
Foil stamping takes longer than regular printing, period. You need to factor this into your wedding timeline or you’re gonna be stressed.
Here’s a realistic timeline:
- Design finalization: 2-3 weeks for you to approve the design
- Die creation: 1-2 weeks once design is approved
- Printing and foil stamping: 2-3 weeks for production
- Assembly: 1 week if you’re doing belly bands, wax seals, or other embellishments
So you’re looking at 6-9 weeks total from start to finish, and that’s if everything goes smoothly. I always tell couples to start the invitation process at least 4 months before they need to mail them out. Wedding invitations should go out 6-8 weeks before the wedding, so work backward from there.
Finding the Right Vendor or Stationer
Not every printer can do foil stamping – it requires specific equipment. When you’re looking for someone to create your invitations, ask these questions:
- Do you do foil stamping in-house or outsource it?
- Can I see physical samples of your foil work?
- What’s your minimum order quantity?
- Do you charge for die setup separately?
- What’s your typical turnaround time?
- Can you provide a proof before the full run?
That last one is important because foil stamping is harder to fix if there’s an error. With digital printing, you can often reprint quickly, but with foil you’d need to redo the entire stamping process.
DIY Foil Stamping – Is It Worth It?
Okay so there are these home foil stamping machines now like the Minc machine or the Cricut Foil Transfer Tool, and I get asked about them constantly. Here’s my honest take:
They work fine for small projects or if you’re doing like 20-30 invitations and you have tons of time and patience. But for a full wedding invitation suite for 100+ guests? Nah. The results aren’t as crisp as professional foil stamping, the foil can be inconsistent, and you’ll spend hours doing it.
I had a bride who insisted on DIY-ing her foil invitations in summer 2021, and she called me crying three weeks before her mail date because half of them looked terrible and she’d already spent $300 on supplies. We ended up finding a rush printer who could do them professionally, but she paid almost double the normal cost because of the rush fee.
If you really want to DIY something, maybe do foil stamping on your thank you cards after the wedding when there’s no time pressure, or use it for smaller details like envelope seals.
Common Problems and How to Avoid Them
Things that can go wrong with foil stamping:
Incomplete coverage: Sometimes the foil doesn’t fully adhere, leaving gaps or spots. This usually happens when the pressure or temperature isn’t quite right, or the design is too detailed. A good printer will catch this and redo it, which is why you want to work with someone experienced.
Cracking or flaking: If the paper gets folded or bent sharply, the foil can crack. This is more common with really thick foil applications. Tell your guests to handle them carefully, I guess? Or just accept that some might not arrive perfect.
Color matching issues: What you see on screen for “gold foil” might not match the actual foil color. Always request physical samples before committing to a large order, because there are like fifteen different shades of gold foil and they all look different.
Misalignment: If you’re doing multiple foil colors or combining foil with other printing, alignment is crucial and also difficult. This is where working with a skilled printer really matters.
Envelope Addressing With Foil Invitations
One thing that annoys me is when people spend all this money on gorgeous foil invitations and then address the envelopes with their home printer and it looks terrible. The envelope is the first thing your guests see!
Good options for envelope addressing:
- Professional calligraphy: Pairs beautifully with foil invitations, but costs $3-8 per envelope
- Digital calligraphy: Printed to look like handwriting, more affordable at $1-2 per envelope
- Foil stamping the envelopes: Yes you can do this, though it’s pricey
- Nice clear labels: If budget is tight, at least use a pretty font and clear labels rather than white labels
You can also do foil-stamped envelope liners which look incredible when someone opens the envelope – that flash of metallic color inside is such a nice touch.
Matching Your Foil Invitations to Your Wedding Style
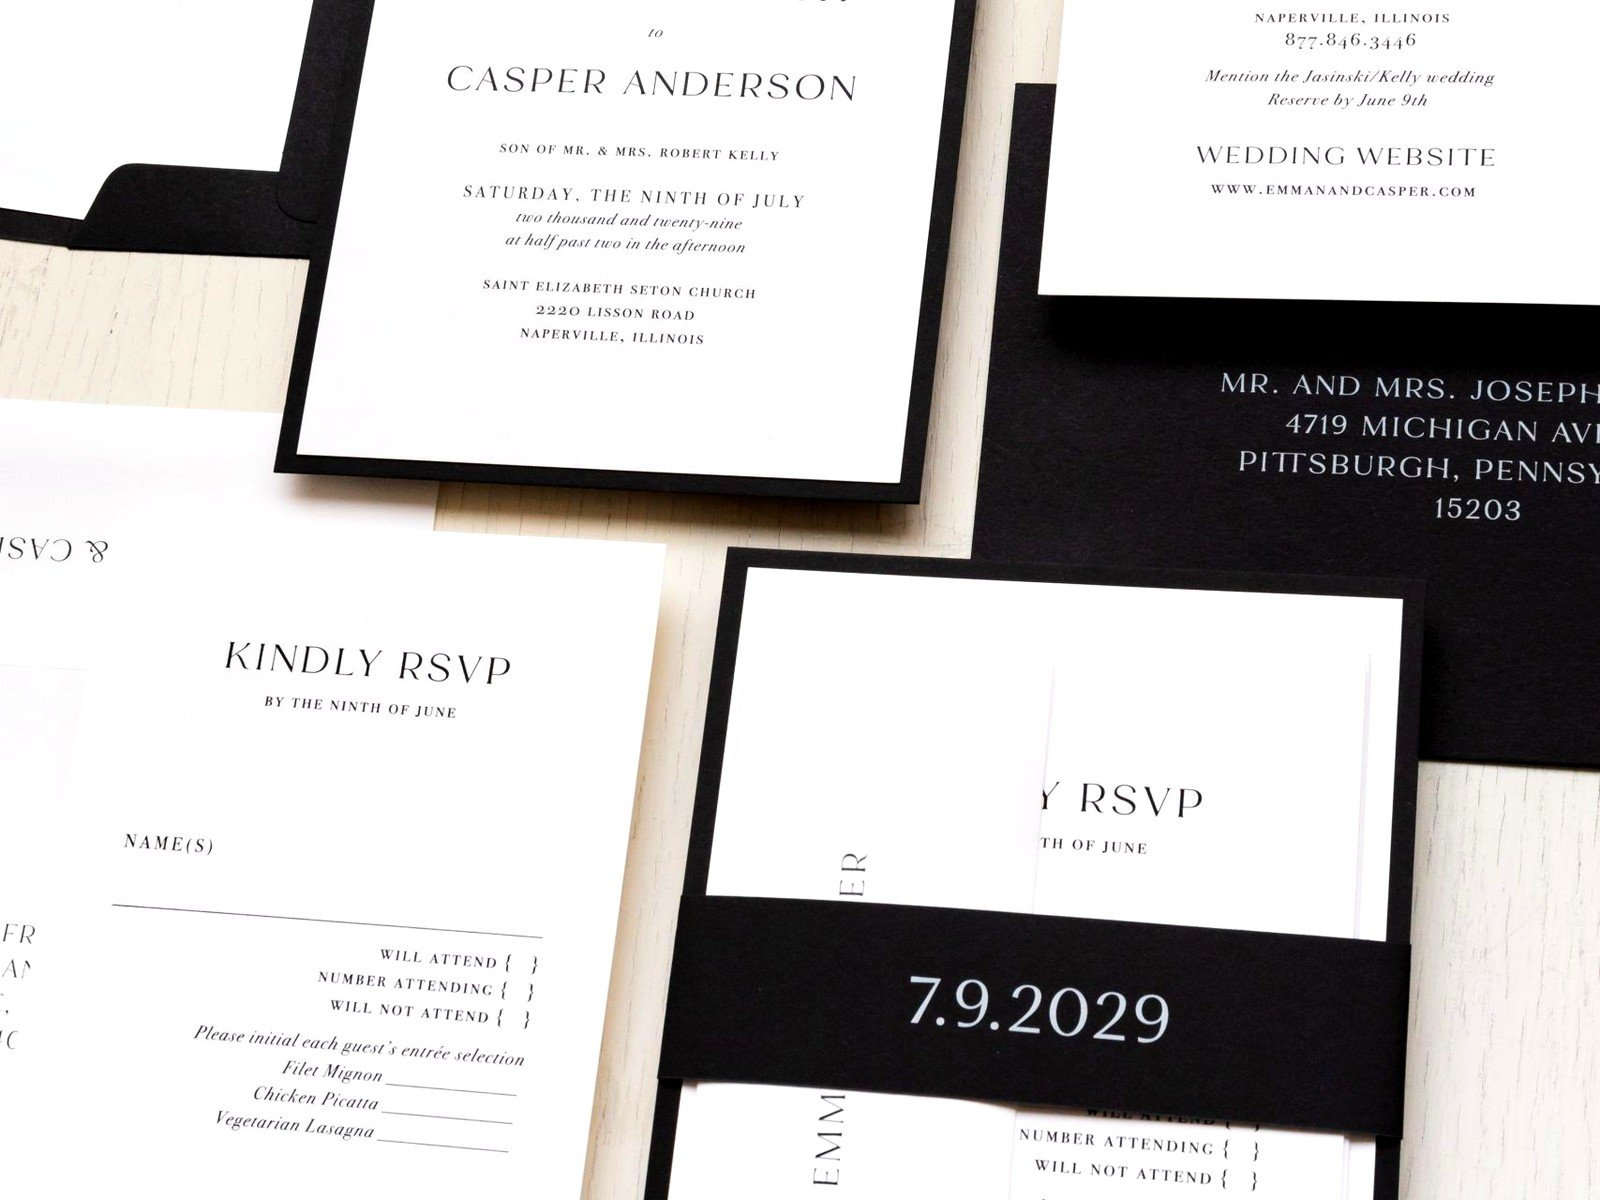
The foil color and design should connect to your overall wedding aesthetic or it’ll feel disjointed. Some combinations that work really well:
Classic elegant wedding: Gold foil on white or ivory paper with traditional serif fonts
Modern minimalist: Silver foil with geometric designs on white or grey paper, clean sans-serif fonts
Romantic garden wedding: Rose gold foil with floral illustrations on blush or cream paper
Bold dramatic wedding: Gold or copper foil on navy, black, or deep burgundy paper
Boho wedding: Copper foil with organic, hand-drawn designs on textured natural paper
I’m currently binge-watching The Bear while working on invitation designs, and there’s something about the precision and artistry in that show that reminds me of good foil stamping work – when it’s done right, every detail matters and you can see the craft in it.
What to Include in Your Foil Invitation Suite
You don’t have to foil stamp every single piece in your invitation suite. In fact, I usually recommend choosing where to splurge:
Definitely foil: The main invitation card – this is your showpiece
Consider foiling: Your names or monogram on the RSVP card, belly band, or envelope liner
Skip foiling: Details cards with lots of text (accommodation info, directions, etc.) – just print these normally
This approach keeps costs manageable while still giving you that luxury look where it matters most. Your guests will spend the most time looking at the main invitation anyway, so that’s where you want the wow factor.
Ordering Extras and Keeping Samples
Always order extra invitations – I typically recommend 15-20 extra beyond your guest count. You’ll want them for:
- Last-minute guest additions (this always happens)
- Replacements for ones damaged in the mail
- Your own keepsakes and wedding album
- Parents and grandparents who want copies
- Mistakes in addressing
Since there’s a die setup fee, ordering extras during your initial print run is way cheaper than trying to do a small reprint later. Plus if enough time has passed, the printer might not even have your die anymore and you’d have to pay that setup fee again.