Planning Guides, Style Guide
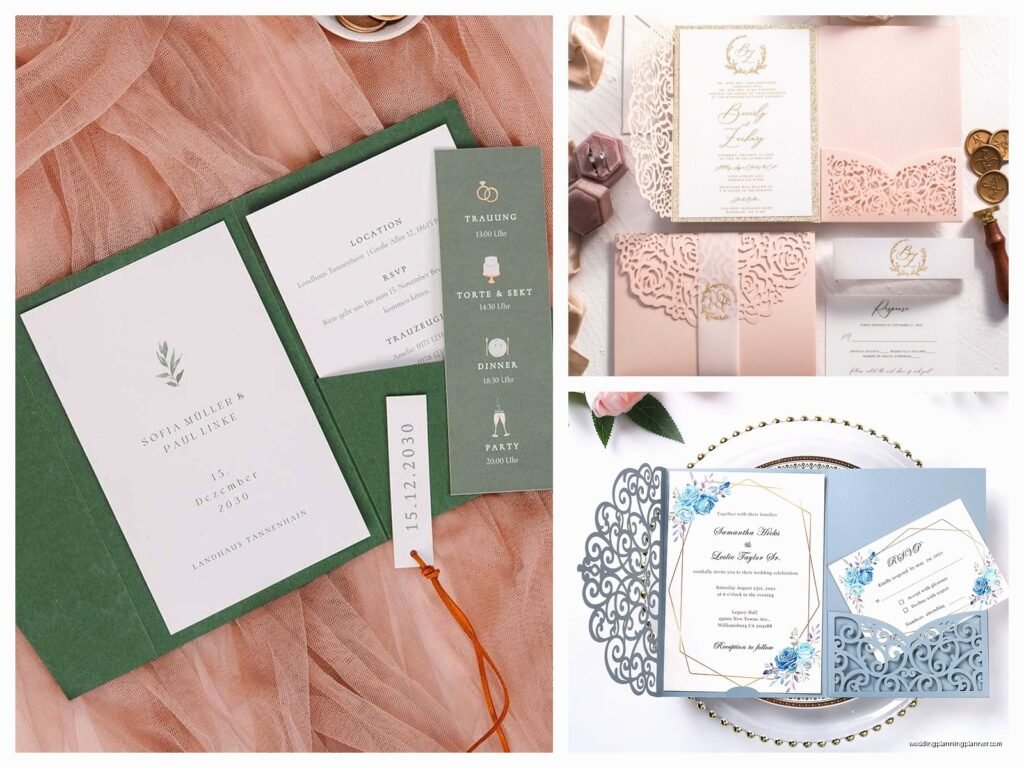
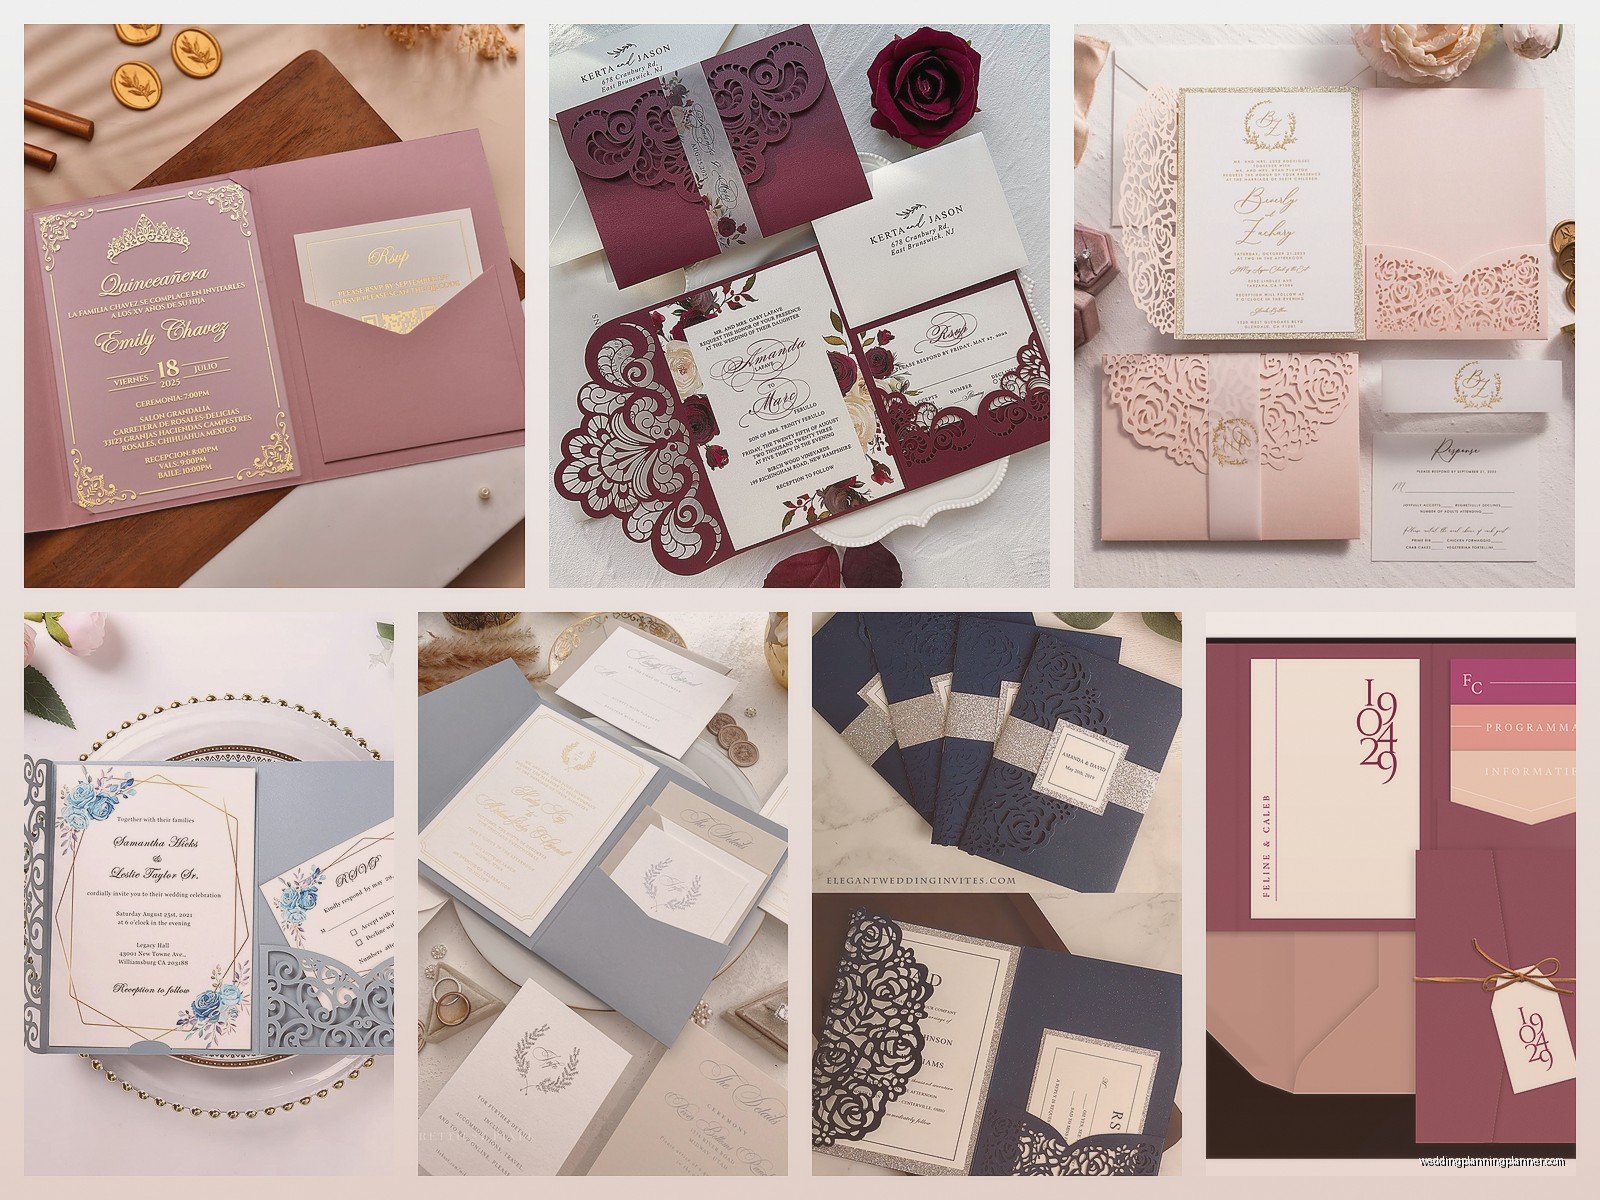
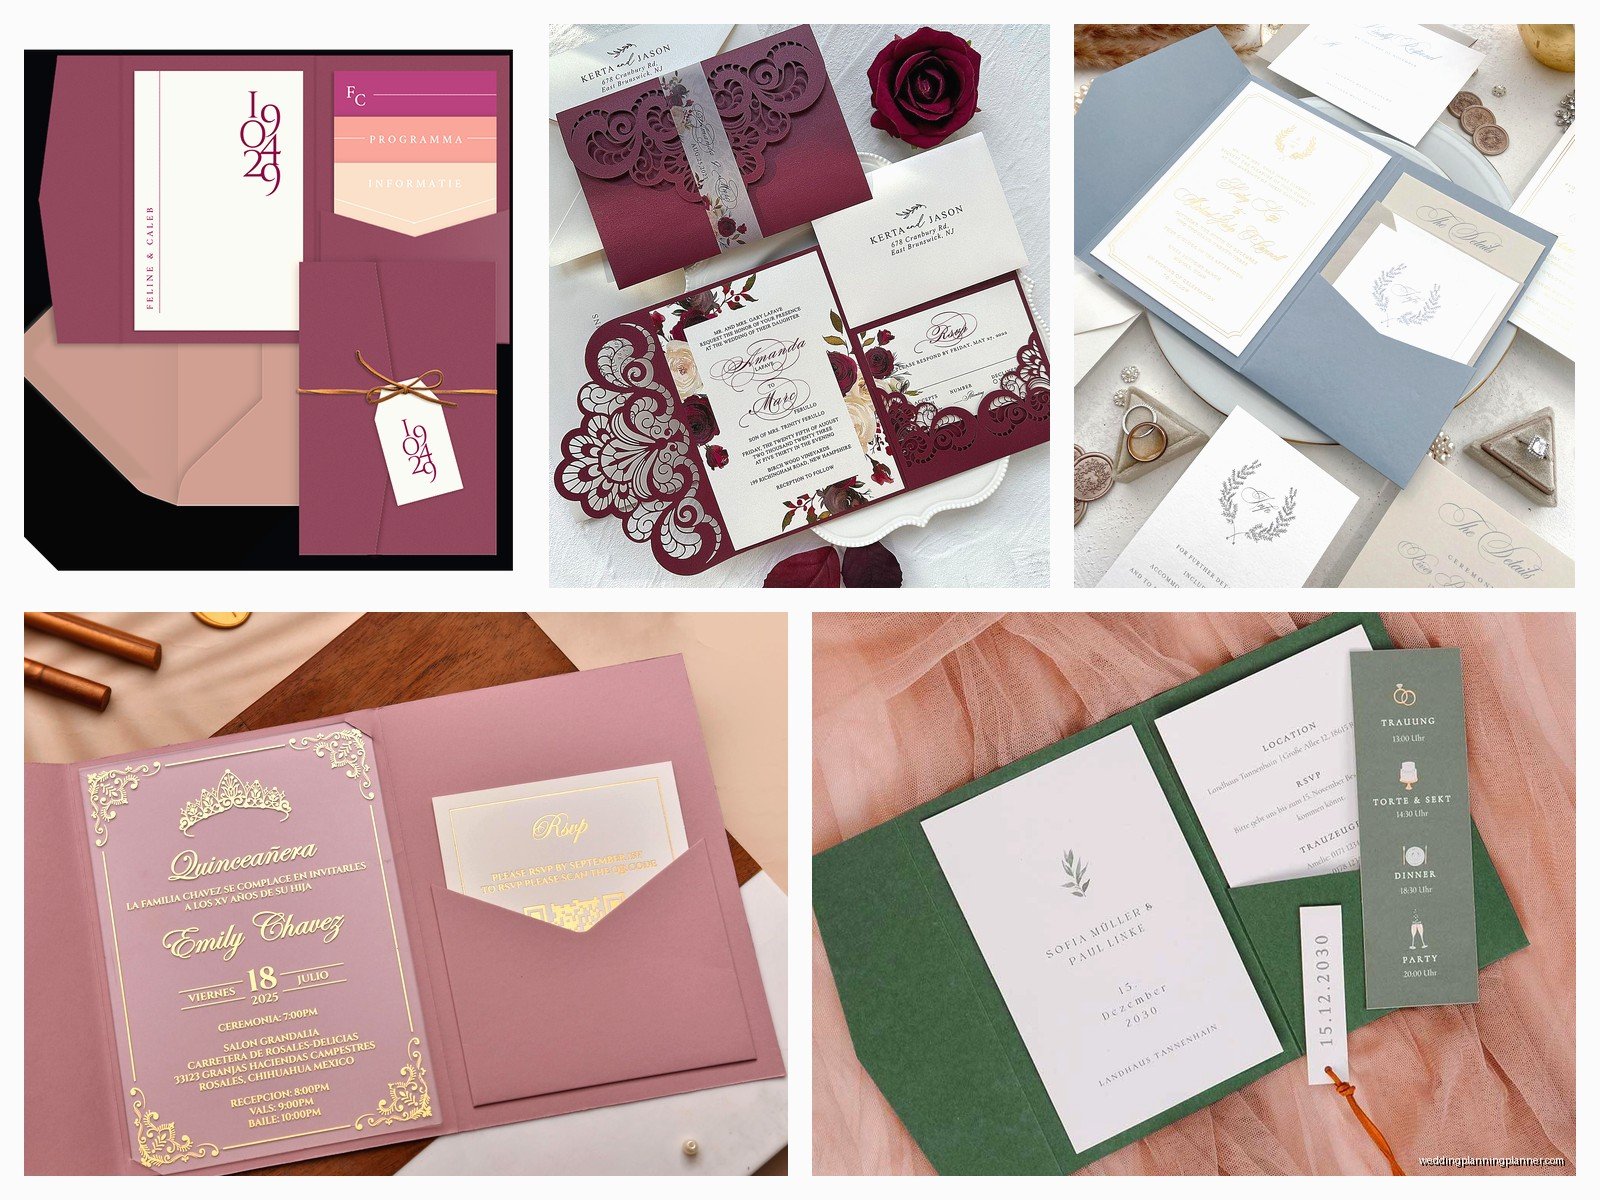
Pocket Invitations: Layered Pocket Fold Style
May
Okay So Pocket Invitations Are Actually Easier Than You Think
Pocket fold invitations are those fancy layered ones where you’ve got like a folded pocket that holds all your inserts and honestly they look way more expensive than they actually are to put together. I had this bride back in spring 2023 who was convinced she needed to spend like $15 per invitation until I showed her how to DIY pocket folds and she literally saved herself almost $2000. The look on her face was priceless.
The basic concept is you’ve got a card stock piece that folds to create a pocket on one side, and then you layer all your other pieces—invitation card, RSVP card, details card, whatever—inside that pocket. Sometimes there’s a belly band or ribbon to hold it all together but we’ll get to that.
What You Actually Need To Buy
First off, you need card stock in at least two weights. For the pocket itself I always use 80lb or heavier cover stock because it needs to hold the weight of everything inside without flopping around. Your inserts can be lighter—65lb cover or even 28lb text weight works fine.
You’re gonna need a scoring tool. This was the thing that annoyed me for YEARS because I kept trying to fold card stock without scoring it first and wondering why my pockets looked all wonky and unprofessional. Just buy a scoring board or even a bone folder with a ruler, it makes such a difference. The folds are crisp and clean instead of that weird crinkly mess you get when you just fold it by hand.
Adhesive is weirdly important here. I use either a tape runner or double-sided tape, never liquid glue because it warps the paper and takes forever to dry. My cat knocked over an entire bottle of liquid adhesive onto a batch of invitations once and I wanted to cry, so yeah, tape runner all the way.
The Standard Pocket Fold Sizes
Most pocket invitations are either 5×7 or 6×9 when they’re closed. For a 5×7 pocket you’d start with a 10×7 piece of card stock that you fold in half, but here’s where it gets specific—you don’t fold it exactly in half. You want the pocket panel to be slightly shorter so when you fold it up it creates that pocket opening.
So for a 5×7 finished size, I cut the card stock at 10.25 inches by 7 inches. Then I score at 5 inches and fold. The extra quarter inch gives you room to work with and makes the pocket actually functional instead of too tight.
For 6×9 you’d do basically the same math, starting with like 12.25 x 9 inches and scoring at 6 inches. You can play around with these measurements depending on how deep you want your pocket to be.
Actually Constructing The Pocket
Okay so you’ve got your scored and folded card stock. Now you need to create the actual pocket part which means… you gotta glue or tape the sides. I usually run a thin line of adhesive down both side edges of the folded panel, about a quarter inch from each edge. Press it firmly to the back panel and you’ve got yourself a pocket.
Some people do a diagonal cut on the top corners of the pocket flap to make it look fancier and I’m not gonna lie, it does look pretty good. You just trim like a quarter inch triangle off each top corner before you glue the sides down. Makes it easier to pull the inserts out too.
One thing I learned the hard way—and I mean I ruined like 50 invitations learning this—is that you need to let the adhesive set for at least 30 minutes before you start stuffing the pockets. If you try to shove cards in there immediately the sides can pop open or shift and then everything looks crooked.
Designing Your Insert Cards
This is where you can get creative but also where people tend to overthink it. Your main invitation card should be the largest and most prominent piece. I usually make it about 4.75 x 6.75 for a 5×7 pocket so it peeks out just slightly above the pocket edge.
Then your other inserts—RSVP, reception details, accommodations info, whatever—should be smaller and in descending sizes if you’re doing the layered look. Like maybe 4.5 x 6.25, then 4.25 x 6, something like that. The idea is you can see each layer when you open the pocket.
Or honestly you can just make them all the same size and stack them, that works too. There’s no rules police gonna come after you for this stuff. I had a bride who wanted all her inserts the exact same size and shape and it looked totally fine, just a different aesthetic.
The Layering Part That Makes It Look Expensive
So here’s the thing that makes pocket invitations look really high-end—you layer different papers and textures. I’m talking vellum overlays, metallic card stock, patterned paper as a backing, all that stuff.
A super easy trick is to cut a piece of vellum slightly larger than your main invitation card and layer it on top with the text showing through. Secure it with a wax seal or a small piece of double-sided tape at the top. Instant elegance and you barely did anything.
Or you can mount your invitation card onto a slightly larger piece of metallic or colored card stock so you get that layered border effect. Like if your invitation is 4.75 x 6.75, mount it on a 5 x 7 piece of gold metallic and boom, it looks custom and professional.
I also really love using patterned paper as a backing layer inside the pocket itself. You glue it to the back panel before you create the pocket and it adds this nice surprise element when someone opens it. Floral patterns are pretty popular obviously but I’ve done geometric, watercolor, even a subtle damask that looked really sophisticated.
Closure Options Because Nobody Wants Their Invitation Falling Apart
Belly bands are probably the most common closure and they’re just a strip of card stock or vellum that wraps around the whole invitation. I cut them about 2 inches wide and long enough to wrap around with a half inch overlap. You can print names, monograms, or designs on them, or leave them blank and add a wax seal.
Ribbon is classic and works great but make sure you’re using real ribbon, not that craft store stuff that frays immediately. Satin or grosgrain in a quarter inch or half inch width looks the most elegant. You wrap it around once and tie a simple knot or bow on the front.
Wax seals are having a huge moment right now and honestly they do look gorgeous on pocket invitations. You can put them directly on the pocket flap or on a belly band. Just FYI they add weight which means extra postage, something I forgot to mention to a client once and she was NOT happy when she got to the post office with 150 invitations.
Sticker seals are the easiest option if you’re doing a ton of these. You can get custom printed clear stickers with monograms or designs and just slap them on the pocket flap. Takes like two seconds per invitation.
Assembly Line Method That Saves Your Sanity
When you’re making these in bulk—and if you’re doing a wedding you’re definitely making them in bulk—you need a system or you’ll lose your mind. Trust me on this, I tried to assemble 200 pocket invitations one at a time once and I was still working at 2am watching terrible reality TV and questioning my life choices.
Set up an assembly line. Do all your scoring first. Then all your folding. Then all your gluing. Let everything dry completely—seriously, walk away, go make coffee, watch an episode of whatever you’re binge watching right now, just let it dry.
Then do all your insert arranging. I lay out all my insert cards in the order I want them stacked, then I go through and put them in each pocket one by one. Then add your closures last.
It sounds tedious but it’s actually way faster than trying to complete one invitation at a time from start to finish. Your brain gets into a rhythm and you can kinda zone out.
Printing Considerations You Need To Know
If you’re printing these at home which a lot of people do to save money, you need to know your printer’s limitations. Most home printers can’t handle card stock heavier than 80lb cover, so you might need to have your pocket folders printed professionally and do the inserts at home.
Also watch your margins because printers have unprintable areas around the edges. I usually keep everything at least a quarter inch from any edge, sometimes more depending on the printer. Test print on regular paper first before you waste expensive card stock.
If you’re going the professional printing route, places like Catprint or Cards & Pockets have pre-scored pocket folders you can buy which honestly saves SO much time. You just print your design on them or glue your printed layer to them and you’re done with that part.
Common Mistakes I See All The Time
Making the pocket too shallow is probably the biggest one. If your pocket is only like an inch deep, your inserts are gonna slide out or look awkward sticking way up out of the pocket. Aim for at least 3-4 inches of pocket depth for a 5×7 invitation.
Using card stock that’s too light for the pocket is another thing. I know heavier card stock costs more but if your pocket is all floppy and sad looking, nobody’s gonna be impressed. Just splurge on the good stuff for the pocket itself at least.
Forgetting to account for envelope size—this gets people every time. Your finished invitation needs to fit in a standard envelope with a little wiggle room. A 5×7 invitation fits in an A7 envelope, a 6×9 needs a 6×9 envelope which is less common and more expensive. Plan this out before you commit to a size or you’re gonna be scrambling to find envelopes later.
And please for the love of everything, assemble one complete invitation first as a sample before you do all of them. I cannot tell you how many times I’ve seen people make 100 pockets only to realize their inserts don’t fit right or something looks off. Make one, show it to people, make sure you like it, THEN do the rest.
What About Postage Though
Okay so this is where pocket invitations can get annoying because they’re usually too thick for regular letter postage. Anything over a quarter inch thick or with any kind of bulky closure needs extra postage, sometimes it counts as a parcel instead of a letter.
Take a finished sample to the post office and have them weigh it and measure it. They’ll tell you exactly what postage you need. And buy your stamps accordingly—don’t be that person who puts regular stamps on 150 invitations only to have them all returned for insufficient postage. That actually happened to me in summer 2021 and I’m still not over it.
Also those wax seals I mentioned? They make your envelopes non-machinable which means they have to be hand-cancelled and that costs extra. Usually like 30 cents more per invitation. It adds up fast so just factor that into your budget from the start.
Time Investment Reality Check
If you’re making pocket invitations from scratch, budget way more time than you think you need. For 100 invitations I’d say plan on like 8-10 hours of work minimum, and that’s if everything goes smoothly and you don’t have to redo anything.
Cutting takes forever. Scoring takes time. Assembly takes time. Printing takes time. Stuffing envelopes takes… okay you get it, everything takes time. Don’t start this project the week before you need to mail them out or you’re gonna be stressed and miserable.
I usually tell clients to start at least 3-4 weeks before their mail date, and that’s assuming they already have their design finalized and all their materials purchased. If you’re still figuring out colors or wording, add more time.
But honestly when they’re done and you’re holding this beautiful layered pocket invitation that you made yourself, it feels pretty amazing. And your guests are definitely gonna be impressed because most people just send flat cards these days. Pocket invitations stand out in a good way and they feel substantial and special when you open them, which is kinda the whole point of wedding invitations anyway.