Planning Guides, Style Guide
Vellum Paper Invitations: Translucent Material Designs
Jun
Okay So Vellum Paper Invitations Are Actually Pretty Straightforward
Vellum invitations are having this huge moment right now and honestly they’re not as complicated as people think but there ARE some things you gotta know before you order like 150 of them. The translucent quality is what makes them special – they’re basically see-through or semi-transparent paper that you layer over other card stock or use on their own for this elegant ethereal vibe.
First thing to understand is vellum comes in different weights. You’ve got lightweight stuff around 17-29 lb that’s super delicate and almost tissue-like, then medium weight 30-40 lb which is what I recommend for most wedding invitations, and heavyweight 48+ lb that’s more sturdy but loses some of that dreamy translucent effect. The weight you pick completely changes how the invitation feels in someone’s hand and also – this is important – how well it prints.
Printing on Vellum Is Where People Mess Up
So here’s what annoys me about vellum: everyone falls in love with how it looks and then freaks out when they realize printing on it is kinda tricky. Summer 2021 I had this bride who ordered all her vellum paper before consulting me and she got the cheapest stuff from a craft store and it literally melted in her home printer. Like actually melted because vellum can’t handle heat the same way regular cardstock does.
You have a few printing options and they all have pros and cons:
- Digital printing – This works but you need a printer that doesn’t use heat to fuse the toner. Laser printers are generally a no-go because they get too hot and the vellum can warp or stick to the drum. Inkjet printers work better but the ink takes FOREVER to dry on vellum since it’s not absorbent. You’re looking at 24 hours minimum drying time.
- Letterpress – Gorgeous option but expensive and vellum is so delicate that deep impressions can tear it. You want a light kiss impression not a deep deboss.
- Foil printing – Actually works really well with vellum because the foil adheres to the surface. Gold and silver foil on vellum looks incredible but again it’s pricey.
- Professional offset printing – If you’re doing a large quantity this is your best bet. The printer knows how to handle specialty papers.
My cat knocked over my coffee while I was working on vellum samples last week and I discovered that water makes vellum wrinkle permanently so… there’s that fun fact for you.
Design Considerations That Actually Matter
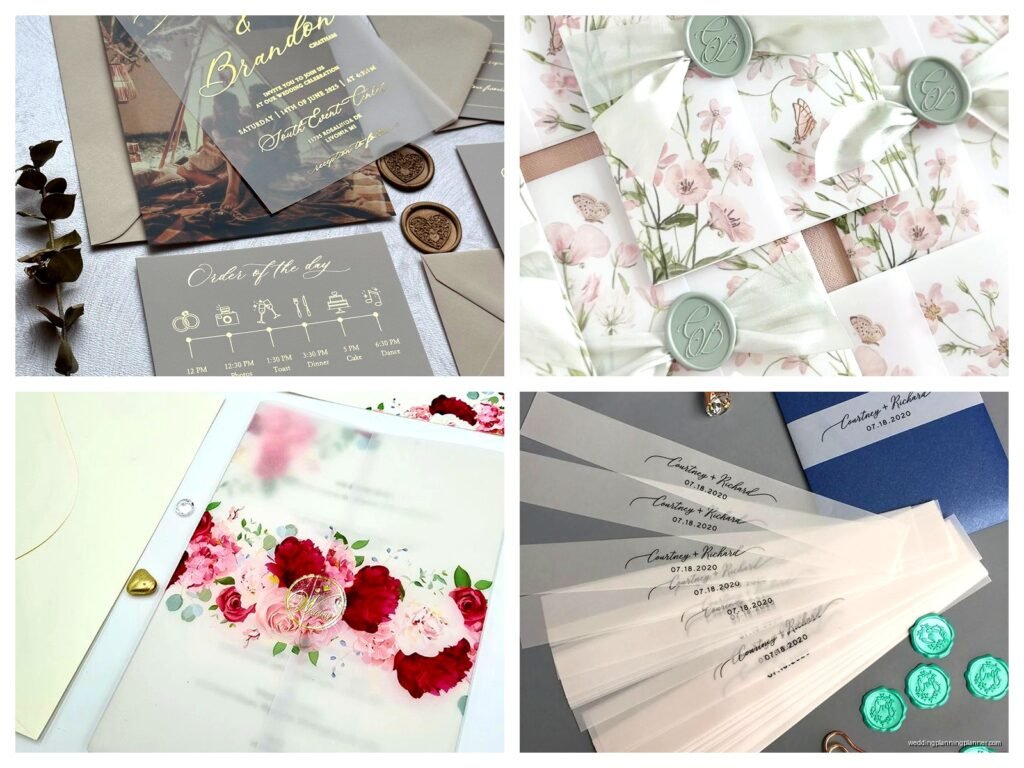
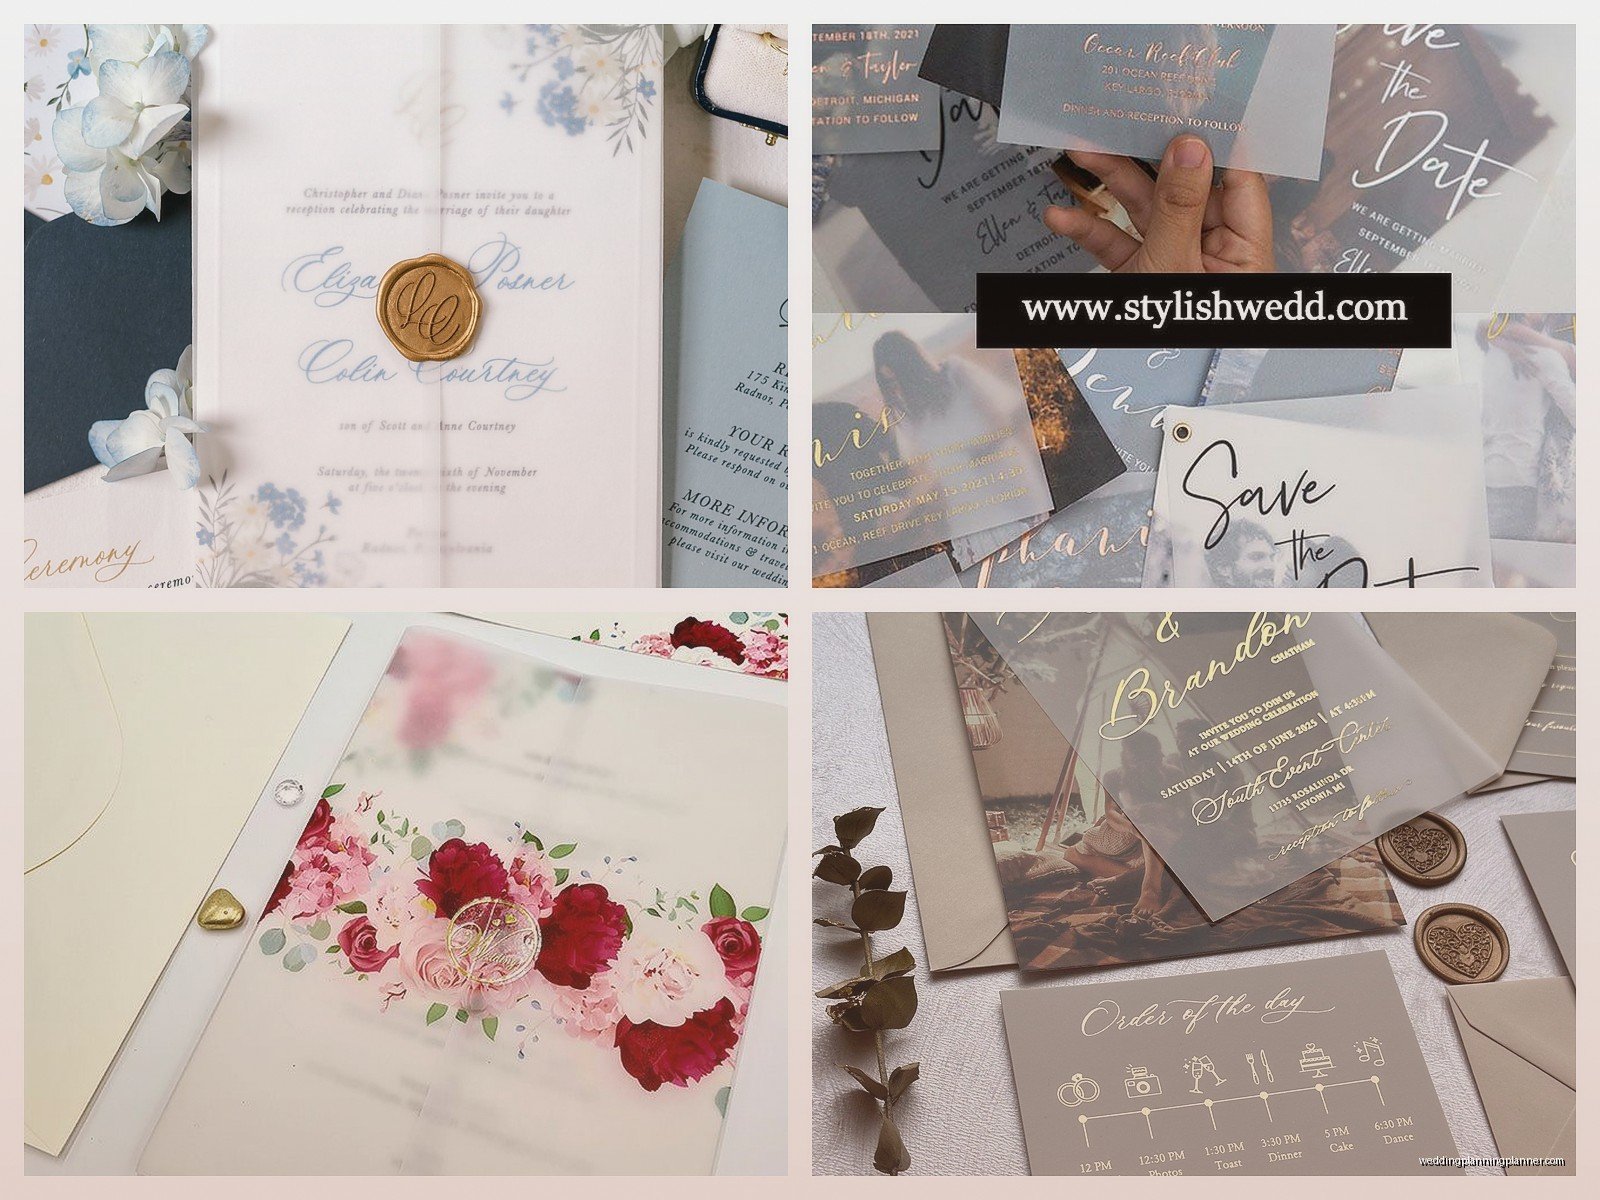
When you’re designing for vellum you can’t just take a regular invitation design and slap it on translucent paper. The whole point is the see-through quality so you need to think about layering. Most vellum invitations work as an overlay on top of a printed card or they’re wrapped around a card suite with a belly band or wax seal holding everything together.
Here’s what I do for clients: create a main invitation card on colored or patterned cardstock, then design a vellum overlay with just the essential text or a decorative frame. The vellum softens whatever’s underneath and creates this dimensional effect. You can see hints of color or pattern through the vellum which is way more interesting than just… you know, regular paper.
Font choices matter more with vellum than regular invitations. Since you’re dealing with transparency, thin delicate fonts can disappear or look washed out especially if you’re printing in light colors. I usually recommend:
- Medium to bold weight fonts
- Dark ink colors – black, navy, deep burgundy, forest green
- High contrast between the text and whatever’s showing through underneath
- Larger point sizes than you’d normally use because the translucent effect makes everything look slightly less defined
Assembly Gets Real Complicated Real Fast
Okay so assembly is where vellum invitations become an actual project. You can’t just throw these in envelopes like normal cards. Well you CAN but it looks sloppy and the vellum slides around and gets wrinkled.
Common assembly methods:
Layering with corners: You print on vellum and then mount it over a cardstock backing using photo corners or small glue dots in the corners. This keeps the vellum flat but you can still see through to the layer underneath. Just don’t use too much adhesive or it’ll show through the translucent paper which looks messy.
Belly bands: This is where you wrap a strip of paper or vellum around the entire invitation suite to hold everything together. The vellum piece can be one of the layers in the stack. I did a wedding in spring 2023 where we used velvet ribbon as the belly band and it looked so expensive but was actually pretty affordable if you buy ribbon in bulk.
Wax seals: Everyone wants wax seals with vellum because it looks romantic and old-world but here’s the thing – wax seals add thickness and can break in the mail. If you’re gonna do wax seals you need to either hand-deliver the invitations or use flexible wax (which is basically fancy sticker material) instead of traditional hard wax.
Vellum wraps: Instead of layering vellum on top, you can wrap it around the invitation suite like a jacket. Print your design on the vellum wrap and leave the ends open or secure them with a seal. This protects the inner cards and looks really elegant when someone opens it.
Binding methods: Some people use eyelets or grommets to bind vellum to cardstock but this only works with heavier weight vellum otherwise it tears. Ribbon threaded through holes can work if you reinforce the holes.
Envelopes and Mailing Stuff You Need to Know
Vellum invitations are almost always thicker and heavier than standard invitations because of all the layering. You need to factor in postage costs – most vellum invitation suites require extra postage and some need hand-canceling at the post office so they don’t get destroyed by sorting machines.
Take a fully assembled invitation to the post office and have them weigh it BEFORE you buy stamps for all of them. I learned this the hard way when 80 invitations got returned to a bride because she used regular forever stamps and each invitation needed $1.20 in postage. She was… not happy with me even though I’d told her to check but she didn’t listen and that whole situation was stressful.
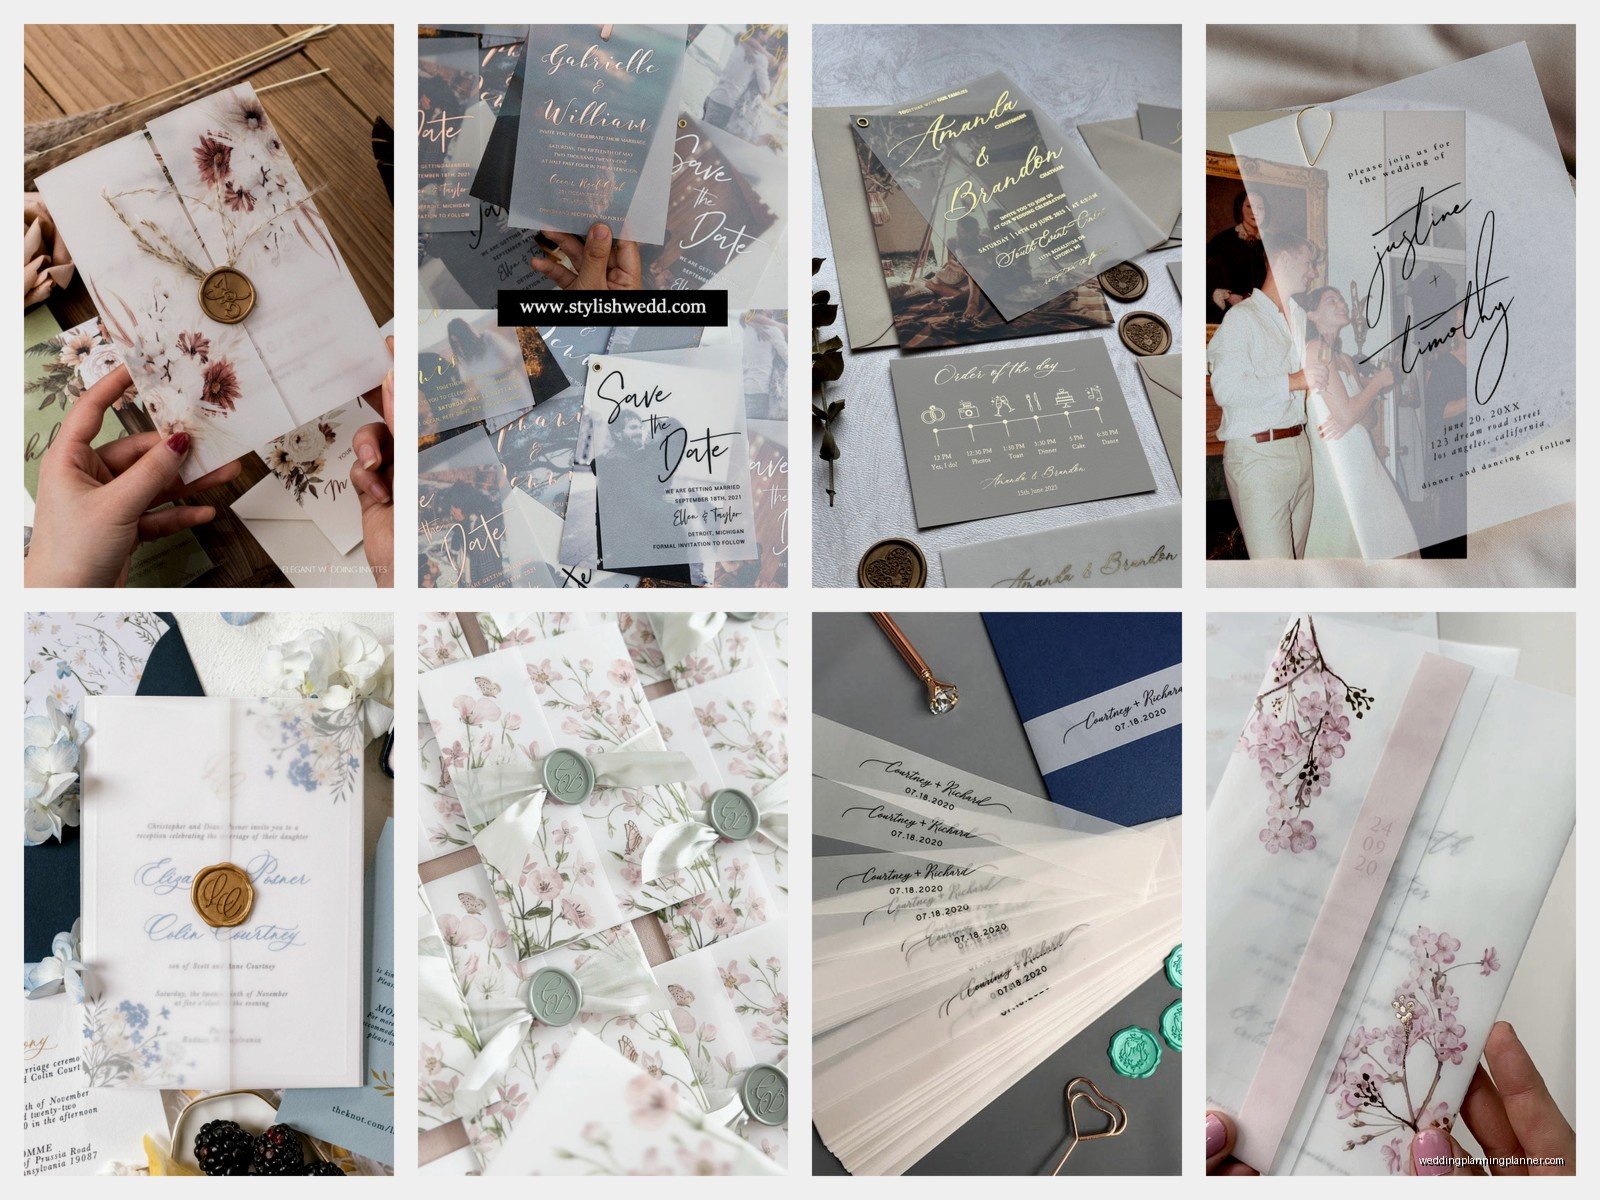
Envelope liners look amazing with vellum invitations because you can see hints of the liner pattern through the vellum when someone pulls it out. Colored envelopes also work well – the vellum creates this preview effect where you can kinda see the envelope color through the translucent paper.
Vellum Types Beyond Basic White
You’re not stuck with plain white or cream vellum. There’s colored vellum in basically every shade – blush pink, sage green, dusty blue, even black vellum which creates this dramatic moody effect. Patterned vellum exists too with printed designs like florals or geometric patterns already on the paper.
Metallic vellum has a shimmer to it and catches light really beautifully. Frosted vellum is more opaque than regular vellum but still has that translucent quality. Textured vellum comes with subtle patterns pressed into the paper.
For beach weddings or tropical themes I’ve used vellum printed with palm fronds or waves. For winter weddings vellum with snowflake patterns or a subtle frost effect. The translucent quality makes any pattern look softer and more organic than it would on regular paper.
Cost Breakdown Because Everyone Asks
Vellum invitations are more expensive than standard cardstock invitations, not gonna lie. The paper itself costs more, printing costs more because it’s specialty paper, and assembly takes longer. Here’s a rough breakdown:
- Vellum paper: $0.50-$2.00 per sheet depending on size, weight, and quality
- Cardstock backing: $0.25-$1.00 per sheet
- Printing: $1.00-$5.00 per invitation depending on method
- Assembly supplies (adhesive, belly bands, seals): $0.50-$3.00 per invitation
- Envelopes: $0.50-$2.00 each for quality envelopes
- Labor if you’re paying someone: $1.00-$3.00 per invitation for assembly
So you’re looking at anywhere from $3.50 to $16.00 per invitation for a vellum design, compared to maybe $2.00-$8.00 for a standard invitation. But the effect is really striking so a lot of couples think it’s worth it.
DIY vs Professional Printing
I get asked constantly if couples can DIY vellum invitations and the answer is… maybe? If you have a good inkjet printer, patience, and you’re okay with some trial and error, then yes. But if you need 200 invitations and you’ve never worked with vellum before, I’d recommend getting at least the printing done professionally.
What you CAN easily DIY is the assembly. Layering vellum over printed cards, adding belly bands, attaching seals – that’s all stuff you can do at home with basic supplies. Have an assembly party with your wedding party and some wine and it actually becomes kinda fun. Well, for the first 50 invitations anyway, then everyone’s ready to be done.
Common Mistakes I See All the Time
People use too much adhesive and it shows through the vellum as dark spots or marks. Use the tiniest dots of glue or adhesive runner in spots where it won’t be visible – corners, under text, along edges that will be covered by belly bands.
Choosing vellum that’s too thin – anything under 25 lb is really hard to work with because it tears easily and wrinkles if you look at it wrong. Stick with 30-40 lb vellum for invitations.
Not testing the print before doing the whole batch. Print one sample, let it dry completely, handle it, assemble it, stuff it in an envelope. See how it holds up. Then print the rest.
Forgetting that vellum shows fingerprints and smudges really easily. Wear thin cotton gloves when handling vellum after printing or you’ll have finger marks all over your beautiful invitations.
Designing with light colored ink on vellum – it barely shows up. If you want a softer look, layer the light-colored-ink vellum over a colored cardstock so there’s contrast.
When Vellum Works Best
Honestly vellum fits almost any wedding style but it really shines for certain aesthetics. Romantic garden weddings, modern minimalist weddings, vintage-inspired weddings, beach weddings – vellum works for all of these. It’s that versatile translucent quality that adapts to whatever else you pair it with.
Formal black-tie weddings look incredible with black vellum over gold cardstock or white vellum with formal script and a wax seal. Casual outdoor weddings can use vellum with wildflower patterns or hand-lettered fonts. The material itself is elegant but how you design and assemble it determines the overall vibe.
I had a couple do vellum invitations for their industrial loft wedding and they printed stark black geometric designs on frosted vellum over concrete-textured cardstock and it was… perfection. So don’t think vellum is only for soft romantic stuff.
Timing and Ordering
Order vellum paper at least 8-10 weeks before you need the invitations finished. This gives you time for printing tests, reprints if something goes wrong, and assembly. Vellum can be back-ordered or out of stock, especially specific colors or weights, so plan ahead.
If you’re working with a stationer or printer, they’ll need extra time for vellum projects compared to standard invitations. The setup is more complex and printing is slower because the paper is delicate.
For assembly, budget at least 3-5 minutes per invitation if you’re doing anything more complex than simple layering. So if you have 150 invitations with vellum overlays, belly bands, and wax seals, you’re looking at 7-12 hours of assembly time total. Recruit help or be prepared for some long evenings watching Netflix while you assemble. I rewatched the entire first season of The Bear while doing invitation assembly last month and honestly it made the time go faster.