Planning Guides, Style Guide
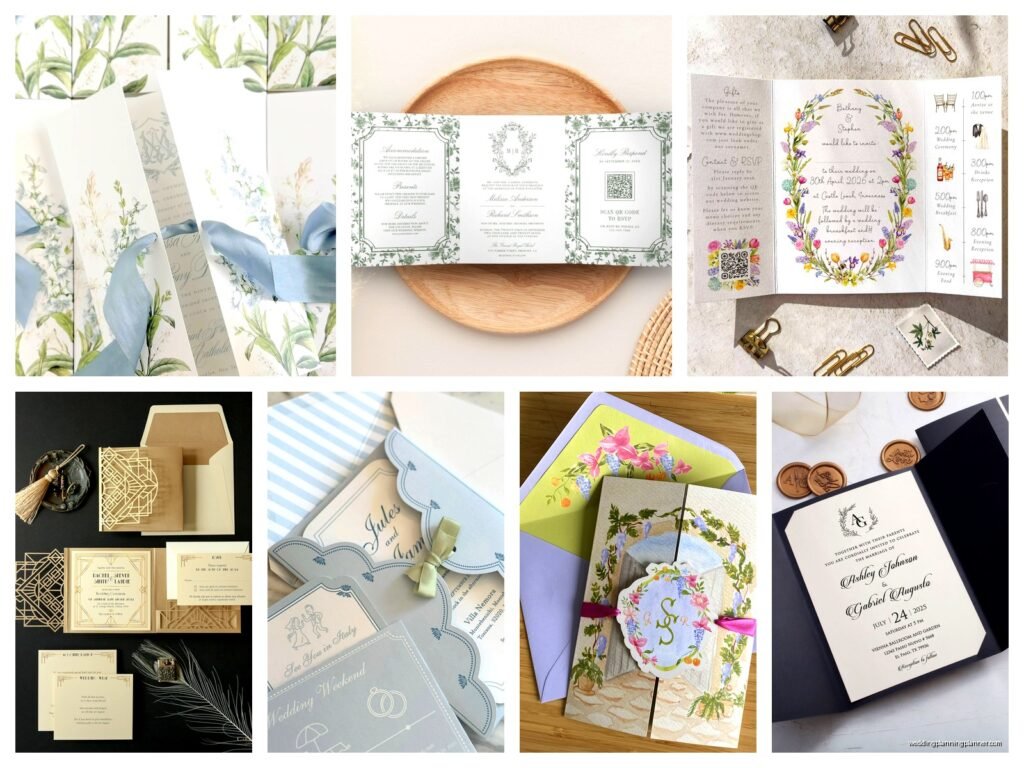
Gatefold Invitation: Two-Door Opening Folded Design
Jun
Okay So Gatefold Invitations Are Actually Pretty Straightforward
Gatefold invitations are those fancy two-door opening designs where both sides fold inward to meet in the middle, and honestly they’re one of my favorite formats to work with even though they can be kinda finicky with the measurements. The basic concept is you’ve got a flat piece of cardstock that’s scored twice so the left and right panels fold toward the center, creating this really dramatic reveal when your guests open them.
I remember this wedding in spring 2023 where the bride was absolutely set on gatefolds for her garden wedding and we must’ve gone through like six paper samples before finding one that was thick enough to feel substantial but not so thick it wouldn’t fold cleanly. That’s actually the first thing you gotta figure out – the paper weight matters SO much more with gatefolds than with regular bifold invitations.
Paper Weight and Scoring
You want something between 80lb and 100lb cover stock for the main gatefold piece. Anything lighter and it feels cheap when people hold it, anything heavier and you’re gonna struggle with clean folds. I’ve seen people try to use 130lb cardstock and it just… it doesn’t work unless you have professional scoring equipment, and even then it can crack along the fold lines.
The scoring is where most DIY attempts fall apart. You NEED to score before you fold. I can’t stress this enough. Scoring creates a compressed line in the paper that lets it fold cleanly without cracking or buckling. You can use a bone folder and a ruler if you’re doing this at home, but honestly for anything over like 25 invitations, I’d recommend getting a scoring board from any craft store.
Standard Gatefold Dimensions
The most common finished size is 5″ x 7″ when closed, which fits nicely in standard A7 envelopes. To create this, your flat cardstock needs to be 10″ x 7″ before folding. Each door panel is 2.5″ wide, and you score at 2.5″ from each edge. The middle section where the doors meet is 5″ wide.
But here’s what annoyed me for YEARS until I figured it out – you actually want a tiny gap between the doors when they close, like 1/16″ to 1/8″. If you make them meet perfectly flush, the paper thickness makes them buckle or one door ends up overlapping the other slightly. So I actually score at 2.45″ from each edge instead of exactly 2.5″. This little adjustment has saved me so much frustration.

You can also do 6″ x 9″ gatefolds (starting with 12″ x 9″ cardstock) or even square ones like 6″ x 6″ (from 12″ x 6″ stock), but make sure whatever size you pick has readily available envelopes because custom envelope sizing gets expensive really fast.
Design Layout Considerations
The fun part about gatefolds is deciding what goes where. The front panels – those two doors – should work together as a cohesive design. You can split a monogram down the middle, use complementary designs on each door, or have text that reads across both panels. Just remember people will see these first when the invitation is closed.
Inside is where you put your main invitation text. This is the 5″ wide center panel that’s revealed when they open the doors. Some people also add design elements to the inside of the door panels themselves, but honestly I think that can look cluttered unless you’re going for a really maximalist aesthetic.
One thing I learned from a stressful situation with a client back in 2021 – always consider the reading direction. We designed this beautiful gatefold where the couple’s names were split across the two front doors, but we didn’t think about how people would naturally open it. Most people open both doors simultaneously from the center, but some people open one door first, then the other. If your design only makes sense when both doors are fully open at the exact same time, you might want to rethink it.
Printing Options
You can print gatefolds at home if you have a good quality printer that handles cardstock, but you need to measure your printer’s maximum paper width first. Most home printers max out at 8.5″ wide, so a 10″ wide flat gatefold won’t fit. You’d need to print on 8.5″ x 7″ stock and adjust your dimensions accordingly, which gives you narrower door panels.
Professional printing is honestly worth it for gatefolds in my opinion. Digital printing works great for smaller quantities (under 100), and offset printing becomes cost-effective once you’re ordering 150+. Letterpress on gatefolds looks AMAZING but oh my god the cost… I only recommend that if you’ve got serious budget to work with.
If you’re printing at home, print before you score and fold. If you score first, the paper might not feed through your printer correctly and you’ll get jams or misaligned printing.
Assembly Steps
Alright so here’s the actual process. You’ve got your printed cardstock, now you need to turn it into a gatefold:
- Measure and mark your score lines with a pencil (these marks will be on the back/inside so they won’t show)
- Use a scoring tool or bone folder with a ruler to create the score lines
- Fold both doors inward toward the center, creasing firmly with your bone folder
- Check that the doors close properly with that slight gap in the middle
- Add any belly bands, wax seals, or closures if you’re using them
The folding technique matters more than you’d think. I always fold with the printed side facing down so I can see what I’m doing with the score lines. Fold one door first, crease it really well, then fold the second door. Some people try to fold both at once and it rarely comes out even.
Closures and Embellishments
Gatefolds kinda need something to keep them closed because they naturally want to spring open a bit, especially with heavier cardstock. Your options:
Belly bands are probably the most popular – these are strips of paper or vellum (usually 1.5″ to 2″ wide) that wrap around the closed gatefold. You can print them with the couple’s names, wedding date, or a design element. They’re typically attached with a small glue dot on the back.

Wax seals look gorgeous but they add weight and thickness, which affects postage costs. Also, my cat knocked over my wax melting pot once and I’m still finding little bits of gold wax in weird places in my office, so… be careful with those.
Stickers or labels are the simplest option – just a circular or custom-shaped sticker that holds the doors closed. These work fine but they’re not as elegant as other options.
Ribbon or twine can be threaded through small slits you cut in the invitation, but this is time-consuming for large quantities and the slits can tear if people aren’t careful opening them.
Whatever closure you use, make sure you test it in the actual envelope you’re using because some closures add enough bulk that the invitation won’t fit properly or the envelope won’t seal flat.
Envelope Sizing and Postage
This is where people mess up constantly. A 5″ x 7″ gatefold invitation needs an A7 envelope, which is 5.25″ x 7.25″. But gatefolds are thicker than regular flat invitations, especially once you add a belly band or wax seal or any inserts.
Go to the post office with a fully assembled invitation in its envelope before you mail all of them. Seriously. Hand it to the postal worker and have them weigh it and measure it. Gatefolds are often considered “non-machinable” because of their thickness or rigidity, which means extra postage. I’ve had clients who budgeted for regular first-class stamps and then found out they needed like $1.50+ per invitation in postage.
The non-machinable surcharge is usually around $0.40 extra per piece, and that’s on top of the regular postage cost. And if your invitation is over 1 ounce (which gatefolds with multiple inserts often are), you’re paying even more.
Adding Inserts
You can definitely include RSVP cards, details cards, accommodation info, etc. with gatefolds. Most people tuck these inside the gatefold, on top of the center panel text. Some designers create pockets on the inside of the door panels to hold insert cards, which looks really polished but adds another level of complexity to the assembly.
If you’re including multiple inserts, I’d suggest keeping them slightly smaller than the 5″ width of your center panel so they don’t stick out or interfere with the doors closing properly. Like, 4.5″ x 6″ inserts work nicely inside a 5″ x 7″ gatefold.
You can also attach inserts with photo corners or small glue dots if you want them to stay in place, but loose inserts are fine too – just arrange them in a logical order so the most important information is on top.
Cost Considerations
Gonna be real with you, gatefolds cost more than regular invitations. You’re using more paper (that 10″ x 7″ sheet versus maybe a 7″ x 5″ flat card), there’s more labor in the folding and assembly, and the closures add cost. Plus the envelope and postage expenses.
For DIY gatefolds, budget around $3-5 per invitation for materials if you’re being conservative. That includes the cardstock, printing, envelopes, and a simple closure. Professional printing and assembly can run anywhere from $8-20+ per invitation depending on paper quality, printing method, and embellishments.
If budget is tight, you might consider doing gatefolds only for your VIP guests or immediate family and doing simpler invitations for everyone else, though some etiquette people would probably say that’s tacky… I think it’s practical but you know your crowd better than I do.
Common Mistakes To Avoid
Don’t make the doors too wide – if each door panel is more than about 40% of the total width, they’ll overlap too much in the center and it looks sloppy. The math should be roughly 25% + 50% + 25% for the three panels.
Don’t forget to account for text spacing near the folds. Any text or design elements within about 1/4″ of a score line might get distorted when you fold, so keep important stuff away from those edges.
Don’t use paper with a strong grain direction perpendicular to your folds – the paper will fight you and might crack. Most cardstock grain runs along the longer dimension, so orient your gatefold design accordingly.
And please don’t skip the scoring step thinking you can just fold it carefully… nah, that never works out the way you think it will or maybe it works for the first five and then you get tired and the rest look terrible.
Digital Printing vs Offset vs Letterpress
I mentioned this briefly earlier but it’s worth expanding on. Digital printing is perfect for quantities under 100-ish invitations. The setup costs are minimal, you can do variable data (like printing each guest’s name), and turnaround is quick. The print quality on modern digital presses is really good, though you might see slight variations from sheet to sheet.
Offset printing becomes economical around 150-200 pieces. The colors are more consistent across the full print run, and you can do Pantone color matching if you need a specific shade. But there are setup costs for the plates, so small quantities don’t make financial sense.
Letterpress is just… it’s beautiful, the debossed impression adds this tactile quality that’s impossible to replicate with other methods, but you’re looking at significantly higher costs and longer production times. For gatefolds specifically, letterpress can be tricky because the impression from printing can interfere with clean folding if you’re not careful about placement.
Timeline For Production
If you’re DIYing, give yourself way more time than you think you need. Printing, scoring, folding, and assembling 100 gatefold invitations will take you a full weekend minimum, probably longer if you’re adding embellishments or you’re a perfectionist.
For professional production, you’re looking at:
- Design and proofing: 1-3 weeks
- Printing: 1-2 weeks for digital, 2-4 weeks for offset, 4-6 weeks for letterpress
- Scoring and folding: Usually included in printing timeline
- Assembly (if done professionally): Add another week
So from final design approval to having finished invitations in your hands, budget at least 4-6 weeks, and more like 8-10 weeks if you’re doing anything custom or fancy. I always tell clients to add two weeks to whatever timeline they think they need because something always comes up – the paper is backordered, the proof has a typo, whatever.
Testing Before Full Production
Make a mock-up. Seriously, make at least one complete mock-up with the actual paper you’re planning to use, printed (even if it’s just a draft), scored, folded, with whatever closure you’re using, stuffed in the real envelope. Mail it to yourself. See how it arrives, check if anything got damaged, make sure it actually fits through mail sorting equipment.
I cannot tell you how many disasters I’ve prevented by doing this test run. You’ll discover things like “oh the belly band slips off during mailing” or “the envelope flap won’t stay sealed because the invitation is too thick” or “this paper color looks completely different under home lighting versus what I saw in the store.”
The cost of one test invitation is nothing compared to the cost of reprinting 150 invitations because you discovered a fatal flaw after everything’s been produced.