
Planning Guides, Style Guide
Pocketfold Wedding Invitations: Layered Pocket Style
May
The Whole Pocketfold Thing Isn’t As Scary As It Looks
Okay so pocketfold invitations are basically wedding invites that have a pocket – shocking, I know – but they’re actually genius for organizing all the random cards you need to send guests. The main card folds in half or has a flap, and inside there’s this pocket (or sometimes two) where you tuck in all your inserts like the RSVP card, details card, accommodation info, whatever. I had this bride in spring 2023 who wanted SEVEN different insert cards and I was like… we’re gonna need a bigger pocket.
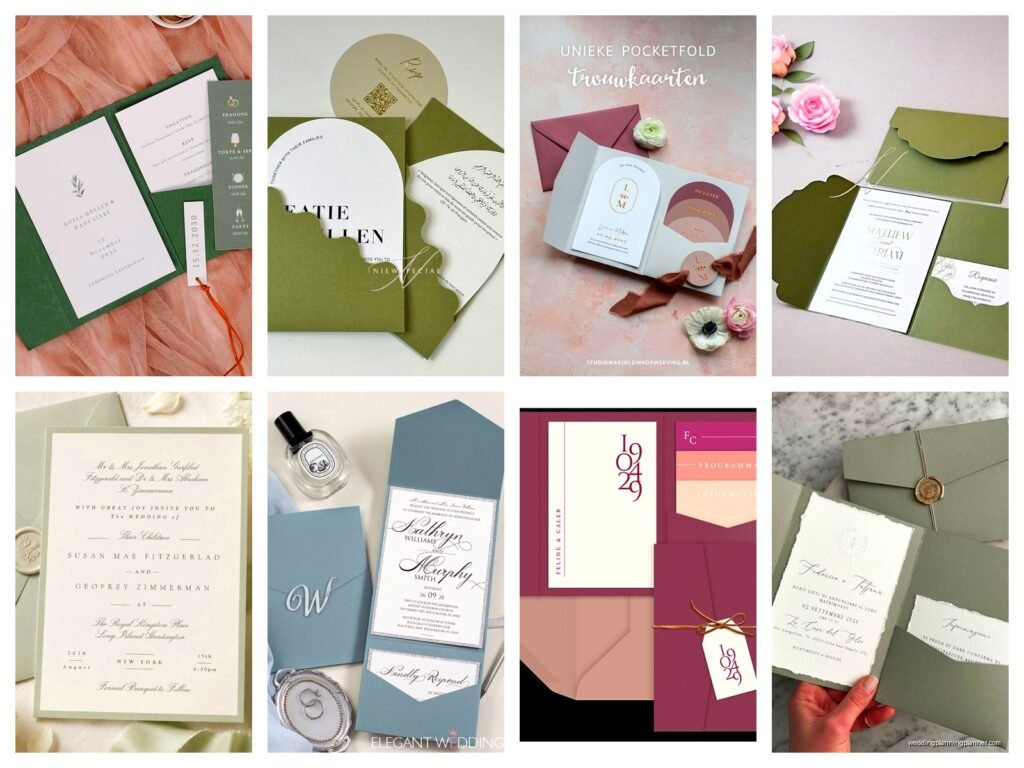
The layered pocket style specifically means you’re stacking multiple cards in that pocket in a way that guests can see each one slightly peeking out. It’s that cascading look where each card is visible even when they’re all tucked in together. Looks fancy, keeps everything organized, and honestly saves you from stuffing loose cards into an envelope and hoping they don’t arrive as confetti.
Why People Actually Choose These
You want pocketfolds when you’ve got a lot of information to share but you don’t wanna cram it all onto one card in 8-point font. They’re perfect for destination weddings where guests need hotel blocks, airport info, weekend itineraries, and maybe a map of where the rehearsal dinner is.
They also just look more expensive than they sometimes are? Like, you can DIY these for way less than people think, but they give off this very put-together vibe. The pocket keeps everything contained so when your guest opens the invitation, they’re not chasing five different cards across their kitchen table.
What annoys me though is when couples order pocketfolds and then only have like two inserts. You don’t need a whole pocket system for your main invite and an RSVP card – that’s overkill and you’re paying extra for structure you’re not using.
The Basic Anatomy Of A Pocketfold
Let me break down what you’re actually working with here. The pocketfold itself is the main piece – usually it’s a scored and folded piece of cardstock that creates the pocket. Most common sizes are 5×7 inches when closed, or 6×9 inches for a larger format.
Inside you’ve got the pocket itself, which can be on the left panel, right panel, or sometimes there’s a double pocket situation with one on each side. The pocket is either part of the fold design (like the paper literally folds to create it) or it’s a separate piece glued onto the panel.
Then you’ve got your insert cards. These are usually slightly smaller than the pocket opening so they tuck in nicely. Common insert sizes are around 4×6 inches or 5×6.75 inches depending on your pocket dimensions. The layered effect happens when you cut these inserts at different heights – maybe your RSVP card is 4 inches tall, your details card is 4.5 inches, your accommodation card is 5 inches, so they create that stepped look.
Choosing Your Pocket Configuration
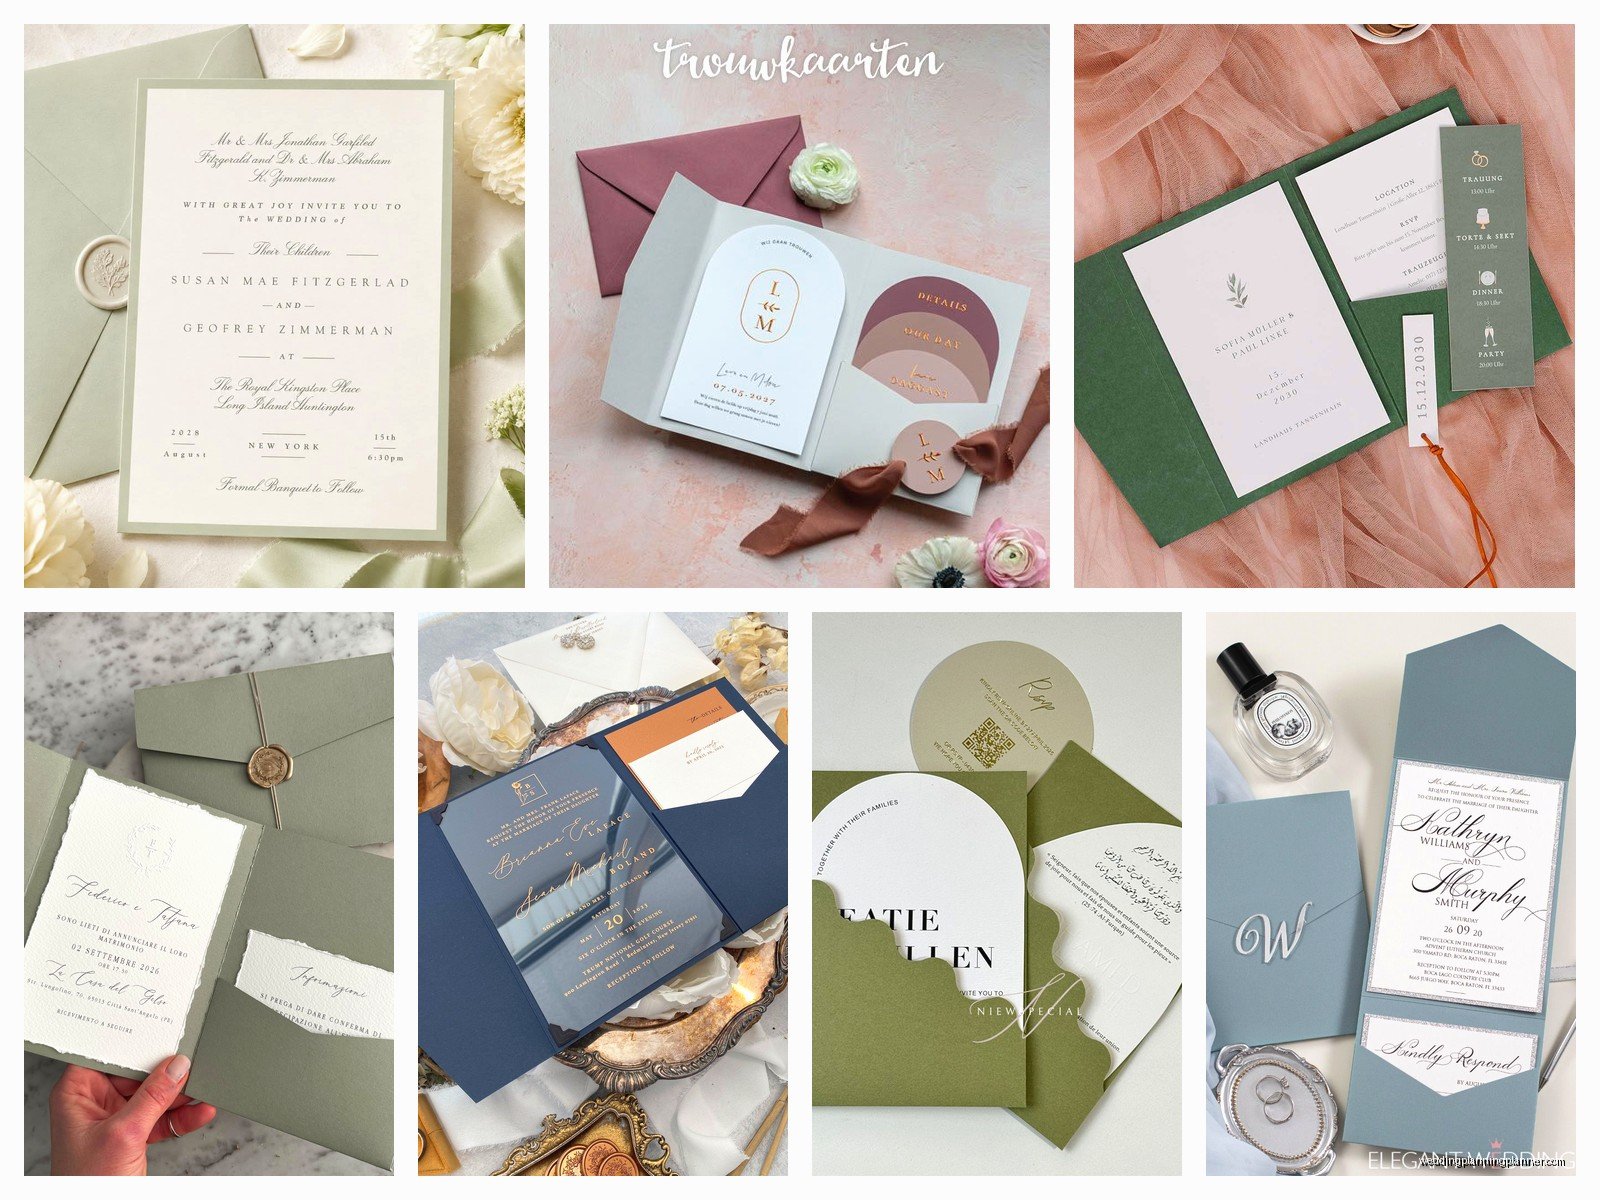
Single pocket on the left is classic. Your invitation text goes on the right panel, pocket on the left holds all the inserts. This is what I recommend for most couples because it’s intuitive – guests open it up and immediately see the main invite, then explore the pocket.
Single pocket on the right works too, especially if you want the first thing guests see to be a photo or a decorative design on the left panel. Less common but it can look really cool with the right design.
Double pocket means both panels have pockets. Honestly? This is usually unnecessary unless you have like 8+ inserts or you want to separate categories – maybe ceremony/reception info on one side and accommodations/travel on the other. My cat knocked over my coffee while I was assembling a double pocket order once and I’m still finding cards with coffee stains.
Materials You’re Gonna Need
For the pocketfold base, you want cardstock that’s thick enough to hold its shape but not so thick you can’t score and fold it cleanly. I usually go with 80lb to 100lb cover weight cardstock. Anything thinner and it feels flimsy, anything thicker and you’re fighting with it to fold properly.
Your insert cards can be lighter – 65lb or 80lb cardstock works great because you’re layering multiple pieces and you don’t want the pocket to get too bulky.
You’ll need a scoring tool if you’re DIYing this. You can use a bone folder and a ruler, or get a proper scoring board which honestly makes life so much easier. Trying to fold cardstock without scoring it first is… well, you’re gonna get wonky folds and nobody wants that.
Adhesive is important – I like double-sided tape or a tape runner for attaching pockets because liquid glue can warp the paper or create bumps. Some people use glue dots which work fine but can be kinda tedious.
And obviously you need envelopes. Most pocketfolds need A7 envelopes (5.25 x 7.25 inches) for a standard 5×7 pocketfold, but measure your finished product first because if you’ve added belly bands or additional layers, you might need to size up.
DIY Assembly Process
Alright so if you’re making these yourself, here’s the actual process. First you’re gonna cut your pocketfold base to size – for a 5×7 finished size, you typically cut a 10.5 x 7 inch piece that you’ll fold in half, or you might do a gatefold style where both sides fold inward.
Score your fold lines. This is crucial. Use your scoring board or ruler and bone folder to create a clean crease line where you want the paper to fold. Then fold it and crease it well with the bone folder.
Next you’re creating the pocket. If you’re doing a glued pocket (which is easier than trying to fold the paper to create one), cut a piece of cardstock that’s slightly smaller than your panel – maybe 4.5 inches wide by 6 inches tall for a standard size. You’ll glue this onto the inside panel along the bottom and side edges, leaving the top open so cards can slide in.
Let the adhesive dry completely before you start stuffing cards in there. I learned this the hard way when a pocket peeled right off because I was impatient.
Creating The Layered Insert Effect
This is where it gets fun. You need to figure out your insert hierarchy – what do you want guests to see first? Usually the RSVP card is in front because that’s the action item, then maybe your details card, then accommodations, then any extra info.
Cut each card to a different height. The front card might be 4 inches tall, the next one 4.5 inches, the next 5 inches, etc. The width stays the same – usually about a quarter inch narrower than your pocket width so they slide in and out easily.
You can also do a stepped width instead of height, where each card is slightly narrower, creating a side-by-side layered look. Less common but it works if your text layout suits it better.
Print or write your information on each card. Then stack them in order with the shortest in front, and slide the whole stack into the pocket. The top edges should create that cascading visual where guests can see each card title or top portion.
Design Considerations That Actually Matter
Color coordination is important but don’t go crazy. I had a bride who wanted each insert to be a different color of the rainbow and it looked like a Lisa Frank folder exploded in there. Stick to 2-3 colors max that tie into your wedding palette.
Your main invitation should be the focal point. If you’re doing a pocketfold, the main invite usually sits on the right panel when the folder is opened, or sometimes it’s one of the inserts in the pocket. Either way, make sure it’s the largest or most decorative piece so it’s clear that’s the primary invitation.
Typography needs to be readable at the sizes you’re working with. Those insert cards are smaller, so if you’re using a super decorative script font, make sure it’s large enough that people can actually read it without a magnifying glass.
Think about the opening experience. When someone receives your pocketfold, they should be able to intuitively figure out how to open it and what to do with all the pieces. If you need to include instructions on how to open your invitation… maybe reconsider the design or—
Embellishments And Extra Touches
Belly bands are those strips of paper or ribbon that wrap around the closed pocketfold. They keep it shut and add a decorative element. You can print on them, add a wax seal, or tie them with ribbon. Just remember they add bulk so you might need bigger envelopes.
Wax seals are gorgeous on pocketfolds but they can be a pain for mailing. The post office sometimes charges extra for non-machinable mail, and wax seals can break off during processing. If you’re set on using them, maybe put them on the inside rather than the outside envelope.
Ribbons and bows look pretty but again, bulk. And they can get caught in sorting machines. I usually recommend against them for mailed invitations, but they’re perfect if you’re hand-delivering.
Foil accents, letterpress, or embossing can make your pocketfold look really high-end. These usually need to be done professionally unless you’ve got equipment at home, and they add to the cost, but the effect is pretty stunning.
Common Mistakes I See All The Time
Making the pocket too small is probably the number one issue. You think you’ve measured everything perfectly, then you try to slide in four cards and they don’t fit or they’re so tight they tear when guests try to remove them. Always make your pocket slightly larger than you think you need.
Using thin paper for the base. I cannot stress this enough – if your pocketfold is floppy and won’t stand up on its own, it’s gonna look cheap no matter how pretty your design is. Spend the extra money on quality cardstock.
Overcomplicating the insert stack. You don’t need ten different cards. Combine information where it makes sense. Your rehearsal dinner info can probably go on the same card as your weekend itinerary.
Not accounting for postage weight. Pocketfolds are heavy, especially with multiple inserts. You’re probably looking at extra postage – often two stamps instead of one. Take a completed invitation to the post office and have them weigh it before you buy stamps for 150 invitations.
Forgetting to test the assembly process before committing to 200 invitations. Make one complete sample first. Mail it to yourself. See how it holds up, whether anything shifts around, if the pocket stays attached. Then make any necessary adjustments before you produce the full order.
Ordering Vs DIY
Look, DIY can save you money but it’s time-consuming. I’m talking hours of cutting, scoring, folding, gluing, and assembling. For 100 invitations, you’re probably looking at 15-20 hours of work if you’re doing it alone. More if you’re a perfectionist.
Ordering from a professional stationery company costs more upfront but they handle all the production. You just approve the design and they ship you finished invitations. The quality is usually more consistent too.
There’s a middle ground where you order pre-made pocketfold bases and then print and assemble the inserts yourself. This saves the hassle of constructing the pockets while still giving you control over the content and some cost savings.
Consider your timeline too. DIY takes planning and buffer time for mistakes. If your wedding is in three months and you haven’t started your invitations… maybe just order them.
Practical Tips For Assembly Line Efficiency
If you’re DIYing, set up an assembly line. Don’t try to complete one invitation start to finish, then move to the next. Instead, cut all your bases, then score all your bases, then fold all your bases, then attach all your pockets. It’s way faster.
Get friends to help but give them specific tasks. One person cuts, one person scores, one person folds, one person glues. Too many people doing different steps at once leads to confusion and mistakes.
Work in batches of 10 or 25. Complete a small batch, check the quality, then continue. This way if you realize something’s off, you haven’t already made 100 wonky invitations.
Have a clean, organized workspace. You’ll have multiple stacks of different cards, and they all look similar. Label everything or you’ll end up putting the wrong insert in the wrong invitation. Trust me on this one – summer 2021 I mixed up details cards for two different weddings and didn’t catch it until a guest called asking why their invitation mentioned a vineyard when the wedding was at a beach. That was a fun day.
Postage And Mailing Logistics
Take a completed invitation to the post office before you mail them all. Have it weighed and measured. Pocketfolds often require extra postage because of weight and thickness. You’ll probably need a 70-cent stamp instead of the standard Forever stamp, or sometimes even more.
Hand-canceling is when the post office manually processes your envelopes instead of running them through machines. It costs extra per piece but it prevents your invitations from getting chewed up, bent, or having embellishments torn off. Some post offices are more willing to do this than others, so ask ahead.
Mail them flat, not bent or rolled. Use rigid mailers or add “Do Not Bend” stickers if you’re worried, though honestly postal workers have seen those stickers a million times and they don’t always help.
Send yourself a test invitation at least 3-4 weeks before you plan to mail the full batch. See what condition it arrives in, how long it takes, whether anything falls out or gets damaged. Then you can make adjustments if needed.
Timeline For Production
If you’re ordering professionally, most companies need 2-3 weeks for production after you approve the final proof, sometimes longer during peak wedding season. Then add shipping time and the time you’ll need for addressing and mailing.
For DIY, budget at least 3-4 weeks if you’re working on it in your spare time. More if you have a large guest list or complex design. You’ll need time for printing (especially if you’re doing multiple rounds to get colors right), assembly, addressing, and then actually getting them to the post office.
Invitations should be mailed 6-8 weeks before your wedding date, so work backwards from there to figure out when you need to start the whole process.
Coordinating The Whole Suite
Your pocketfold should coordinate with your other wedding stationery – save the dates, programs, menus, place cards, thank you notes. You don’t need everything to match exactly, but there should be a cohesive design thread.
Use the same color palette, similar fonts, and consistent design elements. If your pocketfold has a geometric border, maybe that geometric pattern shows up smaller on your program. If you’re using a specific shade of dusty blue, carry that through to your other pieces.
Some couples do a full custom illustration or monogram for their pocketfold and then use that same artwork across all their stationery. It ties everything together and makes the whole wedding feel more designed and intentional.
