Planning Guides, Style Guide
Bespoke Wedding Stationery: Custom Handcrafted Paper Suite
Jun
So You Want Custom Handcrafted Wedding Stationery
Okay so bespoke wedding stationery is basically where you throw the template websites out the window and create something that’s entirely yours. I’m talking custom paper weight, letterpress printing, hand-torn edges, wax seals, the whole deal. It’s not for everyone because honestly it gets pricey and time-consuming but when a couple wants their invites to feel like an actual experience when guests open them? That’s when you go this route.
First thing you gotta know is timeline. I had this bride in spring 2023 who came to me TWELVE WEEKS before her wedding wanting fully custom letterpress invitations with hand-dyed silk ribbon and I literally laughed. Not in a mean way but like… that’s not happening. For truly bespoke stationery you need 6-9 months minimum. Sometimes a full year if you’re doing something wild like handmade paper or multiple printing techniques.
Starting With The Design Concept
Before you even think about paper stock or printing methods, you need a concept. And I don’t mean “we like blush pink” – I mean an actual visual direction that connects to the wedding itself. What’s the venue like? What’s the vibe? Are we talking English garden party or modern industrial loft or coastal Mediterranean?
I usually start by having couples create a Pinterest board but here’s what annoys me SO MUCH: when they pin like 47 different styles and expect me to merge vintage botanical with minimalist modern with Art Deco gatsby vibes. Pick a lane! Or at least pick two complementary lanes. Your stationery suite should tell one cohesive story.
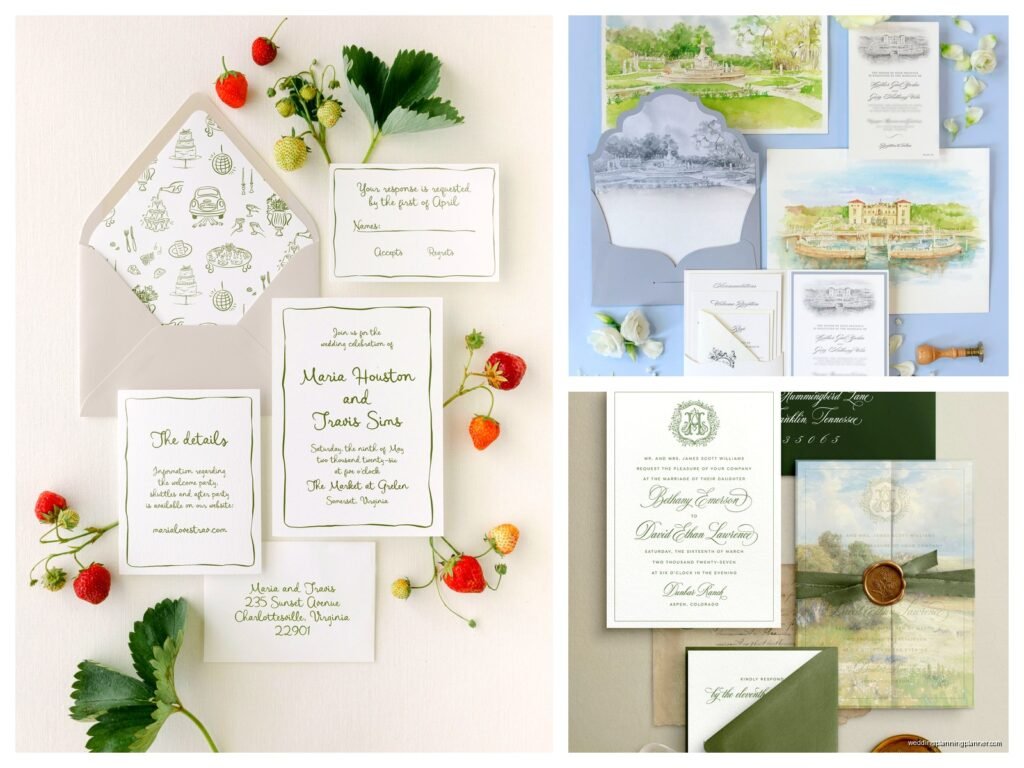
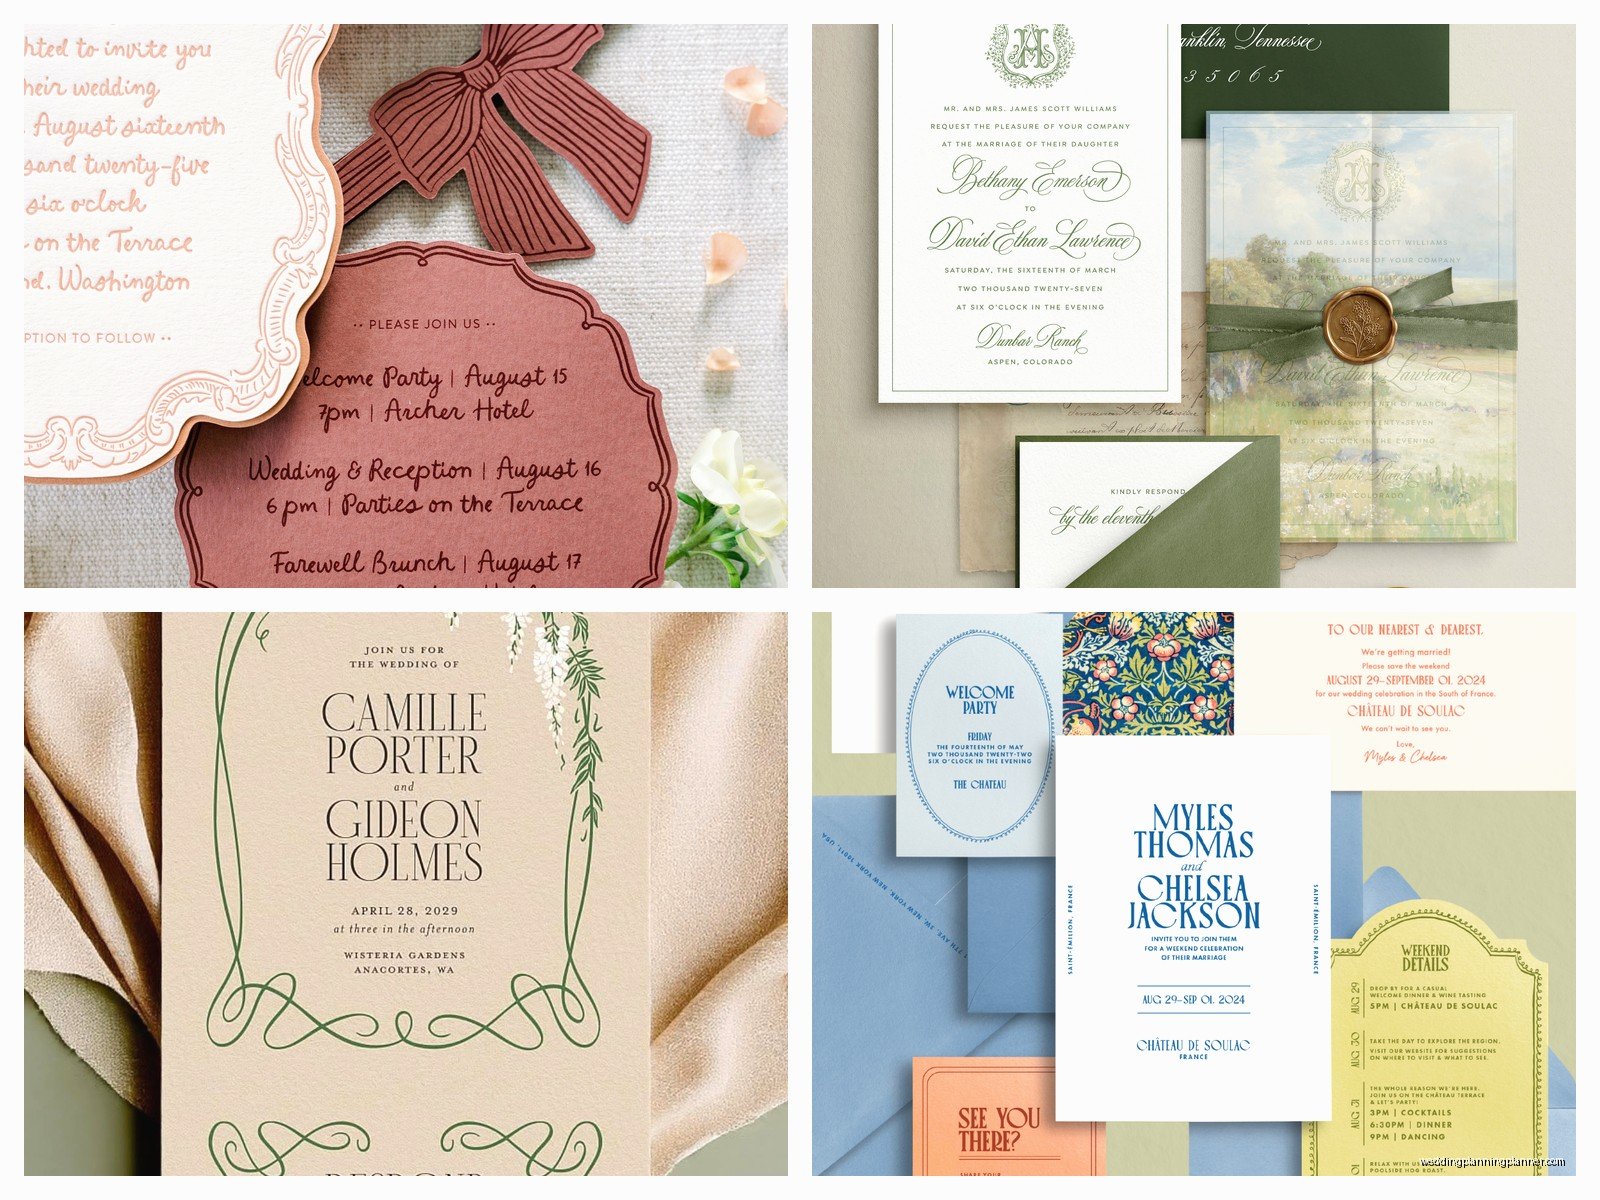
What you’re actually designing isn’t just an invitation. A full bespoke suite typically includes:
- Save the dates (optional but recommended for custom suites)
- Main invitation card
- RSVP card and envelope
- Details card (accommodations, weekend events, dress code)
- Envelope liner
- Belly band or ribbon wrap
- Wax seal or custom stamp
- Maybe a map or timeline card
Some couples also want programs, menus, place cards, table numbers, welcome signs… the list can spiral. I always recommend focusing your custom handcraft energy on the invitation suite itself because that’s what people keep.
Choosing Your Paper Stock
This is where it gets fun and also where your budget starts doing gymnastics. Regular cardstock from a print shop? Nah, we’re not doing that here. For bespoke work, you’re looking at specialty papers.
Cotton paper is the gold standard – it’s what you want for letterpress because it’s soft enough to create that gorgeous impression. Crane’s Lettra is like the industry favorite, comes in different weights (110lb cover is standard, 220lb is extra luxe). It feels substantial, almost fabric-like.
Handmade paper is the ultimate custom move. You can actually have paper made specifically for your wedding with inclusions like dried flowers, gold leaf, or even seeds that guests can plant. I worked with a papermaker once who embedded tiny pieces of the couple’s favorite song sheet music into the paper and I still think about how cool that was.
Vellum and translucent papers work great as overlays. You can print on them or use them blank to create layers and depth. They’re also cheaper than your base cardstock so they’re a good way to add visual interest without destroying your budget.
Textured papers like linen, felt, or laid finishes give you that tactile quality that makes people actually want to touch the invitation. Which is kinda the whole point of going custom – it should feel different than what came out of someone’s inkjet printer.
Paper weight matters more than people think. You want at least 110lb for invitation cards, 80lb for RSVP and detail cards is fine. Envelopes should be substantial too – nothing worse than a gorgeous custom invite in a flimsy envelope that feels like it came from Staples or… wait I’m getting off track.
Printing Methods For Custom Work
Okay so this is where bespoke stationery really becomes bespoke. Printing method completely changes the look and feel.
Letterpress is probably what you picture when you think fancy wedding invitations. It’s an impression printing technique that presses the design INTO the paper, creating this dimensional effect you can feel with your fingers. It’s gorgeous for text and simple graphics. Downside? It’s expensive, requires specific paper, and you can’t do full-color photo printing. Also setup costs are high so you need decent quantity to make it worthwhile.
Foil stamping uses heat and metallic foil to create shiny elements. Gold foil, rose gold, copper, silver, even holographic foils. This looks incredibly luxe but like letterpress, it’s a specialty process with setup fees. You can combine it with other printing methods though which is cool.
Engraving is old-school fancy – it’s basically the opposite of letterpress where the design is raised above the paper surface. Very traditional, very expensive, very “my family has old money.” It’s beautiful but honestly unless you’re having a super formal black tie wedding, letterpress usually gives you more bang for your buck.
Digital printing sounds less fancy but modern digital presses can produce incredible quality, especially for watercolor designs or photographs. It’s also the most budget-friendly and flexible option. I always tell couples there’s no shame in doing digital printing on beautiful paper stock with custom finishing touches.
You can also mix methods! Digital print the main design, add foil details, finish with a wax seal. That’s actually my favorite approach because it keeps costs manageable while still feeling totally custom.
Hand-Finishing Techniques
This is where “handcrafted” really comes in and honestly where you can DIY some elements if you’re crafty or have friends who are gonna help (just… make sure they actually will before you count on them because I’ve seen that go wrong).
Edge painting is when you paint the edges of your paper – usually in gold, copper, or a color that matches your wedding palette. It’s time-consuming but creates this incredible luxury detail. You need good paint, a steady hand, and patience. Lots of patience.
Deckled or torn edges give that organic, romantic look. You can buy a deckle-edge ruler or honestly just carefully tear against a straight edge. It works best with cotton paper that has nice fibers.
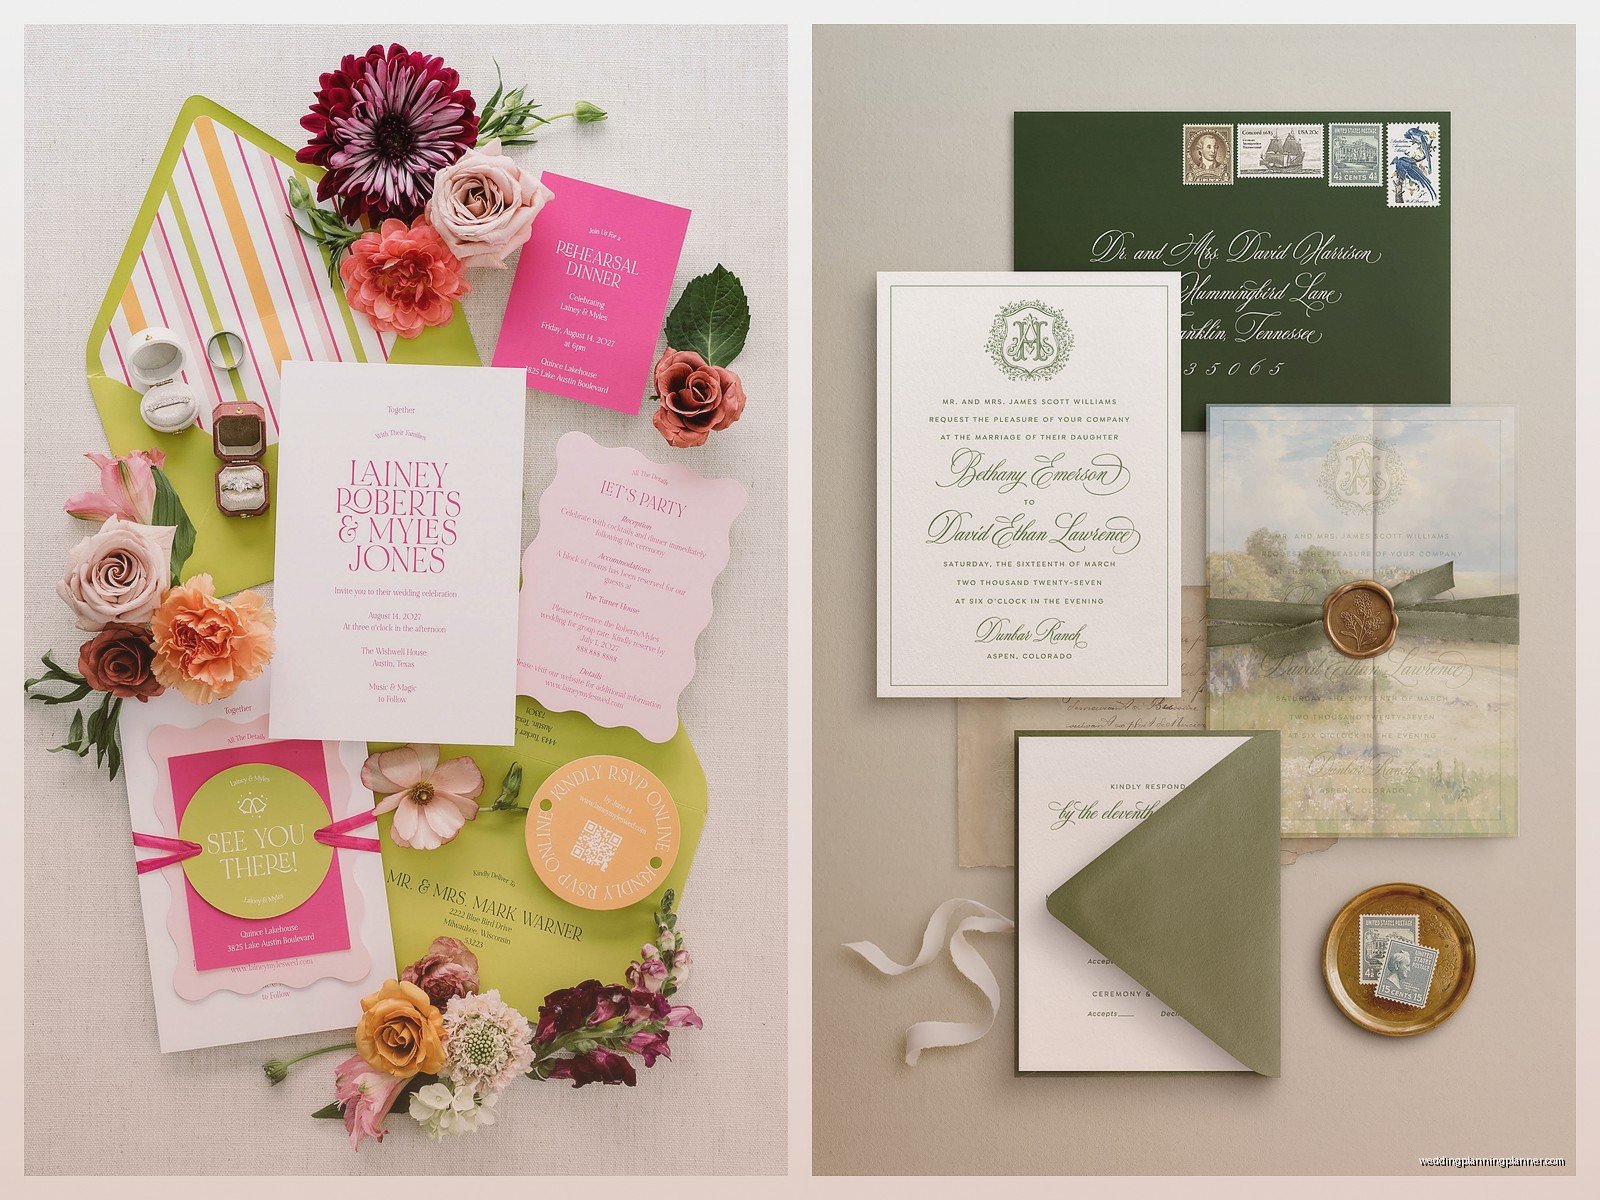
Wax seals are having a huge moment. You can get custom seal stamps made with your monogram or wedding logo. Real wax looks better than those peel-and-stick ones, but here’s the thing – they can break in the mail and they might require extra postage. I learned this the hard way when a bride called me crying because half her seals arrived shattered. Now I always recommend sealing them on the inner envelope or the belly band, not the outer mailing envelope.
Silk ribbon, lace, or fabric wraps turn your invitation into an actual package. Hand-dyed silk ribbon is expensive but so worth it. You can also use vintage lace, velvet ribbon, or even leather cord depending on your vibe.
Envelope liners are an underrated detail. You can print custom patterns, use metallic or patterned paper, or even line them with fabric. They make opening the envelope feel special before you even get to the invitation itself.
Working With Artisans and Calligraphers
If you’re going truly bespoke, you might work with actual artisans rather than just a stationery company. This means coordinating multiple vendors which is… it’s a thing.
A good calligrapher for envelope addressing will charge $3-8 per envelope depending on style and their experience. For 150 invitations that’s $450-1200 just for addressing. But it looks incredible and guests notice. You can also have calligraphy on the invitation itself – maybe just names or a quote.
Watercolor artists can create custom illustrations or motifs. I had a couple commission a watercolor of their venue that we then printed on the invitations and used throughout all their paper goods. It tied everything together beautifully and gave their wedding a signature visual element.
If you’re working with multiple artisans, someone needs to project manage the timeline. That’s usually me, the planner, and lemme tell you coordinating between the paper maker, the printer, the calligrapher, and the ribbon supplier while keeping the bride calm is… my cat is literally sitting on my keyboard right now which feels like a metaphor for how chaotic this coordination can get.
The Budget Reality Check
I’m gonna be real with you – truly bespoke handcrafted stationery is expensive. Like really expensive. I’ve seen couples spend $15-25 per invitation suite when you factor in all the elements. For 150 guests that’s $2250-3750 just on invitations.
But here’s where you can be strategic:
- Go fully custom on the invitation suite but do simpler digital printing for day-of paper (programs, menus, etc.)
- Choose one special printing technique (like foil) and use it sparingly as an accent rather than all over
- DIY the assembly and hand-finishing even if you have the printing done professionally
- Skip save-the-dates or do them digitally, then splurge on the invitation
- Reduce your suite components – do you really need a separate details card or can that info go on the invitation back?
Also postage – I forgot to mention this earlier but weird-sized envelopes, heavy paper, wax seals, they all increase postage costs. Take a fully assembled invitation to the post office and have it weighed before you buy stamps. And hand-cancel them! Tell the post office not to run them through the machine because that’ll destroy any dimensional elements.
Timeline and Ordering Process
Here’s a realistic timeline for custom stationery:
9-12 months before: Start researching, look at portfolios, figure out your design direction and budget
8-10 months before: Book your stationer or artisans, start design process
6-8 months before: Finalize design, approve proofs, order printing
4-5 months before: Receive printed pieces, do assembly and hand-finishing
3-4 months before: Address envelopes (or hire calligrapher), get postage, mail invitations
Most custom stationers require a deposit (usually 50%) when you book them and then the balance before printing. Some break it into thirds – booking, proof approval, final delivery.
Always order extra. ALWAYS. I usually recommend 10-15% overage because mistakes happen during assembly, you’ll think of people you forgot, something will get damaged. It’s way cheaper to order extras upfront than to try to do a small reprint later.
What Actually Matters
After doing this for years, I can tell you what guests actually notice and appreciate versus what only the couple cares about. Guests notice: beautiful paper quality, cohesive design, clear information that’s easy to read, and special touches like wax seals or ribbon. They don’t really notice: whether you used 110lb or 130lb cardstock, the specific printing method unless it’s really obvious, or subtle design elements.
So if you’re making budget cuts, keep the overall visual impact and the tactile quality, lose the invisible details that only you’ll know about. Unless those details matter to YOU, in which case do them anyway because it’s your wedding.
The point of bespoke stationery isn’t to impress people or prove you spent money – it’s to create something that genuinely represents you as a couple and sets the tone for your wedding. When guests open that invitation, they should immediately get a sense of what kind of event they’re coming to. Formal or casual, traditional or creative, intimate or grand.
My favorite custom suite I ever worked on was for a couple who met at a bookshop. We created invitations that looked like vintage book pages, with letterpress printing, deckled edges, and each one was wrapped in a custom bookmark that served as the RSVP card. It was so perfectly them and their guests talked about those invitations for months. That’s what you’re going for – something memorable that feels authentic to your story, not just something that looks expensive.