Planning Guides, Style Guide
Folded Wedding Invitations: Multi-Panel Card Designs

May
Okay so folded invitations are honestly where things get interesting
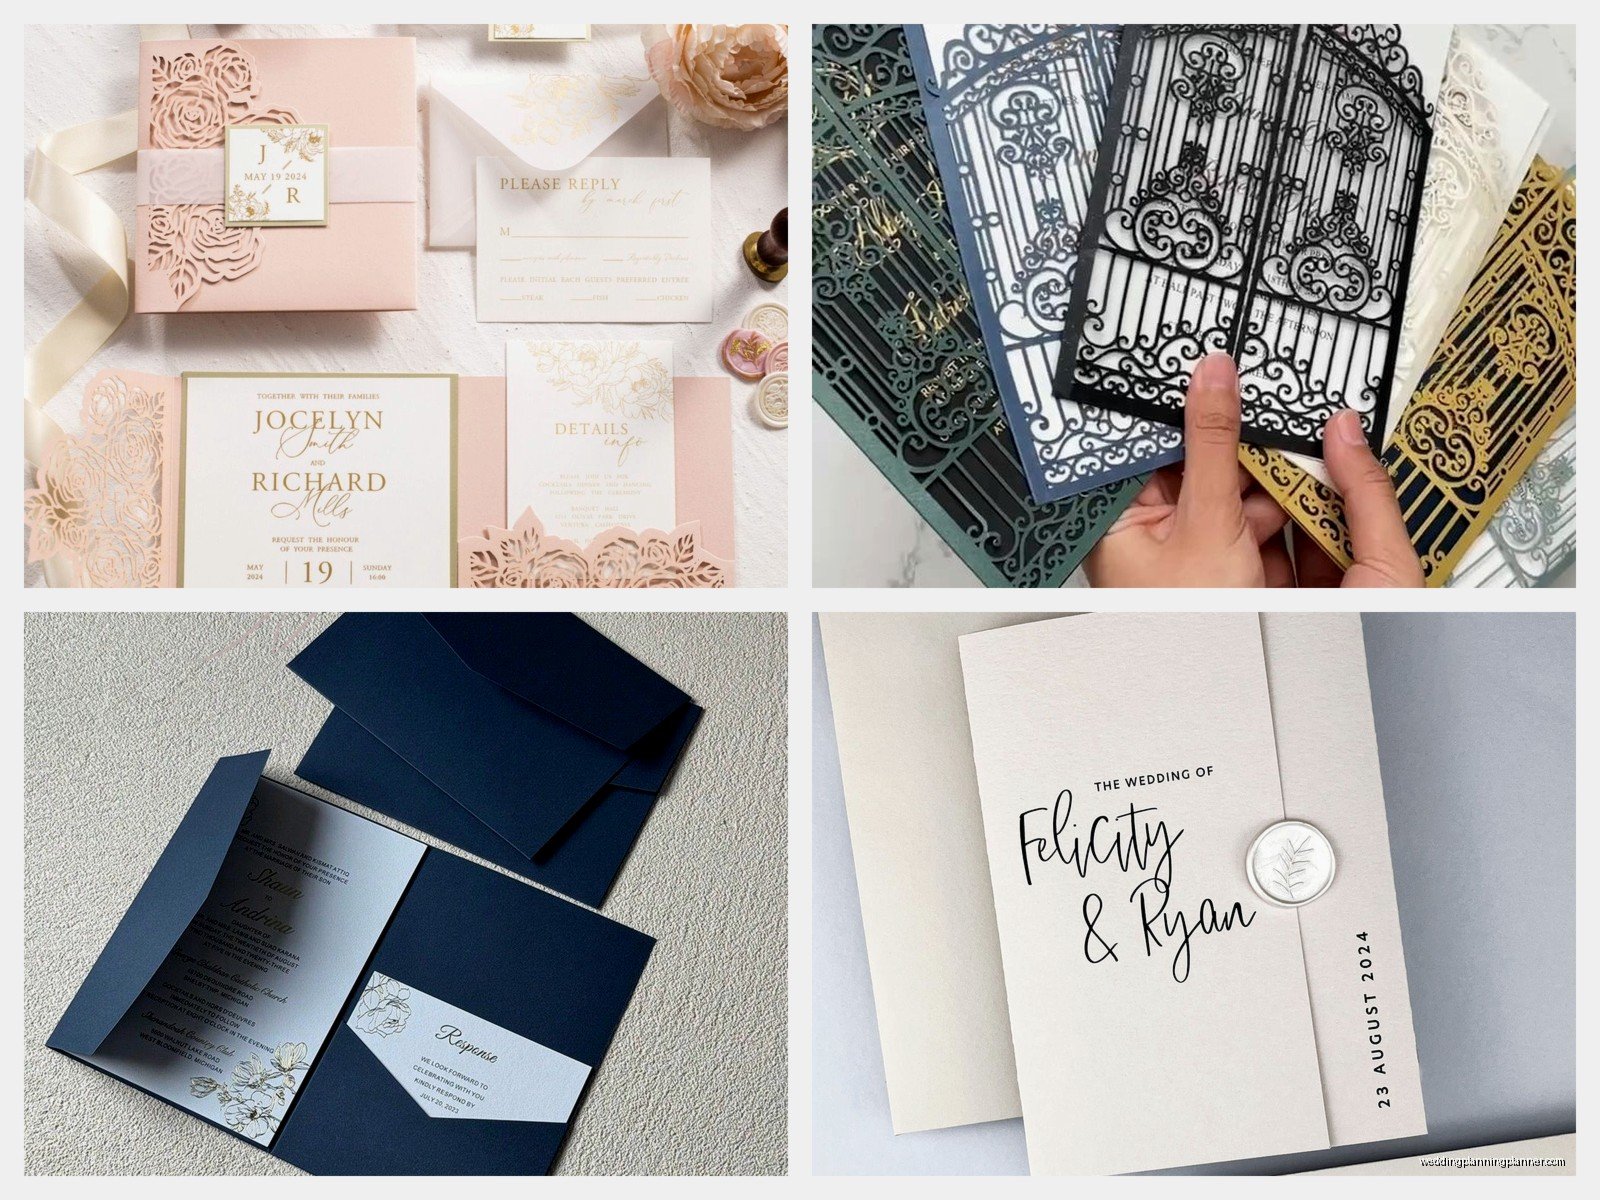
Folded wedding invitations are basically any invitation that has multiple panels – gatefolds, trifolds, Z-folds, bifolds, all that stuff. They’re not just flat cards, they’ve got dimension and you can do so much with them in terms of design and information layout. I’ve been working with these since like 2015 and they’re kinda having this huge moment again because couples want something that feels substantial but also tells a story as you open it.
The main thing to understand is that folded invites give you more real estate without making your guest flip through seventeen different cards. Everything can live in one piece, which honestly makes assembly SO much easier. I learned this the hard way during spring 2023 when I had a bride who insisted on seven separate insert cards and we spent an entire afternoon with her bridesmaids just trying to get everything in the right order. Never again.
The basic types you’re gonna see
Bifold (Half-Fold): This is your standard fold-in-half situation. Front cover, open it up, and boom – two inside panels plus a back panel. Super classic, works for both portrait and landscape orientations. You typically put your main invitation wording on the right inside panel, and then ceremony details or a cute quote on the left. Back panel can have your wedding website or stay blank.
Gatefold: These are the fancy ones where two panels open from the center like little doors. They’re dramatic as hell and guests actually enjoy opening them. The front can have your names or a monogram, and when they open the “gates” they see the full invitation text. You can also do asymmetrical gatefolds where one side is larger than the other, which looks really modern.
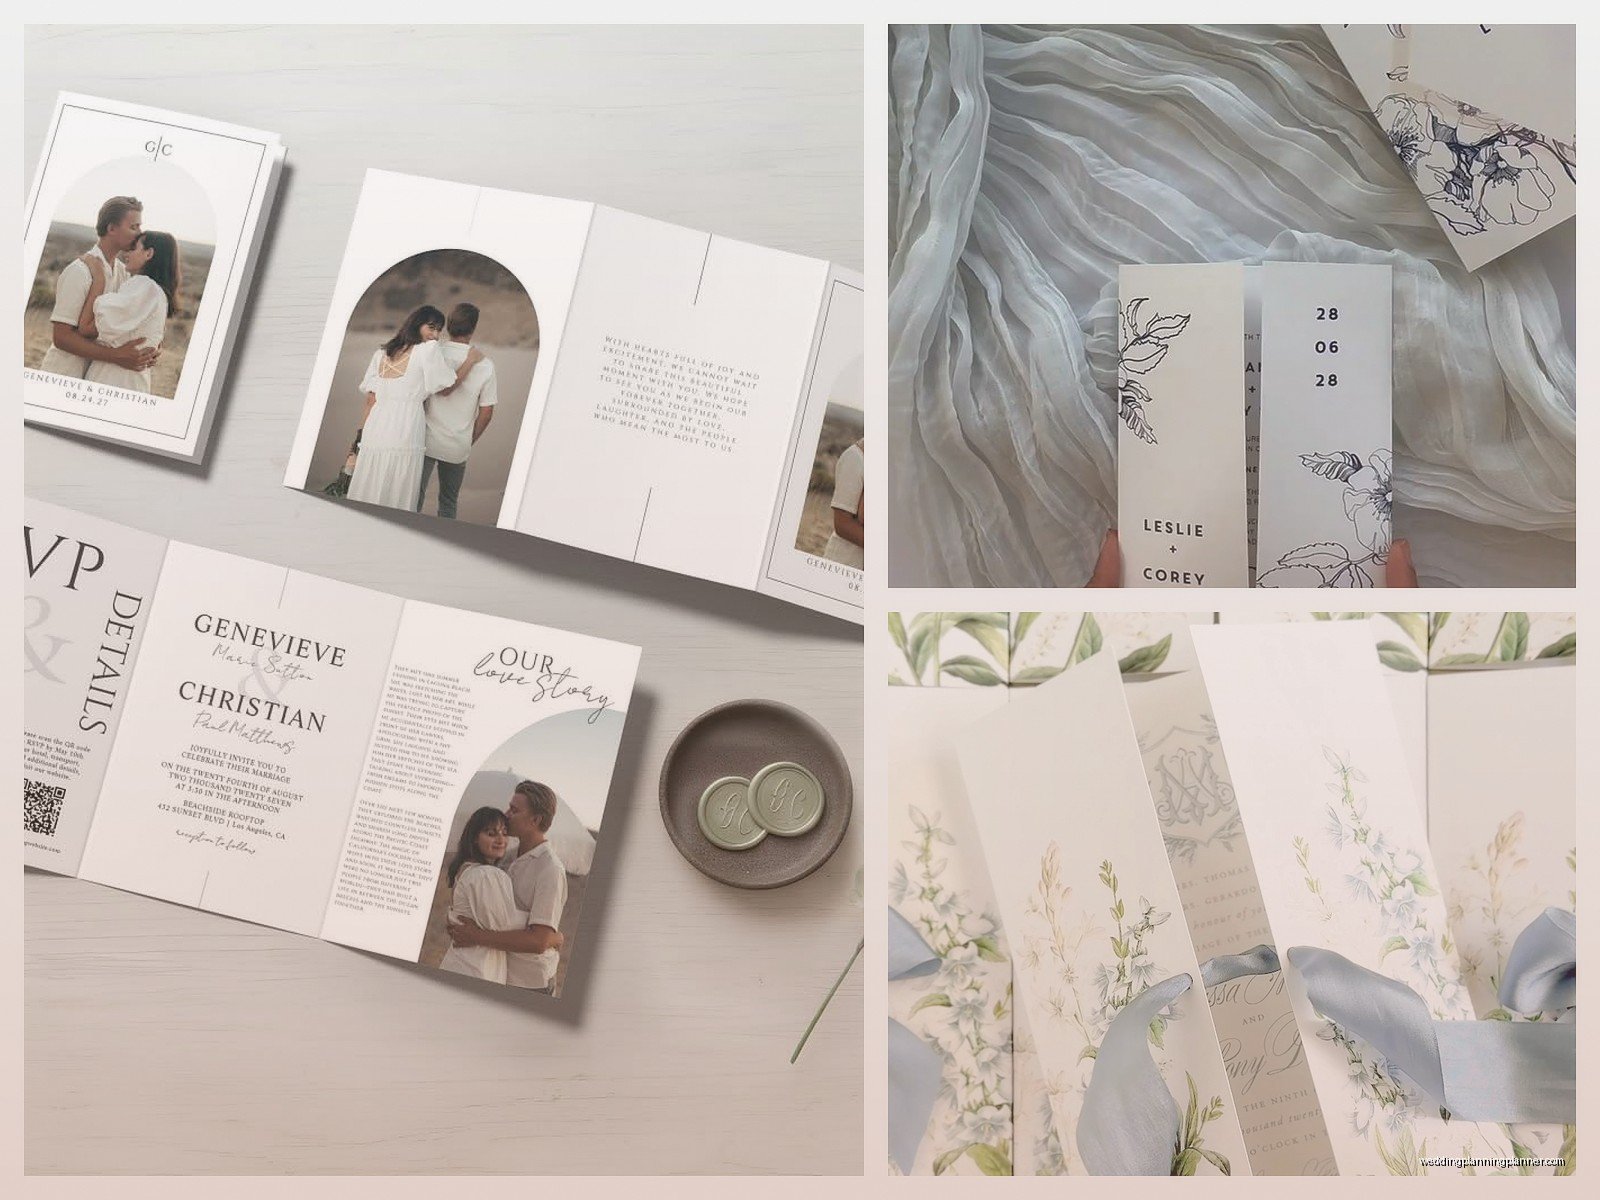
Trifold: Three panels that fold in on themselves. They’re chunky and substantial. I usually see these done in a Z-fold pattern or a C-fold (where both sides fold inward). Great if you have a lot of info to include – rehearsal dinner, accommodation details, weekend itinerary, whatever.
Z-Fold: Accordion style. Panel one folds one direction, panel two folds the opposite. These are actually really fun for telling a story chronologically… or they can be confusing if you don’t design them with a clear reading path in mind.
Paper weight is gonna make or break this
This is where people mess up constantly. You can’t just use any cardstock for a folded invite. If you’re doing a bifold, you want something between 80lb and 100lb cover weight. Any heavier and it won’t fold cleanly – you’ll get cracking along the fold line which looks terrible. For gatefolds and trifolds, I actually recommend going slightly lighter, like 80lb cover, because you’ve got multiple folds happening.
The finish matters too. Matte cardstock scores and folds better than glossy. Glossy tends to crack more visibly. Linen or laid texture finishes hide imperfections in the fold really well, which is why I love them for DIY brides.
Oh and if you’re printing at home – which, we’ll get to that nightmare – you need to make sure your printer can handle the weight. Most home printers tap out around 80lb cover.
Scoring is not optional I don’t care what anyone says
You gotta score before you fold. A score is basically a compressed line in the paper that gives it a clean fold line. Without scoring, your folds will be wonky and unprofessional looking. I had a client in summer 2021 who was absolutely convinced she could just fold 100 invitations by hand without scoring them first and… no. They looked handmade in a bad way.
If you’re ordering from a professional printer, they’ll score everything with their fancy equipment. But if you’re DIYing, you need a scoring board (like the Martha Stewart one) or at minimum a bone folder and a ruler. Run the bone folder along a ruler edge with decent pressure, then fold. Makes all the difference.
Design layout gets tricky with panels
You have to think about what your guest sees at each stage of opening. The front panel is obviously your first impression – names, date, maybe a design element. But then what? When they open a gatefold, both inside panels should work together as one cohesive design moment. Don’t put critical info on one panel that requires context from another panel if they’re not viewed simultaneously.
For Z-folds, number your panels mentally. Panel 1 (front), Panel 2 (first inside), Panel 3 (fully unfolded). Think about the reveal. I like putting the ceremony details on Panel 2 and then reception info on Panel 3. It creates a nice flow.
One thing that annoys me SO MUCH is when people don’t account for the gutter – that’s the space right at the fold. If you put text too close to the fold, it disappears into the crease or becomes hard to read. Leave at least a quarter inch margin from any fold line. Preferably more.
Printing these things yourself vs professional
Alright so here’s the real talk. Printing folded invitations at home is possible but it’s annoying. You’re printing on larger sheets and then folding them down, which means you need to set up your document correctly in whatever design software you’re using. The panels need to be arranged so that when you fold, everything ends up in the right spot.
For a bifold, you’re printing on one sheet where the left half becomes the inside left panel and back, and the right half becomes the front and inside right panel. Except it’s actually reversed from that because… ugh it’s confusing. I always do a test print on regular paper first and fold it to make sure everything lands where it should.
Professional printing is easier but more expensive obviously. Most online invitation printers offer folded options. Minted, Zazzle, even Vistaprint has some. You upload your design, they print and score and ship them to you ready to go. The quality is gonna be way better than home printing – better color accuracy, crisp scoring, no printer jams at 11pm the night before you need to mail them.
Assembly is actually easier with folded invites
This is the part people don’t realize. Yeah, a folded invite seems more complicated, but assembly is simpler because everything’s in one piece. You’re not trying to stack five inserts in the right order. You fold it, maybe add a belly band or vellum wrap, and you’re done.
If you are adding belly bands – those paper or ribbon strips that go around the middle – make sure they’re tight enough to stay put but not so tight they dent the paper. I use a little bit of glue on the underside of the band to secure it rather than relying on friction alone.
Wax seals look gorgeous on folded invitations, especially gatefolds. You can seal the “gates” closed with a wax seal that matches your wedding colors. Just make sure you hand-cancel these at the post office because the wax seal will jam sorting machines.
Postage gets expensive real fast
Folded invitations are bulky and heavy. A typical bifold invitation is gonna be at least 2-3 ounces, which means you’re looking at extra postage. As of now that’s like $1.00+ per invitation for mailing. Gatefolds and trifolds can push even heavier.
You also can’t use those forever stamps for anything over 1 ounce. You need to go to the post office and get them weighed. Bring a fully assembled sample – envelope, invitation, any inserts, belly band, the works. They’ll tell you exact postage. Then you can buy the right stamps.
Square envelopes cost extra to mail too, which… my cat just knocked over my coffee, hold on… okay anyway yeah square envelopes are considered “non-machinable” so that’s an additional surcharge. If your folded invite fits in a standard rectangular envelope, stick with that.
Envelopes for folded invitations
The envelope needs to fit your folded invite with a little breathing room. You don’t want it crammed in there. For a 5×7 bifold, you’d use a 5.25×7.25 envelope (A7 size). For gatefolds, measure your invite when closed and add a quarter inch to each dimension.
Pockets on the inside of the envelope are kinda pointless with folded invites since everything’s already contained, but some people like the look. I think they’re an unnecessary expense but that’s just me.
Information hierarchy across panels
Think about what’s most important and put that front and center – literally. The main invitation wording (names, date, venue) should be on the most prominent panel. For a bifold, that’s the right inside panel. For a gatefold, that’s the space revealed when you open both gates.
Secondary info like reception details, dress code, or your wedding website can go on less prominent panels. Back panels are great for registry info or accommodation blocks, stuff that’s helpful but not critical.
Don’t overload every single panel with text. White space is your friend. I see so many DIY designs where every inch is covered with words or patterns and it’s just overwhelming. Let the design breathe.
Timing for ordering or making these
If you’re ordering from a professional printer, give yourself at least 3-4 weeks for production and shipping. Rush orders are possible but they cost extra and the quality control might be… not great.
If you’re DIYing, start early because you’ll need time for test prints, adjustments, scoring, folding, and assembly. I’d say give yourself 6-8 weeks minimum. Especially if you’re doing wax seals or any embellishments that are time-intensive.
Order extra paper if you’re printing yourself. Like 25% extra. You will mess up. Your printer will jam. Something will get folded wrong. Just plan for it.
Embellishments that work well
Vellum overlays look really elegant on folded invitations. You can print your design on the cardstock and then add a translucent vellum panel on top with just names or a delicate pattern. It adds dimension without bulk.
Foil stamping on the front panel of a gatefold is stunning but expensive. If you’re gonna splurge anywhere, that’s a good spot for it.
Ribbon ties are classic for bifolds – a silk ribbon threaded through two small holes to keep the invitation closed. Just make sure you reinforce those holes because they can tear.
Laser cutting along the edges or on the front panel creates a really intricate look. Works especially well with gatefolds where the laser cut design is on the “gates” themselves.
Common mistakes I see constantly
Not accounting for text orientation. If your invite is landscape when closed but unfolds to show portrait panels, make sure your text is oriented correctly on each panel. Sounds obvious but I’ve seen it messed up.
Using too many fonts. Just because you have multiple panels doesn’t mean you need multiple fonts. Stick with two, maybe three max.
Making the fold too complicated. A quadfold with six panels and three different fold directions? That’s not elegant, that’s a puzzle. Keep it simple enough that your 85-year-old grandmother can open it without instructions.
Forgetting about the back panel. Even if you’re not printing anything there, it should still be part of your design consideration. A blank white back panel on an otherwise designed invite looks unfinished.
Color choices and printing methods
Digital printing is fine for most folded invitations and it’s the most affordable. The color won’t be quite as rich as letterpress or offset printing, but honestly most guests won’t notice.
Letterpress on folded invitations is gorgeous but you’re gonna pay for it. The impression in the paper adds such a luxe feel though. Just know that letterpress works best on softer papers, so you might need to adjust your paper weight choice.
If you’re doing multiple ink colors, make sure they work together across all panels. Sometimes what looks good on a flat design doesn’t work when you’re seeing different panels at different times. Do a mockup where you actually fold it and see it from the guest perspective.
Templates and design software
Canva has some folded invitation templates but they’re kinda basic. If you know your way around Adobe InDesign or Illustrator, that’s gonna give you way more control. You can set up your document with the exact panel dimensions and bleeds.
Etsy has tons of folded invitation templates that you can customize. Just make sure the template is set up correctly for your fold type. A bifold template won’t work if you’re trying to make a gatefold.
When setting up panels, use guides to mark your fold lines. This helps you keep text and design elements properly placed. Most design software lets you add non-printing guides for this.
I’ve been watching The Bear while working on invitation designs lately and honestly the stress levels in that show match the stress of trying to get 200 folded invitations perfect, so that’s fun.
Proofreading becomes extra important
With multiple panels, there are more places for typos to hide. Proofread each panel separately, then proofread the whole thing as a flow. Have someone else look at it too because you’ll go blind to your own mistakes after staring at it for hours.
Check dates, times, addresses, website URLs. Make sure AM/PM is correct. Verify the venue name is spelled right. I once had an invitation go out with “Sturday” instead of “Saturday” and the bride is still annoyed about it three years later.
Print a physical proof and fold it. Seeing it on screen is different from holding the actual thing. You might realize the text is too small or too close to a fold or the color looks weird on actual paper.