Planning Guides, Style Guide
Floral Design For Wedding Invitation: Design & Ordering Guide
Apr
Okay So Floral Design on Wedding Invitations
The biggest mistake I see is people treating florals like they’re just decoration when they’re actually doing SO much heavy lifting in terms of setting the vibe for your whole wedding. Like back in spring 2023 I had this bride who wanted “just some flowers” on her invite and then got upset when the printer delivered something that looked like a generic grocery store bouquet because she didn’t specify anything beyond “pretty flowers please” and I was like… we gotta talk about this properly.
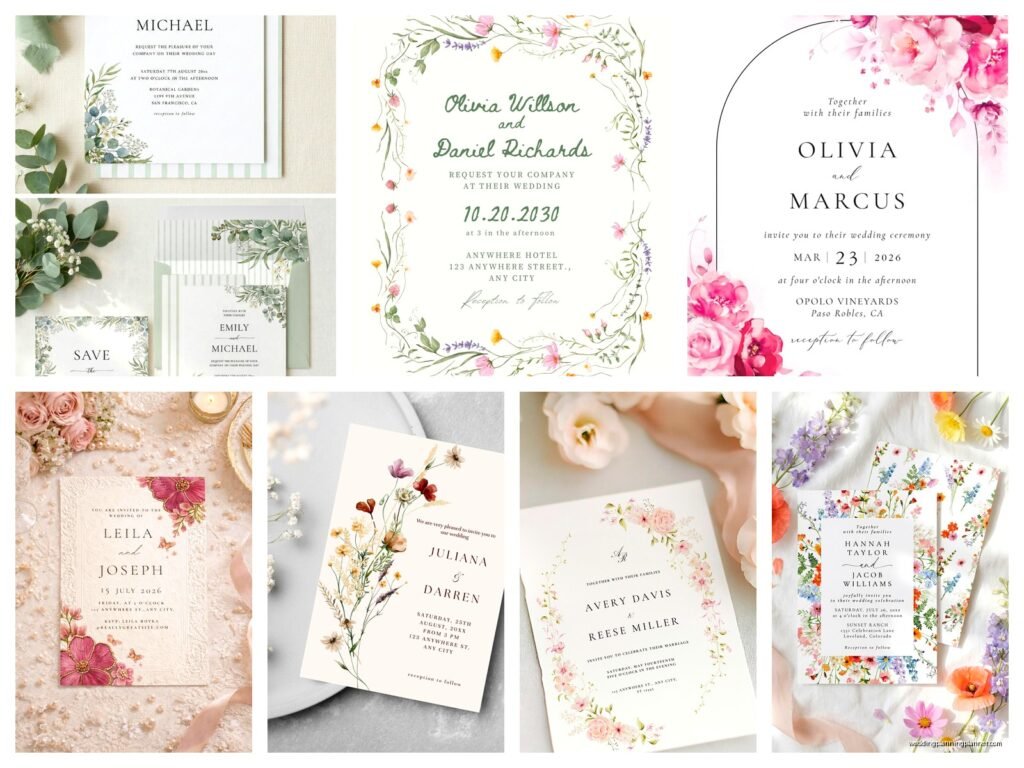
First thing you need to decide is whether you want botanical illustration style (the delicate watercolor looking ones), graphic florals (bold and modern), pressed flower look, or photo-realistic flowers. Each one sends a completely different message and works with different printing techniques which affects your budget in ways you wouldn’t expect.
Botanical Illustrations Are Not All The Same
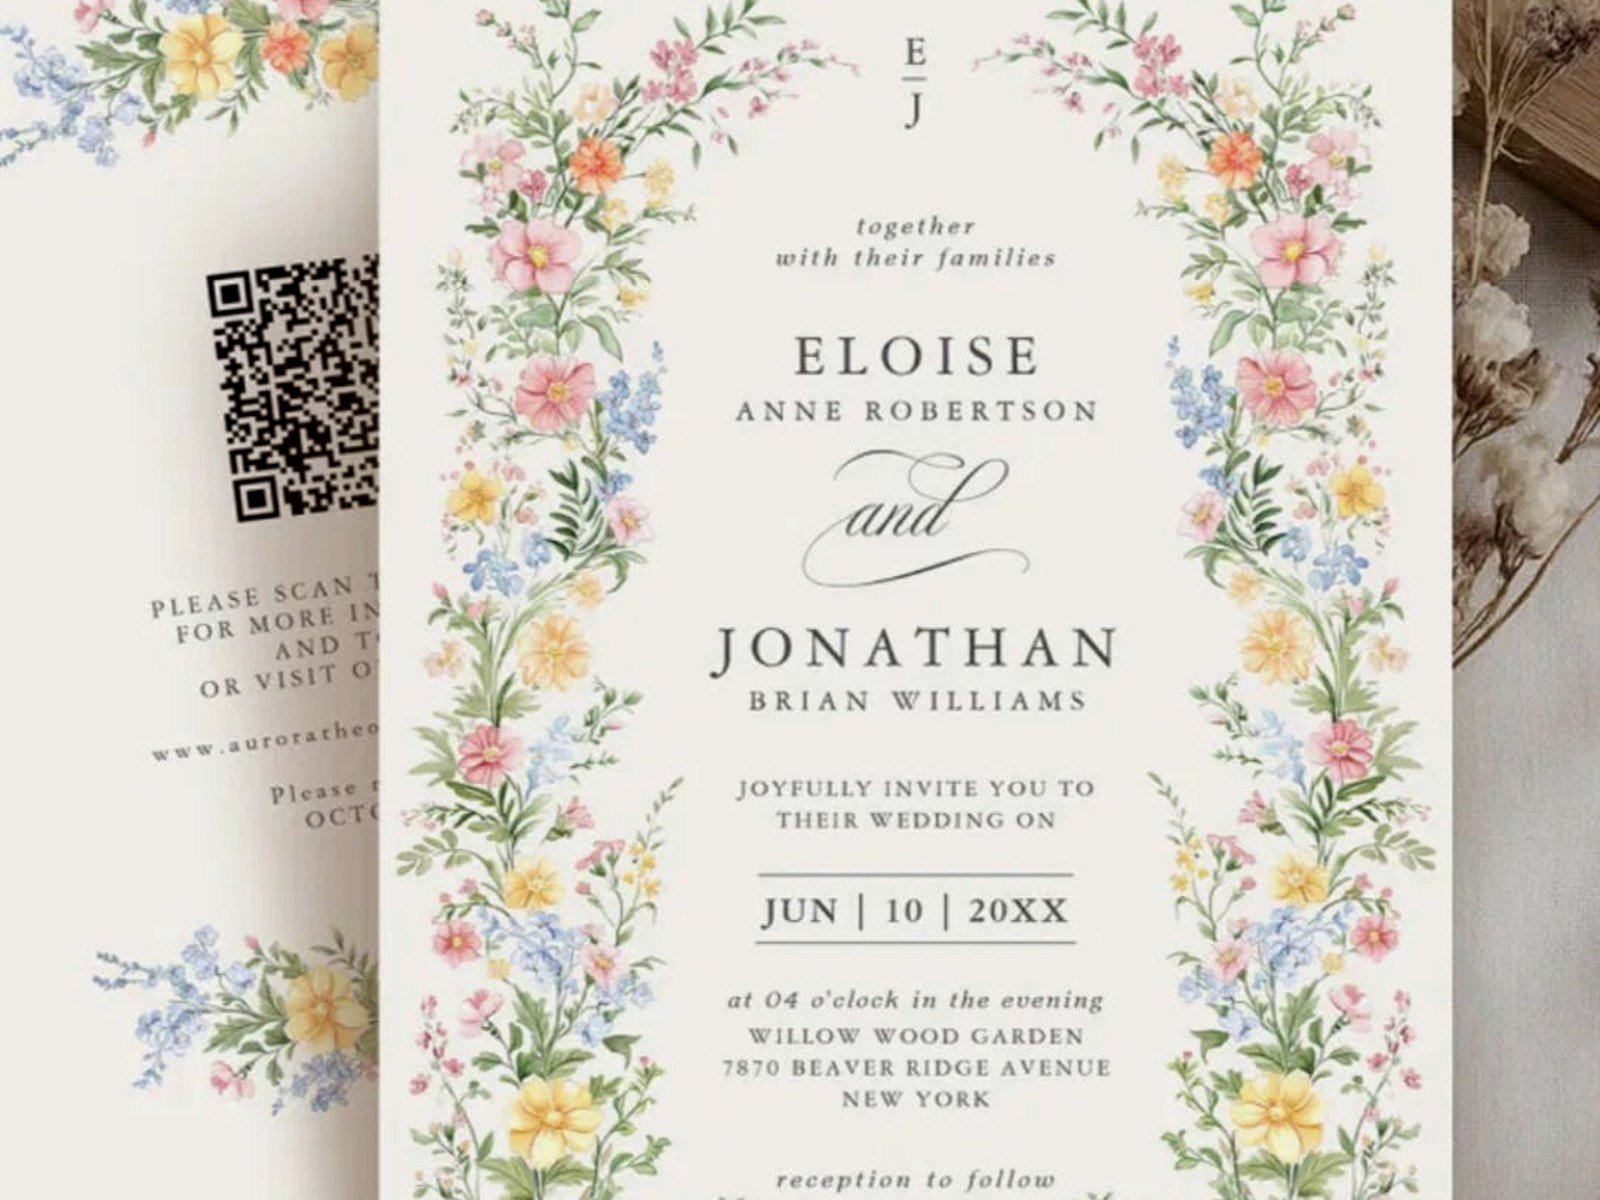
When you say botanical illustration most people picture those soft watercolor garden roses and eucalyptus sprigs but there’s actually like a whole spectrum here. You’ve got the loose and flowy watercolors that look hand-painted, then you’ve got the more structured vintage botanical drawings that look like they came from an old science textbook (in a good way), and then there’s this trendy thing now where it’s kinda both? Like structured line work with watercolor washes.
I usually tell clients to look at their venue first because if you’re getting married in a modern loft space, those super romantic garden watercolors might feel off. But then again rules are meant to be broken and contrast can be interesting so… you do you I guess.
For ordering, you need to know that watercolor florals show up VERY differently depending on printing method. Digital printing is gonna be your most affordable option and honestly looks pretty good for most watercolor designs. But if you want that really lux feel, letterpress or foil stamping can be gorgeous with botanical line drawings. Just know that adding watercolor AND letterpress means you’re doing multiple passes through the press which gets expensive fast.
Picking Your Actual Flowers (This Matters More Than You Think)
So here’s what annoys me the most about this whole thing—people pick flowers for their invitation that have NOTHING to do with their actual wedding flowers or season or anything. And then everything feels disjointed. You don’t have to match exactly but like, if you’re getting married in November maybe don’t put cherry blossoms all over your invitation? Just a thought.
Popular choices and what they actually communicate:
- Garden roses – romantic, classic, expensive-looking (even if your whole suite isn’t expensive)
- Eucalyptus – organic, modern, that Pinterest aesthetic everyone wanted in 2019
- Peonies – luxe, feminine, spring vibes obviously
- Wildflowers – casual, bohemian, outdoor wedding energy
- Anemones – modern, a little edgy, sophisticated
- Olive branches – Mediterranean, understated elegance
- Ferns – woodland, natural, works well for forest or garden venues
You can also mix like three max types of flowers/greenery. More than that and it starts looking cluttered unless you’ve got a really skilled designer who knows how to balance it. I learned this the hard way when a client insisted on seven different flower types because they were all meaningful and the final design looked like a flower shop exploded on cardstock.
Placement and Layout Stuff
Alright so you’ve picked your style and your flowers, now where do they actually go? You’ve got several options and honestly this is where I see people struggle the most because what looks good on Pinterest doesn’t always work with your specific text layout.
Border designs are classic—flowers framing the entire invitation. These work great if you have a longer invitation with lots of text because the florals don’t compete with your words. But they do require more printing area which can increase costs if you’re doing specialty printing.
Corner arrangements are probably the most popular right now. You put a cluster of florals in one or two corners and let them kinda trail along the edges. This is nice because it leaves the center clean for text and it’s elegant without being too much. Works with literally any wedding style.
Top or bottom arrangements where flowers are just along one edge—this is more modern and works really well if you want florals but also want to keep things minimal. My cat actually knocked over my coffee onto a proof of this style once and honestly the stain kinda looked like it could’ve been part of the watercolor design which was… lucky I guess.
Scattered florals or small repeating patterns give you a more whimsical feel. Little flower buds or petals scattered around the text. This can be really pretty but make sure your designer leaves enough white space because too many scattered elements makes everything hard to read.
Behind the text as a subtle background—this is tricky because you need the florals to be light enough that text remains readable but present enough that they’re actually visible. Usually works best with very pale watercolors or just greenery.
Working With Designers and Templates
If you’re going custom route with a stationery designer, you need to communicate clearly about what you want. And I mean CLEARLY. Saying “I like flowers” is not enough. Create a Pinterest board, sure, but also be able to articulate what specifically you like about each pin. Is it the color palette? The loose style? The specific flowers? The amount of florals versus white space?
Most designers will do 2-3 rounds of revisions included in their package. Use them wisely. Don’t approve round one if you’re not actually happy just because you feel bad asking for changes—you’re gonna have to look at these invitations for years in photos so get it right.
Template route is totally fine too and way more budget-friendly. Sites like Minted, Zola, Etsy have thousands of options. The thing with templates is you usually can’t change the actual floral design, just colors and text. So make sure you LOVE the flower arrangement as-is. I’ve seen people try to convince themselves they like a design because everything else about it works but then they’re disappointed when the final product arrives and they still don’t like those specific roses or whatever.
With templates you can often customize colors though which is huge. If you love a design but the flowers are pink and your wedding colors are burgundy and sage, many designers will do a color change for a small fee. Always ask.
Color Considerations That People Forget About
Your florals need to work with your invitation paper color. White or cream paper gives you the most flexibility obviously. But if you’re doing colored cardstock—like dusty blue or sage green or blush—your floral colors need to have enough contrast or they’ll disappear.
Also think about how colors print. Bright colors usually show up great with digital printing. But soft blush pinks and pale yellows can sometimes look washed out depending on the printer and paper quality. Ask for a printed proof if you’re concerned, especially if you’re ordering like 150+ invitations.
Metallics are having a moment—gold or rose gold accents in the florals. These usually require foil stamping which is a separate process from your main printing. Foil is gorgeous but it adds cost and you can’t print foil at home if you’re doing DIY assembly, so plan accordingly.
Practical Ordering Timeline and Process
Start looking at floral invitation designs like 8-10 months before your wedding. You need time to design, proof, print, and mail with enough lead time for guests to RSVP (usually 6-8 weeks before wedding).
Order extras. I always say order 15-20 more than you think you need. You’ll mess up addressing, you’ll forget someone, you’ll want to keep a few for your own records. Extra invitations are way cheaper when ordered with your main batch than trying to do a small reorder later.
The process usually goes: pick your design → customize text and colors → receive digital proof → approve or request changes → receive printed proof (optional but recommended for custom work) → final approval → printing → shipping to you → addressing and mailing.
That whole process can take 6-8 weeks minimum, longer during peak wedding season (basically April through October). During summer 2021 everything was backed up because of the pandemic postponements and I had clients waiting 12+ weeks for invitations which was incredibly stressful for everyone involved.
Printing Methods and What They Mean For Floral Designs
Digital printing is your standard option—looks like what comes out of a high-quality printer because that’s basically what it is. Works great for watercolor florals, full-color designs, photos. Most affordable option and still looks really nice.
Letterpress is where the design is pressed into the paper creating an indentation. Traditionally single color but you can do multiple colors with multiple passes. Works beautifully with botanical line drawings and creates this tactile luxury feel. Not ideal for watercolor florals because you can’t really do the color gradients.
Foil stamping adds metallic elements—usually gold, silver, rose gold, or copper. Perfect for adding shimmer to floral designs. You could do like a digital print for the flowers and foil stamp for just the text or certain floral accents.
Thermography creates raised printing that you can feel. It’s like a middle ground between flat digital and letterpress in terms of cost and effect. Works fine with florals but doesn’t have the same impact as letterpress.
You can also combine methods but that gets pricey fast. Like letterpress florals with digital color text or digital florals with foil accents on certain petals. It looks amazing but you’re paying for multiple printing processes.
Matching Your Suite Beyond Just The Invitation
Your floral design should carry through your whole stationery suite ideally—save the dates, invitations, RSVP cards, detail cards, menus, programs, place cards, thank you notes. But you don’t have to use the exact same layout on everything. Maybe your invitation has a full corner arrangement but your RSVP card just has a small sprig of the same flowers. That creates cohesion without being repetitive.
Some couples do a larger floral arrangement on the invitation and then pull out one or two signature flowers to use on smaller pieces. Like if your invitation has roses, peonies, and eucalyptus, maybe your place cards just have the eucalyptus as a simple accent.
Envelope liners are a great place to go more dramatic with florals too. Since they’re inside the envelope and just decorative, you can do an all-over floral pattern that would be too much on the actual invitation. I love when the envelope liner has a bold floral and then the invitation itself is more restrained—it’s like a little surprise when guests open it.
DIY Considerations If You’re Going That Route
Listen, DIY can save you money but it’s also gonna cost you time and potentially sanity. If you’re buying a template and printing at home or through an online printer, make sure you understand file formats and color modes. Most templates come as PDFs but you might need the editable file depending on how much you’re customizing.
Home printing for floral designs is tricky because watercolors especially need good quality to look right. Your basic inkjet printer probably isn’t gonna cut it. You’re better off uploading to a professional online printer even if you’re using a template—places like Catprint or your local print shop.
Paper quality matters SO much with floral designs. Cheap cardstock makes even beautiful florals look flat. Go for at least 110lb cardstock, and if you can afford it, textured papers like cotton or linen finish make florals look more organic and expensive.
What To Ask Your Stationer or Template Seller
Before you commit to anything, ask these questions:
- How many revision rounds are included?
- What’s the timeline from order to delivery?
- Can I see a printed proof before full order?
- What printing method are you using?
- What paper stock and weight?
- Can flower colors be customized?
- Do you provide envelope addressing services?
- What if I need to order more later—can you match the original?
- Are envelope liners included or extra?
Also ask about their file delivery—if you’re doing a template, make sure you’re getting high-resolution files that your printer can actually use. Nothing worse than falling in love with a design and then finding out the files are too low-res for professional printing.
Trends That Are Happening Right Now
Okay so currently I’m seeing a lot of requests for organic asymmetrical arrangements instead of perfectly balanced designs. Like the flowers are kinda just flowing naturally across one side of the invitation rather than being centered or symmetrical. It feels more modern and less formal.
Dried flower aesthetics—think pampas grass, dried roses, wheat, that whole earthy neutral palette. Works really well for fall and winter weddings.
Monochromatic florals where everything is shades of one color. All white flowers with gray-green leaves, or all burgundy tones. Super sophisticated and photograph really well.
Mixing florals with geometric elements—like your flowers are contained within a hexagon or arch shape, or there are geometric line accents mixed with organic florals. It’s that blend of structured and natural that feels current.
Honestly though trends are whatever, pick what you actually like because you’re gonna be looking at these invitations in your wedding album forever and nothing dates faster than choosing something just because it’s trendy right now.
Budget Real Talk
Since nobody wants to talk about actual numbers but everyone’s thinking about it—digital printing with floral designs usually runs $3-8 per invitation depending on paper quality and whether you’re including extras like envelope liners or belly bands. Letterpress starts around $10-15 per invitation and goes up from there. Custom illustrated florals from a designer can be $1000-3000 just for the design work before you even print anything.
Templates are obviously way cheaper—you can find gorgeous floral designs on Etsy for like $15-40 and then just pay printing costs. If your budget is tight, this is absolutely the way to go and nobody at your wedding is gonna know or care whether your florals were custom designed or from a template as long as they look good.
The thing that gets people is all the extras—envelope addressing, assembly, postage for heavy invitations, rush fees if you’re running late. Factor in probably 30% more than the base invitation quote for all the additional stuff because it adds up faster than you think.
Alright I think that covers most of what you need to know about floral designs for wedding invitations without making your brain explode. The main thing is just be clear about what you want, give yourself enough time, and don’t be afraid to ask questions because this is literally what we do all day and we’ve seen every possible scenario play out.