Planning Guides, Style Guide
Wedding Invitation Stationery: Complete Paper Suite
Jun
The Main Invitation Suite Pieces
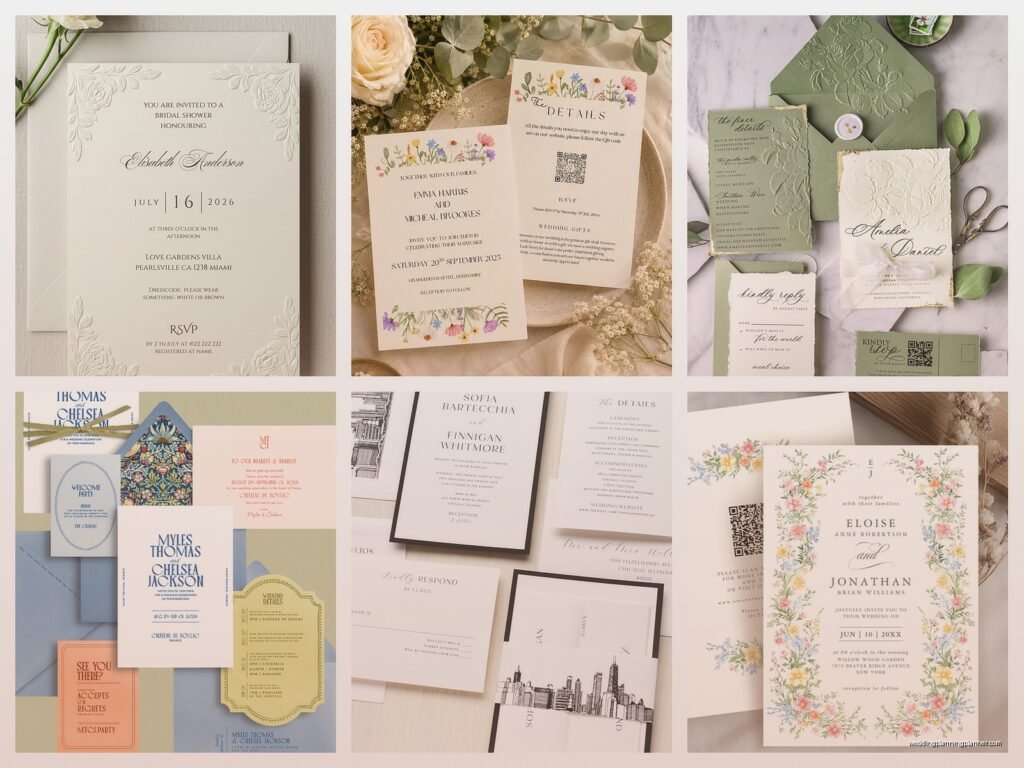
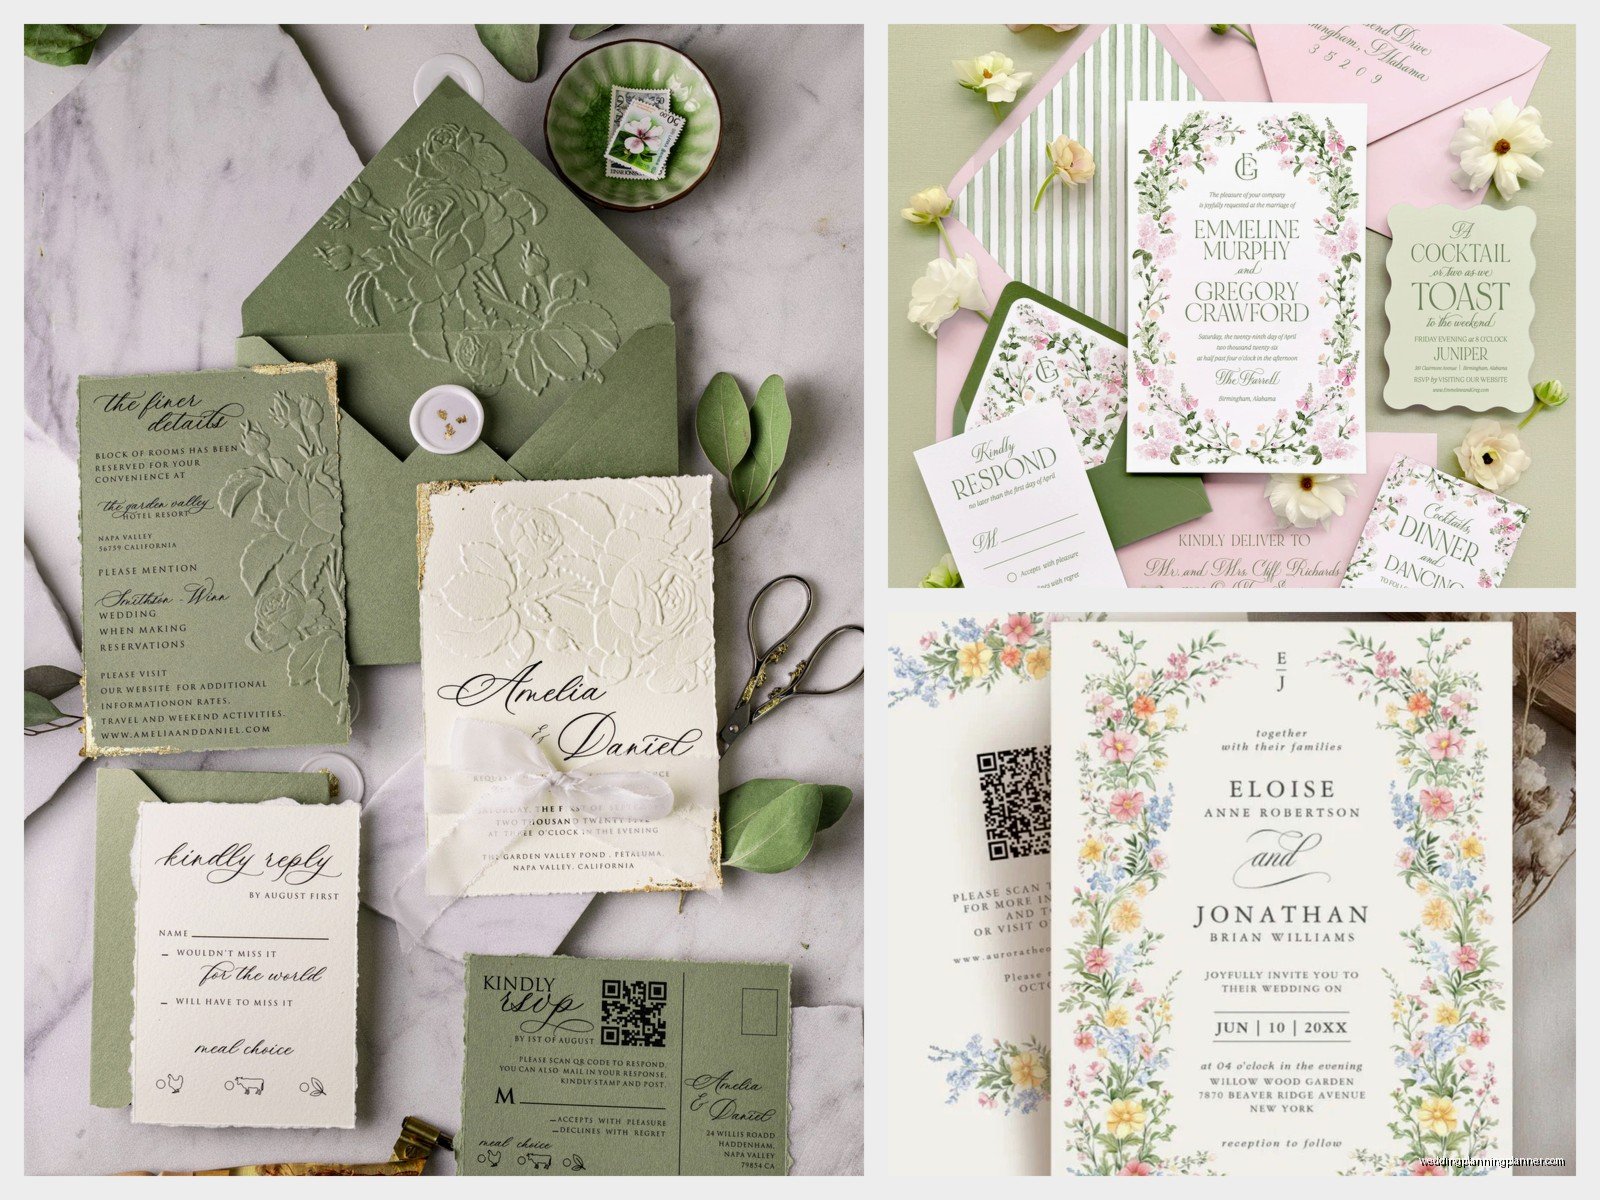
So the complete paper suite is basically everything paper-related that guests see from the moment you get engaged until they show up at your wedding. The core invitation suite includes the main invitation card (obviously), RSVP card with its own envelope, details card, and the outer envelope. Some people add an inner envelope too but honestly that’s becoming less common unless you’re doing a super formal wedding or your family is really into tradition.
I had this bride back in spring 2023 who ordered literally everything—like she had a map card, accommodations card, weekend events card, registry card (which I tried to talk her out of because it feels kinda pushy but she insisted), and even a “what to wear” card. Her suite was like seven pieces and I’m not gonna lie, the postage alone was insane. She called me crying when she realized each invitation was going to cost like $4.50 to mail.
The RSVP card needs its own envelope and you need to pre-stamp and pre-address it. I cannot stress this enough—if you make your guests find a stamp, half of them won’t send it back. They’ll text you instead or just show up and you’ll have no idea about their meal preference or plus-one situation.
Save the Dates vs Invitations
Save the dates go out way earlier, like 6-8 months before the wedding, sometimes even a year for destination weddings. These are less formal and you can have more fun with them. I’ve seen magnets, postcards, photo cards with engagement pics—my cat actually knocked over a whole stack of magnet save-the-dates once and they stuck to my radiator and I didn’t find them for like two weeks, but that’s beside the point.
The actual invitation is the formal one that goes out 8-12 weeks before the wedding. This is where paper quality really matters and where you follow proper etiquette if that’s your thing. Save the dates can be playful but invitations should match your wedding vibe—if you’re doing black tie, your invitation better not look like a beach party flyer.
Paper Weight and Quality
Okay so this is where people get confused and honestly where vendors sometimes take advantage. Paper weight is measured in pounds (lb) or GSM (grams per square meter). Standard printer paper is like 20-24 lb or 80 GSM. For invitations, you want at least 80 lb cardstock or 216 GSM, but I usually recommend 100-120 lb (270-324 GSM) for the main invitation card.

The thickness makes it feel expensive and substantial when people pull it out of the envelope. There’s this tactile thing that happens—you can literally feel whether someone spent money on their invitations or printed them at home. Not that home printing is bad if you do it right, but the paper stock gives it away every time.
Cotton paper is gorgeous and has this soft texture that feels luxurious. It’s more expensive but it also ages better and doesn’t yellow as fast as regular cardstock. Linen texture is pretty popular too and hides fingerprints better than smooth paper, which matters more than you’d think when you’re assembling 150 invitations and touching every single one multiple times.
Finishes and Textures
Matte is classic and easy to write on if you’re doing hand calligraphy for addresses. Glossy looks modern but shows fingerprints like crazy—I had a bride in summer 2021 who insisted on glossy black invitations and we literally had to wear cotton gloves while assembling them because every single fingerprint showed up. It was ridiculous and added like four hours to the assembly process.
Metallic and pearlescent papers catch light beautifully but they’re harder to print on. If you’re doing digital printing, some metallic papers won’t accept ink properly and you’ll get streaking or fading. Letterpress works better on soft cotton paper. Foil stamping can go on almost anything but costs more.
Printing Methods
Digital printing is the most affordable and what most online companies use. It’s basically fancy laser printing and the quality has gotten really good in the past few years. You can do full color, photos, whatever you want. The downside is it sits on top of the paper rather than being pressed into it, so it doesn’t have that textured feel.
Letterpress is when they press the design into the paper so you get this gorgeous debossed effect. You can feel the letters when you run your fingers over it. It’s beautiful and traditional but also expensive—like easily 3-4 times the cost of digital. The setup fees alone can be $200-300 before you even print a single invitation. And you’re usually limited to 1-3 colors because each color requires a separate plate and pass through the press.
Foil stamping uses heat and metallic foil to create shiny elements. Gold foil, rose gold, silver, even holographic foils are available. It’s stunning but also pricey and you can’t do fine details as well as you can with other methods. Small text in foil often looks blobby or doesn’t transfer completely.
Thermography is this raised printing technique that’s cheaper than letterpress but gives you texture. The ink is dusted with powder while wet and then heated so it puffs up. It looks formal and traditional but it can smudge if you’re not careful and some people think it looks dated now.
Envelope Situations
You need at least one envelope, obviously. The outer envelope has the mailing address and goes through the postal system. Some people do inner envelopes that sit inside the outer one—these traditionally had just the guest names (no address) and held all the actual invitation pieces.
Inner envelopes are honestly becoming obsolete unless you’re super formal or you need them to clarify who exactly is invited. Like if the outer envelope says “The Smith Family” but you only want the parents and not the kids, the inner envelope would say “Mr. and Mrs. Smith” to make it clear. But most people just… don’t invite the kids and deal with the awkward conversations later.
Envelope liners are those decorative paper pieces that line the inside of the envelope flap. They’re totally optional but they make such a difference when someone opens the envelope. You see that pop of color or pattern and it elevates the whole thing. I always recommend them if the budget allows because they’re usually only like $0.50-1.00 per envelope.
Addressing is its own whole thing—you can print directly on envelopes, use labels (though some etiquette people hate this), or hire a calligrapher. Digital calligraphy fonts have gotten good enough that most guests can’t tell the difference between real hand calligraphy and a nice printed font unless they’re really looking closely.
What Actually Needs to Be Included
The main invitation card obviously. This has your names, date, time, location, and usually some version of “request the pleasure of your company” or whatever wording fits your style. Formal weddings have specific wording rules but honestly most couples do whatever sounds good to them now.
RSVP card with deadline date—make this at least 3-4 weeks before your wedding so you have time to chase down the people who don’t respond. And trust me, there will be people who don’t respond. There are always people who don’t respond and then get mad when you don’t have a meal for them.
Details card with your wedding website, hotel room block info, transportation details if you’re providing shuttles, dress code if it’s not obvious from the invitation formality. Some people put registry info here but I personally find that tacky—your website should have that information.
Map card if your venue is hard to find or if you have multiple events in different locations. Though honestly with everyone using GPS now, this is less necessary than it used to be. Back in like 2015 everyone wanted custom illustrated maps and now I barely see them.
Optional Pieces That Might Be Worth It
Weekend itinerary card for destination weddings or multi-day celebrations. If you’re doing a welcome drinks thing on Friday and a brunch on Sunday, people need to know that information in advance so they can plan.
Accommodations card if you have multiple hotel blocks or if the room block situation is complicated. Sometimes the details card can cover this but if you’ve got like three different hotels at different price points, a separate card makes it clearer.
Rehearsal dinner invitation if you’re doing a more intimate rehearsal and need RSVPs for that separately. This usually goes in the same envelope with the main invitation but only for the people who are actually invited to the rehearsal.
Assembly Order and Process
This is where people get overwhelmed and honestly it’s not that complicated but when you’re staring at 150 envelopes and 600 individual pieces of paper it feels impossible. The traditional order from bottom to top is: main invitation (face up), tissue paper if you’re using it (most people skip this now), reception card, details card, RSVP card tucked under the flap of its envelope.
Everything gets stacked in size order, largest on bottom, and then you slide it all into the inner envelope if you’re using one (text facing the back flap so when they pull it out they see it immediately) or directly into the outer envelope if not.
Set up an assembly line if you’ve got helpers. One person stuffs, one person seals, one person stamps, one person addresses if you haven’t done that yet. I usually recommend doing this over a couple of nights with wine and snacks rather than trying to power through in one marathon session because mistakes happen when you’re tired and bored.
That thing that really annoyed me—when couples don’t order extras and then freak out when someone spills coffee on theirs or they realize they forgot to invite their mom’s college roommate or whatever. Always order at least 10-15% extra invitations. The per-piece cost goes down when you order more anyway, and you’ll want some for your own keepsakes and inevitably you’ll mess up addressing a few envelopes.
Postage and Mailing
Take a fully assembled invitation to the post office and have them weigh it before you buy stamps. Square envelopes cost more to mail. Envelopes over certain thickness cost more. If your invitation is bulky or has a wax seal or ribbon, it might not be able to go through the sorting machine and will need hand-canceling, which costs extra.
Beautiful vintage stamps are gorgeous but you often need multiple stamps to make up the right postage amount, and then your envelope looks cluttered. I’ve seen people use like five different stamps to make up $2.40 in postage and it just looks messy. One or two pretty stamps looks intentional, five looks like you raided your grandmother’s stamp drawer.
Hand-canceling is when the post office stamps each envelope by hand instead of running them through the machine. This prevents your invitations from getting torn or smudged by the sorting equipment. It costs like $0.20-0.30 extra per piece but it’s worth it if you’ve spent serious money on your invitations. Some post offices are annoying about doing this though and will tell you they don’t offer it, which is… not true, they’re just being lazy.
Timeline for Ordering
Save the dates should be ordered like 8-10 months before the wedding, mailed 6-8 months out. This gives people time to request time off work and book travel if needed.
Invitations should be ordered at least 4-5 months before the wedding. This gives you time for design revisions, proofs, printing, assembly, and addressing. Rush fees are expensive and also stressful—I’ve seen couples pay double because they waited too long and then had a meltdown about it.
The whole “8 weeks before the wedding” mailing timeline is because you need RSVPs back 3-4 weeks before, which gives you time to finalize your headcount with the caterer and make a seating chart. If you mail invitations 6 weeks out, you’re cutting it really close and you’ll be chasing people down right up until the wedding.
Budget Real Talk
You can spend anywhere from like $1.50 per suite to $15+ per suite depending on what you choose. Digital printing with simple cardstock, basic envelopes, no fancy extras—you’re looking at probably $2-4 per invitation all-in including postage. Letterpress on cotton paper with foil accents, envelope liners, hand calligraphy, wax seals—you could easily hit $10-12 per invitation before postage.
For 150 invitations, budget at minimum $500-600 if you’re going the affordable route. Mid-range would be $1000-1500. Luxury is $2000+. And that’s just for the invitation suite—save the dates, thank you cards, programs, menus, and other day-of paper are all separate.
The cost per piece goes down significantly as quantities go up, so if you’re having a huge wedding the per-invitation cost is usually lower than for a small wedding. Which is sort of backwards from what you’d expect but that’s how printing works—setup fees get distributed across more pieces.
Working With Vendors vs DIY
Online services like Minted, Paperless Post (they do physical now too), Zazzle, Shutterfly—these are all template-based but they’ve gotten really sophisticated. You can customize colors, fonts, layouts, and the quality is generally pretty good. The downside is your invitation might look similar to someone else’s because other people have access to the same templates.
Custom stationery designers will create something unique for you but you’re paying for their time and expertise. Expect to spend at minimum $1500-2000 for fully custom design and printing for 100-150 invitations, and it can go way higher depending on printing methods and embellishments.
DIY is totally doable if you’re crafty and have time. You can buy cardstock, print at home or at a print shop, and assemble everything yourself. The cost savings are significant but the time investment is real—plan for at least 20-30 hours of work between designing, printing, cutting, and assembling. And if something goes wrong with your printer or you mess up a batch, you’re scrambling to fix it yourself.
Common Mistakes I See Constantly
Not proofreading carefully enough—I’ve seen misspelled venue names, wrong dates, wrong times. Get like five different people to read your invitation before you print 200 of them because your brain will see what it expects to see, not what’s actually there.
Forgetting about postage costs until the last minute. Budget for this upfront because it adds up fast and can blow your whole stationery budget if you’re not careful or if your invitations end up heavier than you expected.
Not ordering enough envelopes—you will mess some up while addressing. Order at least 25 extra envelopes beyond your invitation count. They’re cheap and you’ll be glad you have them.
Waiting too long to start the process and then having to rush everything. The design process alone can take 2-3 weeks if you’re doing custom work and going through multiple revision rounds. Then printing takes 2-3 weeks. Then you need time to assemble and address. It all adds up faster than you think.
Not considering how everything fits together—your invitation suite should coordinate with your save the dates and with your day-of paper like programs and menus. You don’t need everything to match exactly but there should be some visual connection whether that’s colors, fonts, or design elements, or the whole thing looks disjointed and… I don’t know, it just bugs me when I see a rustic kraft paper invitation and then glossy modern programs, like pick a lane.